5 Pieces Of Gear For Maximum Recording Flexibility – PART 4 – DIs & Re-Amp Boxes

| By Thomas Brett | 
Introduction:

Having an efficient studio workflow is an extremely important factor when it comes to creating a viable business out of music production.

One of the biggest mistakes engineers tend to make when starting out is having to re-do tasks based on the fact that they screwed them up the first time, or simply didn’t take the necessary precautions to allow for a backup solution.

Thankfully, digital recording technology has produced some amazing tools which allow us to achieve maximum flexibility in the studio without having to start from scratch in order to change the core tonal characteristics of our raw recordings every time we want to change something.

In this ongoing series, I’ll be talking you through the amazing capabilities of 5 pieces of studio gear I rely on heavily in my productions in order to get great results fast.

This week, we’re exploring the wonderful worlds of DI & Re-Amping Boxes:

Part 4: DI’s and Re-Amp Boxes
1 DI & Reamp
What Are They?

Well, to sum up their primary functions in a few short sentences…

DI Box: A tool for accurately capturing the raw (DI) sound of an instrument into your audio interface with minimal loss of tonal fidelity or dynamics.

Re-Amp Box: A tool for injecting a pre-recorded DI signal out of your audio interface, and into external amps/gear at the correct output levels for further processing.

NOTE: I won’t go into the technical in’s-and-out’s of the gear in this Blog, as I’ve already written in-depth URM articles on the subject in the past. H

Here are the links to said articles:

https://urm.academy/audio-faqs-volume-1-gear-essentials/

https://urm.academy/recording-guitars-silent-recording-options-part-1/

Now that you know what you’re getting into…

HERE ARE SOME OF THE PRIMARY WORKFLOW BENEFITS TO USING DI & RE-AMP BOXES IN THE STUDIO:

Editing is easier: One of the most annoying things about recording already-distorted guitar/bass tones is the fact that they’re difficult to edit.

  • As you can see in the image below, the unprocessed DI track on the bottom is very articulate and dynamic, making it an ideal candidate for any editing work that might need doing later on.
2 DI vs Amp
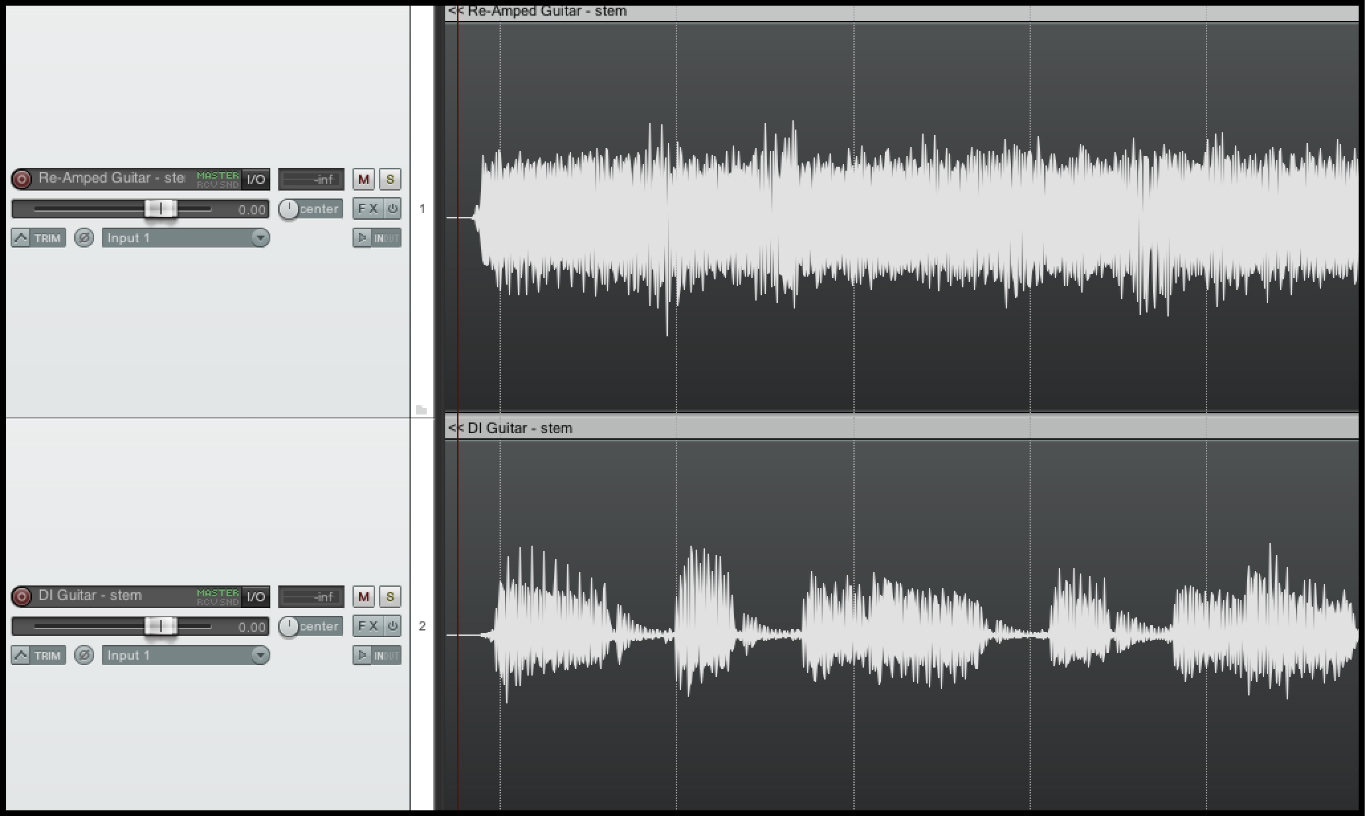
  • The re-amped Peavey 5150 signal above it on the other hand, is basically a compressed block of distortion with minimal visible transient information, making it a real chore to edit accurately. (Despite the gain being set fairly low on the amp…)
  • The fact that you can visually pinpoint and align the beginnings/ends of each note/chord in the DI makes it an easy job to align them to the grid via simply chopping them up at the transients and moving the pieces into place.
  • Ultimately, we can make the conclusion that editing your DI tracks before processing means you’re able to produce incredibly tight performances with minimum editing guesswork, saving you a lot of time in the long run.

Preserve the inspiration: If a guitarist/bassist has turned up at your studio feeling inspired and ready record, one of the worst things you can do is get them to play the same riff over and over again for two hours while you attempt to dial in the “perfect” tone.

  • The longer you take to get setup, the more likely it is you’ll end up de-motivating the person you’re trying to record. This can reflect on their ability to perform, and ultimately do more harm than good – What’s the point of having a good tone if the performance sucks…
  • Recording DI’s and monitoring through pre-configured amp sim monitoring chains which need minimal tweaking to sound awesome means you can start recording as soon as possible, and in return, have the highest chance of recording some inspired performances.

Dial in the tone at your own pace: It’s understandable that a lot of engineers like to spend a decent chunk of time dialing in guitar tones. Re-amping allows you to tweak to your heart’s content without eating into your clients’ valuable recording sessions.

  • After you’ve recorded the client and sent them home, you can take as much time as you need to edit and prepare the DI performance for re-amping without having to worry about somebody breathing down your neck in anticipation.
  • You can then take your freshly edited “ultimate” guitar takes and afford to experiment with multiple amp/cab/mic setups for as long as you like until you find the right tone to fit the song.

NOTE: Check out this excellent video from “Fluff” Ryan Bruce, in which he discusses some of the benefits of recording DI’s & Re-amping:

Flexibility / Backup Plan: It’s not uncommon to reach the end of a recording project, only to realise that your guitar tones may not actually be the best fit for the song.

  • In the case that you don’t have a DI recording of the performance to fall back on, unfortunately the only solutions are to either live with the mistake, or re-track the entire thing… (Which is an enormous, highly de-motivating task!)
  • In the case that you do have a raw DI on hand, the solution to the problem is really as simple as re-amping it through a different setup that you’re happier with. (Aka. Job done in 15 minutes!)

Record silently: One of the biggest benefits of tracking your guitars through a DI is the fact that you can do it silently.

  • Record at any time of day without disturbing the neighbours.
  • Break free from the confinements of only working between specific hours of the day – You can even record in complete silence when inspiration hits in the middle of the night!
  • Monitoring at lower levels also helps prevent any serious damage to your hearing from prolonged exposure to loud guitar cab volumes.

NOTE: In this video, YouTube guitar legend Ola Englund talks about the many benefits of re-amping a DI signal:

Consistent shootouts: It’s quite difficult to shootout multiple amp/cab/mic setups on an actual recording day due to the many variations in performance which can occur between takes.

  • Comparing multiple setups with a single, well-recorded, tightly edited take that’s perfect every time means you’re no longer being falsely influenced by the inconsistencies between different performances, and can accurately make tonal decisions.

Tightness benefits – Cut out hum, finger noise etc. before it hits the amp: As I’ve already mentioned earlier on in this article, DI’s lend themselves to editing a lot better than already-processed guitar signals. Alongside making them easier to tighten-up, this also makes them an ideal candidate for pre-amp noise-removal.

  • Clicks, pops, hums, buzzes, weird finger-sounds and pretty much any other unwanted noises that may occur while recording guitar are much easier to deal with while your signal is still in DI form.
  • By pinpointing and removing all of this nonsense from the DI before it’s amplified and accentuated in the first place, you’ll end up with a much cleaner and mix-ready signal to work with when it comes to mixing.

Now that I’ve rambled on about the benefits of using this gear in the studio, let’s take a look at some of the potential pitfalls involved with the process…

THE DOWNSIDES?

Although I’m a firm endorser of using DI boxes and Re-amping in the studio, there are a few things you need to consider on a song-by-song basis before using them:

It can often needlessly lengthen the overall process: If I have the luxury of recording a great guitarist with some amazing gear, I’ll often opt for a more traditional amp + cab setup for the sake of simplifying the process and moving on quickly.

  • Be kind to yourself, don’t needlessly spend hours editing DI’s and re-amping when you could’ve have achieved equal (if not better) results by simply dialing in a good tone that’s already %95 of the way there and letting the guitarist do their thing.
  • There’s a definite sense of satisfaction which comes from committing to a great tone on-the-spot and knowing that you don’t have X number of additional steps before you can actually start mixing what you’ve recorded.
  • Don’t blindly stick to a particular workflow because somebody else has deemed it “the best”. Always take a moment to stop and consider what the most effective approach may be given the qualities of the guitarist/musician you’re currently working with!

Some guitarists are put-off by the idea: Although most guitarists will be happy to simply record through a DI for future re-amping, some of them will simply refuse to do it or prefer to “keep it real”…

  • Forcing somebody to record in a way that they’re simply not comfortable with is a surefire way to lose business.
  • For this reason, it’s still really important that you know how to dial in and mic-up a great tone on the spot.
  • Also, you can’t always rely on having the time and flexibility required for an intensive DI+Re-amping process anyways…

You have to monitor through similar gear: It’s important to remember that the sound isn’t the only factor involved with playing guitar. The way an amp/cab feels while playing can also have a huge influence on the way the parts are performed.

  • I’ve had sessions in the past where I thought a certain amp-sim sounded awesome, only for the guitarist to tell me that it feels really uncomfortable to play through.
  • You don’t want the guitarist to have to accommodate their playing style to the monitoring chain, otherwise it might sound weird when re-amped through a different type of amp.
  • AKA: If you’re planning on re-amping a DI through a Marshall, make sure that the guitarist is monitoring through an amp/sim with a similar feel to said Marshall while actually tracking the guitars.

It can lead to too many options and potential messing about: As much as it can be great to have a lot of tonal options to choose from in the studio, it can just as easily cause you to spend far too long on tiny details and prevent you from making decisions.

Can lead to over-edited, robotic performances: Despite the fact that I love the idea of recording DI’s and editing every performance to perfection, there’s still something special about simply plugging into an awesome sounding rig and recording a magical performance.

  • Don’t automatically opt for a certain workflow on every session just out of habit. If you’ve got an incredible guitarist who can perform the whole song live to a super-high standard, provide him with the platform to do just that and don’t edit-out the magic that makes him unique!
IN CONCLUSION:
  • DI’s & Re-Amp boxes allow for some awesome flexibility, but don’t abuse this flexibility to the point of over-doing things!
  • Don’t allow workflow efficiency to stomp-out the spirit of rock-and-roll! AKA: Feel free to DI & Re-amp when it’s actually the best approach – You wouldn’t ask Slash to record through an amp-sim, would you…?
SUMMING UP:

To say the very least, the recording equipment we have at our disposal nowadays is simply astounding when compared to what was available to previous generations of engineers.

This being said: Be thankful for the amazing creative opportunities we’ve been given by the smart people developing incredible tools which make our lives easier.

Stop whining about subtle gear comparisons and simply do whatever it takes to make some cool music!

Final Words:

This concludes “5 Pieces Of Gear For Maximum Recording Flexibility – Part 4: DI’s & Re-amp Boxes.” I hope that this article has given you some new ideas to try out during your next project. Be sure to comment below if any of this information has helped you out, or if you have any questions.

Stay tuned for more production/mixing related articles in the not-so-distant future!


Thomas Brett is a producer, mixing engineer and songwriter at Brett Brothers recording studio in the UK. Check out the Brett Brothers studio website for more information and articles on all things mixing www.brettbrothersstudio.com

Read Part 1 of this series here!

Read Part 2 of this series here!

Read Part 3 of this series here!

Want mix tips from Thomas Brett? Read them here!

Nail The MixNail The Mix is our online mixing school that gives you REAL multi-tracks from REAL bands, plus a mixing class from the producer who recorded it. Past guests include Periphery, Chelsea Grin, Machine Head and State Champs. Join now for instant access!

EP49 | Kevin Antreassian

Kevin Antreassian (Dillinger Escape Plan, Backroom Studios) joins us for a conversation about the benefits of networking and staying open to opportunities at every stage of your career.

In addition to being a killer guitarist and engineer, Kevin exemplifies what can happen if you keep your networking game on point. We also get into what it takes to jump in and learn technical songs, why getting on the road and teching for bands can be a great opportunity, and why people should refrain from awkwardly attempting to touch our godly beards.

[smart_track_player url=”https://media.blubrry.com/urmpodcast/s3.amazonaws.com/urmpublicpodcast/season1/February2016/URMPC49-KevinAntreassian.mp3″ title=”EP49 | Kevin Antreassian” image=”https://s3.amazonaws.com/urmpublicpodcast/Images/square+covers/URM_customPodcast_standard_01.jpg” background=”default” social_email=”true” ]

If you really want to get anywhere in this industry you have to play some kind of music, you have to be involved in some scene of some kind. Otherwise, who’s going to trust you with their music if you’re not actually doing what they want to do.” – Kevin Antreassian

ON THIS EPISODE, YOU’LL LEARN ABOUT:

– How Kevin ended up working in audio after initially wanting nothing to do with it
– Things to keep in mind while touring internationally
– The networking that led Kevin to join Dillinger Escape Plan
– What kind of effort and dedication it takes to learn complicated songs
– How to deal with noisy neighbors
– The benefits of being open to being a tech for bands
– And much, much more

Links:

Backroom Studios
Party Smasher Inc.
Metal Beard Club
Dillinger Escape Plan

Thanks for listening!
Sign up to our [cp_modal id=”cp_id_7934d”]mailing list[/cp_modal] to discover more!

Nail The MixNail The Mix is our online mixing school that gives you REAL multi-tracks from REAL bands, plus a mixing class from the producer who recorded it. Past guests include Periphery, Chelsea Grin, Machine Head and State Champs. Join now for instant access!

Leave any questions, comments, or feedback in the comment section below.

[btnsx id=”904″]

[btnsx id=”911″]

[btnsx id=”773″]

[btnsx id=”915″]

[btnsx id=”937″]

[btnsx id=”946″]

[btnsx id=”952″]

[btnsx id=”957″]

[btnsx id=”960″]

[btnsx id=”962″]

5 Pieces Of Gear For Maximum Recording Flexibility – PART 3 – Sonarworks Speaker Correction Software

| By Thomas Brett | 
Introduction:

Having an efficient studio workflow is an extremely important factor when it comes to creating a viable business out of music production.

One of the biggest mistakes engineers tend to make when starting out is having to re-do tasks based on the fact that they screwed them up the first time, or simply didn’t take the necessary precautions to allow for a backup solution.

Thankfully, digital recording technology has produced some amazing tools which allow us to achieve maximum flexibility in the studio without having to start from scratch in order to change the core tonal characteristics of our raw recordings every time we want to change something.

In this ongoing series, I’ll be talking you through the amazing capabilities of 5 pieces of studio gear I rely on heavily in my productions in order to get great results fast.

This week, we’re checking out the amazing capabilities of Sonarworks’ speaker & headphone correction software, and discovering how it allows me to accurately monitor my mixes in any listening situation:

Part 3: Sonarworks

1 Sonarworks

What Is Sonarworks?

Sonarworks is a piece of audio software which can be used to effectively “flatten-out” the frequency response of a pair of headphones or speakers, allowing you to monitor your mixes in a more accurate manner.

Check out the following video for a great explanation and demonstration of how the process works:

DISCLAIMER:

Before we begin, I need to make the following fact very clear: Speaker/headphone correction software IS NOT a replacement for proper room treatment, accurate speaker placement, and purchasing quality gear!

Try to think of this software as more of an extra layer of accuracy and tightness rather than a fundamental solution to all of your monitoring woes.

Now that we’ve got that out of the way…

HERE ARE SOME OF THE PRIMARY BENEFITS TO USING SPEAKER / HEADPHONE CALIBRATION SOFTWARE IN THE STUDIO:

1 – You CAN mix on headphones: I’m sure you’ve heard the classic “You can’t get a good mix on headphones” argument being made at least a few times in your career.

  • Although I don’t agree with this argument in the first place, the ability to treat the shortcomings of a pair of headphones via Sonarworks makes the argument even more irrelevant!
  • Unlike mixing on speakers in a room, the only major variable involved in mixing on headphones is their frequency response, making them an incredibly viable source for correction software.
  • With Sonarworks applied, you no longer have to worry about your headphone mixes translating poorly when listened back to on other playback systems.

2 – Bring unused headphones back to life: It’s not uncommon for certain pairs of headphones we own to end-up sitting on a shelf, gathering dust based on the fact that we’ve upgraded to something better, and/or no longer “trust” them because they are inexpensive.

  • Until I discovered Sonarworks, I’d avoid doing any serious mixing work on my Audio Technica M50x’s or Sony 7506’s and only use them for tracking purposes.
  • The resulting sound from headphones after correcting their various frequency peaks and valleys is so drastically improved, that I now spend a huge amount of time mixing and referencing on said headphones with absolutely no worries as to how my songs will translate elsewhere. PS. Even my higher-end AKG headphones sound a lot better with Sonarworks!
Here’s a list of the headphone models currently supported by Sonarworks:

2 Sonarworks HP1

3 Sonarworks HP2

4 Sonarworks HP3


3 – Speaker/Headphone quality is less of a factor: A good pair of speakers/headphones can seem like a daunting purchase for a young engineer who’s just starting out.

  • Based on personal experience, I can tell you that Sonarworks does an incredible job at making both expensive, and inexpensive headphones sound like a million bucks.
  • The classic Sony MDR-7506 studio headphones for instance, are a prime example of an affordable pair of headphones which are great for live use, but not particularly well-suited for professional mixing applications…

5 SONY 7506

Image: Correcting a pair of Sony MDR-7506 headphones in Sonarworks


  • Notice how the 7506’s are extremely prominent in the treble and upper-mid range, yet fairly scooped and thin in the low / low-mids.
  • Although these inherent characteristics make a lot of sense in a live-performance monitoring situation, they make the headphones virtually unusable for any serious mixing applications.
  • As can be seen above, Sonarworks applies a “correction curve” to the headphones based on an average of multiple MDR-7506’s that they’ve accurately measured, resulting in a neutral curve which is far more viable for listening.

4 – Your room acoustics are less of a factor: Unlike headphones where the gear itself is the main variable, in the case of speakers, the room they are placed in is just as much (if not more) of a contributing factor to their final sound.

  • Properly treating a room for maximum acoustic accuracy is a rather intensive and expensive process which requires a fair bit of preliminary research.
  • Although a fair bit of damage can be averted by taking a few simple precautions such as home-made panels and bass traps, these measures alone often aren’t enough to completely eliminate the underlying issues.
  • Using speaker & room correction software is a great way of ensuring that “final push” of tonal accuracy in situations where the room is decent, but not quite perfect.

NOTE: Check out this cool video, in which Marc Mozart (writer of the great book “Your Mix Sucks”) demonstrates the difference that Sonarworks can make for a small travel-mixing setup:

5 – Consistency between mixing environments & Reduced trial/error period: Learning to compensate for the issues caused by your monitoring is a frustrating process, and it can take a long time before you’re able to truly produce decent results in spite of them.

  • Having a more accurate representation of what your mix really sounds like means you’re not chasing your tail trying to fix problems that aren’t really there.
  • In cases where you’re having to switch between multiple listening environments (different studio rooms, rehearsal spaces, headphones, speaker sets, etc.) you no longer have to worry about the effect that each monitoring solution is having on what you’re hearing.
THE DOWNSIDES?

As I’ve already clearly pointed out at the very beginning of this article, there isn’t really a substitute to putting in the time and effort necessary for achieving an accurate monitoring setup…

In the case that you’re actually heeding this advice and simply using correction software as a “cherry on top” layer of additional accuracy, I can honestly tell you that there aren’t really any significant downsides to the software.

This being said…

Here are some of the important factors you should keep in mind before attempting to use this kind of software:

There is definite value in learning to deal with less-than-adequate monitoring:

  • Let’s face it, you’re not always gonna be in a situation where you have the luxury of using fancy correction software to aid your monitoring. For this reason, it’s a good idea to get to know the shortcomings of your gear sooner rather than later.
  • In the case of my Audio Technica headphones, I know that they have some large bumps in the 100-200Hz & 7-10kHz ranges, as well as a huge scoop between 200-400Hz. Being aware of these issues means that it’s less likely I’ll be fooled into making the wrong decisions when using these headphones without the crutches of calibration software to rely on.

Room treatment is a major procedure that you simply can’t skip-over:

  • If you’re researching this type of software as a sort of “get-out-of-treatment-free” card then give up now.
  • Although Sonarworks can make a significant improvement to even the worst of rooms, it’s simply not worth the amount of phase issues and listening-position problems you’ll most likely encounter from applying uber-drastic frequency curves across your entire mix.

NOTE: Check out this video by audio education legend Bobby Owsinski, in which he teaches how to construct some simple-yet-effective acoustic panels for studio use:

Cheap is cheap, Upgrade A.S.A.P:

  • Although you can technically use correction software to vastly improve terrible gear, it’s honestly a much better idea to simply save up for something better and go from there…
  • Why shoot yourself in the foot by always trying to correct fundamental issues… When you could just simply get something which doesn’t require and “fixing” in the first place?!?
IN CONCLUSION:
  • There are a lot of audio purists out there which like to preach that you should “avoid correction software at all costs”. This is primarily due to the fact that a lot of inexperienced engineers tend to misuse the technology and end-up missing the point entirely. (Alongside the fact that said purists tend to be sitting in professionally-treated, multi-million recording studios while preaching…)
  • As somebody who works in a more realistic, down-to-earth mixing environment, I can vouch for the fact that Sonarworks is a great tool. I use it daily to correct my various pairs of headphones… As well as my Adam A7X monitors (in an already-treated room) and my mixes are much improved because of it!
  • Monitoring is something you definitely shouldn’t skimp on. Rather than buying a brand-new “revolutionary” EQ or Compressor every other month, simply save-up and buy a good pair of headphones or speakers (& room treatment). I guarantee it’ll have a much more profound effect on the quality of your music!

To reiterate my views on the correct way to approach speaker correction one final time:

Get some good speakers/headphones > Treat your room to the best that your circumstances allow for > Add the final touches via speaker correction

SUMMING UP:

To say the very least, the recording equipment we have at our disposal nowadays is simply astounding when compared to what was available to previous generations of engineers.

This being said: Be thankful for the amazing creative opportunities we’ve been given by the smart people developing incredible tools which make our lives easier.

Stop whining about subtle gear comparisons and simply do whatever it takes to make some cool music!

Final Words:

This concludes “5 Pieces Of Gear For Maximum Recording Flexibility – Part 3 – Sonarworks.” I hope that this article has given you some new ideas to try out during your next project. Be sure to comment below if any of this information has helped you out, or if you have any questions.

Stay tuned for more production/mixing related articles in the not-so-distant future!


Thomas Brett is a producer, mixing engineer and songwriter at Brett Brothers recording studio in the UK. Check out the Brett Brothers studio website for more information and articles on all things mixing www.brettbrothersstudio.com

Read Part 1 of this series here!

Read Part 2 of this series here!

Want mix tips from Thomas Brett? Read them here!

Nail The MixNail The Mix is our online mixing school that gives you REAL multi-tracks from REAL bands, plus a mixing class from the producer who recorded it. Past guests include Periphery, Chelsea Grin, Machine Head and State Champs. Join now for instant access!

EP151 | Nolly Getgood & Ermin Hamidovic

On this edition, we’re doubling your podcast value with a round table discussion with Nolly Getgood and Ermin Hamidovic.

Nolly and Ermin have both been amazing contributors for URM, and it felt like a great time to have both of them back. This time out we’re really digging into the mixing/mastering relationship, learning to maximize focus, mental health and maintaining your well being, and answers to a number of your mixing and mastering questions. It’s a great conversation, that goes way beyond just audio and into topics that really apply to everyone.

[smart_track_player url=”https://media.blubrry.com/urmpodcast/s3.amazonaws.com/urmpublicpodcast/season3/July2017/URMPC151-NollyGetgoodErminHamidovic.mp3″ title=”EP151 | Nolly Getgood & Ermin Hamidovic” image=”https://s3.amazonaws.com/urmpublicpodcast/Images/square+covers/URM_customPodcast_standard_13.jpg” background=”default” social_email=”true” ]

I think there comes a certain point where, if you want to be a truly good producer, be very aware of the clients you’re working with and be aiming for whatever it is that’s their goal rather than your personal ones.” – Nolly Getgood

ON THIS EPISODE, YOU’LL LEARN ABOUT:

– The relationship between Nolly’s mixing and Ermin’s mastering
– Techniques for focusing
– Nolly’s views on meditation
– Maintaining mental health
– Studio One
– Devin Townsend’s vocal tracks
– And much, much more

Links:

Nolly’s previous appearance on the podcast
Ermin’s previous appearance on the podcast
Getgood Drums
The Systematic Mixing Guide

Thanks for listening!
Sign up to our [cp_modal id=”cp_id_7934d”]mailing list[/cp_modal] to discover more!

Nail The MixNail The Mix is our online mixing school that gives you REAL multi-tracks from REAL bands, plus a mixing class from the producer who recorded it. Past guests include Periphery, Chelsea Grin, Machine Head and State Champs. Join now for instant access!

Leave any questions, comments, or feedback in the comment section below.

[btnsx id=”904″]

[btnsx id=”911″]

[btnsx id=”773″]

[btnsx id=”915″]

[btnsx id=”937″]

[btnsx id=”946″]

[btnsx id=”952″]

[btnsx id=”957″]

[btnsx id=”960″]

[btnsx id=”962″]

EP150 | Dear Joey

Joey Sturgis provides the answers to your most pressing questions.

Want Joey to answer your questions? Send them to [email protected] with the subject line “Dear Joey.” The more detailed the better!

[smart_track_player url=”https://media.blubrry.com/urmpodcast/s3.amazonaws.com/urmpublicpodcast/season3/July2017/URMPC150-AskJoey.mp3″ title=”EP150 | Dear Joey” image=”https://s3.amazonaws.com/urmpublicpodcast/Images/square+covers/URM_customPodcast_standard_02.jpg” background=”default” social_email=”true” ]

What we do as producers and engineers is not just pressing buttons and stuff; it’s being able to put together content and material in an artistic way.” – Joey Sturgis

ON THIS EPISODE, YOU’LL LEARN ABOUT:

– Business resources and phantom mentors
– Guitar and vocal secret sauce
– Getting more exciting DIs
– Apple mastering tools
– Getting mixes that translate well
– And much, much more

Thanks for listening!
Sign up to our [cp_modal id=”cp_id_7934d”]mailing list[/cp_modal] to discover more!

Nail The MixNail The Mix is our online mixing school that gives you REAL multi-tracks from REAL bands, plus a mixing class from the producer who recorded it. Past guests include Periphery, Chelsea Grin, Machine Head and State Champs. Join now for instant access!

Leave any questions, comments, or feedback in the comment section below.

[btnsx id=”904″]

[btnsx id=”911″]

[btnsx id=”773″]

[btnsx id=”915″]

[btnsx id=”937″]

[btnsx id=”946″]

[btnsx id=”952″]

[btnsx id=”957″]

[btnsx id=”960″]

[btnsx id=”962″]