This episode features a roundtable with three URM moderators who successfully networked their way into killer internships: John Maciel, Miami Dolphin, and Tyler Rodriguez. John is currently working with Beau Burchell of Saosin, Miami is with pop-punk producer Kyle Black, and Tyler landed a spot with Sam Pura at The Panda Studios. They share their firsthand experiences of breaking into the industry and working alongside some of the best in the game.
In This Episode
Get ready for a super practical, no-BS discussion about what it really takes to get your foot in the door. John, Miami, and Tyler get real about the sacrifices they made, from moving across the country to learning Pro Tools on a two-week deadline. They break down the essential intern mindset: being a sponge, adapting to a pro’s workflow, and developing the editing speed to keep up. The guys also share crucial advice on navigating studio politics, like how to “be cool” around clients, when to offer your opinion (almost never), and how to read the vibe of a session. They even drop some serious life hacks for surviving on a shoestring budget while you’re paying your dues. If you’re trying to level up from your home studio to a pro environment, this episode is a must-listen.
Timestamps
[0:07:43] Why you have to learn Pro Tools, even if you love another DAW
[0:09:10] Miami’s story: Almost losing an internship because he didn’t know Pro Tools
[0:11:32] How Miami learned the basics of Pro Tools in just two weeks
[0:15:30] It’s an art form to watch a master work in their DAW
[0:16:33] How John networked his way into an internship with Beau Burchell
[0:19:34] Making the necessary sacrifices to go all-in on an opportunity
[0:21:37] The importance of being cool and not overbearing
[0:22:25] The single biggest skill John had to improve: Editing speed
[0:25:28] How Tyler landed his internship with Sam Pura through social media
[0:27:46] The intern mindset: Adapt to their world, don’t try to make them adapt to yours
[0:29:13] Why “cleaning toilets” is really about respect for the space and process
[0:32:14] Would you rather ride bitch in a Lamborghini or own a Toyota Corolla?
[0:36:21] Miami’s story of getting robbed after moving across the country for audio
[0:44:53] Why you need thick skin to survive in the audio industry
[0:47:14] If you can’t handle the answer, don’t ask the question
[0:54:22] Save your opinions unless they are specifically asked for
[0:57:31] A story about handling a client who isn’t comfortable with you
[1:00:44] The biggest rule: Always respect the vibe in the room
[1:21:48] How to handle an internship without starving to death
[1:28:33] The most significant changes they’ve seen in themselves since starting
Ryan “Fluff” Bruce is the creator of the massively popular YouTube channel “Riffs, Beards, and Gear,” the guitarist for Rest, Repose, and a key member of the Joey Sturgis Tones team. He’s a self-made music industry force who transitioned from a decade-long career at Boeing to becoming a full-time content creator and musician, proving it’s never too late to chase your passion.
In This Episode
Fluff is back on the podcast to drop some serious knowledge on how to build a modern music career from the ground up. He and Eyal get into why it’s never too late to start, sharing stories of people who made it happen later in life and discussing how a bit of maturity helps you appreciate success and navigate the industry’s ups and downs. The main event is a deep dive into diversifying your skillset, specifically by adding video production to your audio services. Fluff breaks down how his DAW skills translated directly to video editing (it started with editing porn, believe it or not) and explains why every producer should learn this invaluable skill. They cover the low barrier to entry with today’s tech, the importance of just getting started, and how a relentless work ethic will put you ahead of the competition. It’s a super inspiring chat about spotting opportunities, taking calculated risks, and building a sustainable career.
Producer and engineer Sam Pura is the founder of The Panda Studios, where he has carved out a reputation for crafting punk and pop-punk records that sound modern and punchy, yet raw and natural. He’s best known for his extensive work with bands like The Story So Far, Hundredth, and Basement.
In This Episode
Sam Pura drops by for a masterclass in building a rock-solid production workflow that’s all about commitment and getting things perfect at the source. He explains why he treats his studio less like a recording space and more like a plug-and-play production facility, where everything is dialed in and ready to go. Sam gets into the nitty-gritty of his process, from his meticulous drum tuning method (tuning to the key of the song) to his unique approach of tracking guitars while monitoring only the clean DI signal to force a tighter performance. He also breaks down why the bass needs to be brutally consistent, how he gets killer vocal tones without using any EQ, and why his entire philosophy is based on making confident decisions early so there’s nothing to “fix in the mix.” It’s a deep dive into the mindset and techniques that create huge, detailed, and impactful records from the ground up.
Dissecting one of the most iconic solos of all time
Heavy music can essentially be divided into two categories: before Meshuggah and after Meshuggah. They completely changed the game with not only their songwriting, but also the groundbreaking and unique production on “Destroy Erase Improve” courtesy of the one and only Daniel Bergstrand.
Watch Daniel Bergstrand mix the lead guitars in the iconic Meshuggah song “Future Breed Machine”! He uses Pro Tools, Brainwork Shredspread and Soundtoys Echoboy.
We consider ourselves insanely fortunate to have Daniel on Nail The Mix to take us through one of Meshuggah’s most well-known songs “Future Breed Machine,” and for those who may have missed it, here’s a little peek at the pure awesomeness of this session – check it out as Daniel mixes the iconic solo from the bridge!
Nail The Mix is our online mixing school that gives you REAL multi-tracks from REAL bands, plus a mixing class from the producer who recorded it. Past guests include Periphery, Gojira, Monuments, Machine Head, A Day To Remember and State Champs. Join now for instant access!
Vocals are the most important element in a mix, yet ironically, also the most prone to sounding terrible when over-processed or heavily messed with…
Luckily, the real secret to getting a great vocal sound doesn’t lie in the mixing stage, but rather in the recording and mix preparation stages.
In this two-part URM Blog series I’ll be guiding you through some of the initial steps you can take towards transforming your raw vocal recordings into well-oiled melodic machines, and hopefully help prevent them from having to rely on fancy mixing tricks to sound great.
The Problem?
With all of the amazing modern studio tools available to us nowadays, we’re currently able to replace and re-amp most recorded sounds with fairly minimal effort.
As much as it’s still important to make sure you’re recording every instruments as well as possible before falling back on these types of tricks, the one instrument which really relies on the initial quality of the raw recordings is Vocals.
The Fix!
When it comes to dealing with less-than-adequate vocals, the best plan of action is summed up pretty accurately in the following quote:
“If I had six hours to chop down a tree, I’d spend the first four sharpening the axe.” – Abraham Lincoln (Possibly…)
The pre-mix “Vocal Sharpening” tools I’ll be talking about in this series consist of the following:
Part 1:
Comping
Editing/Quantising
Part 2: (This week)
Tuning
Aligning
Automation
Now that we’ve got the preliminary stuff out of the way, let’s dive straight in:
3 – Tuning (Pitch correction)
Like it or not, pitch-correction is an integral part of the vocal production process at this point in music history.
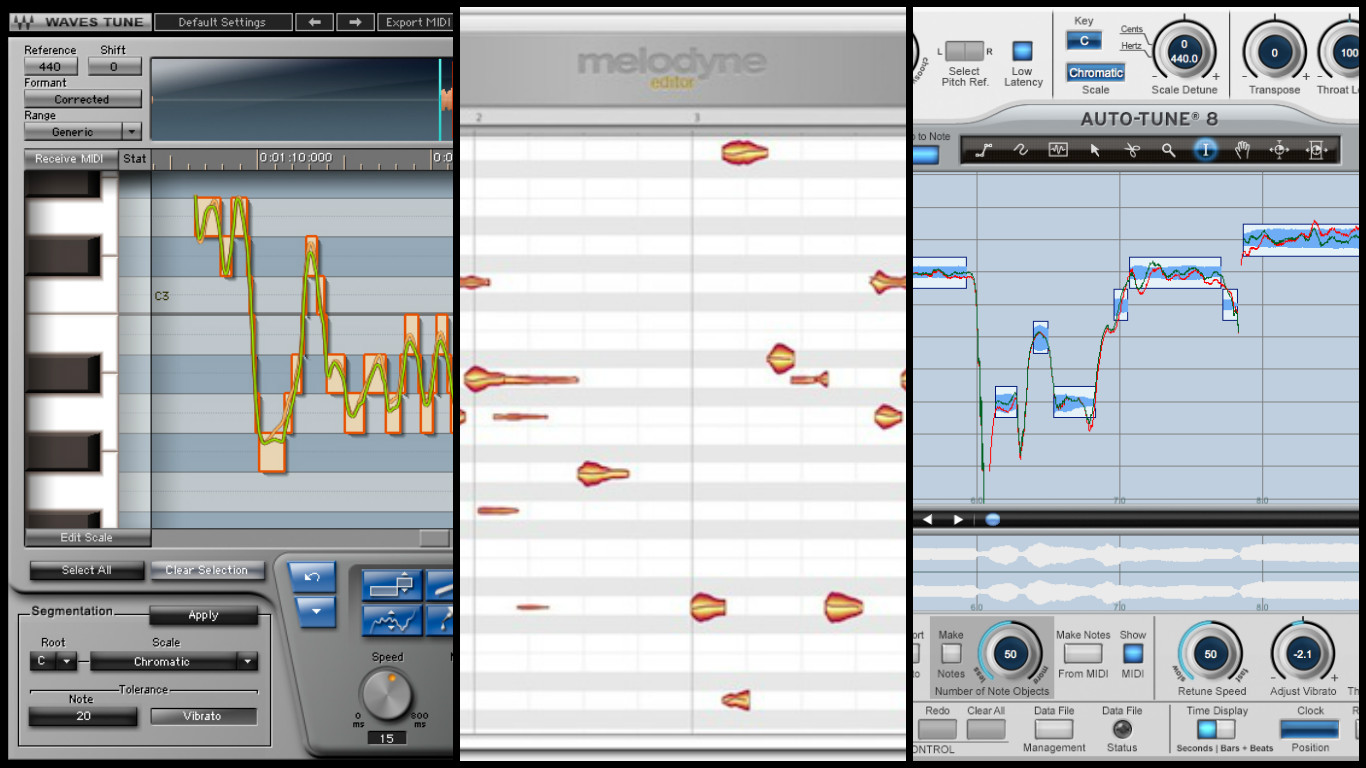
With the event of modern pitch-correction software such as Melodyne, Auto-Tune and Waves Tune, we’re now free to manipulate and correct vocal performances to our heart’s content. (*Cheers and cries simultaneously internally*)
Although every now and then you may be lucky enough to cross paths with some excellent singers who don’t need to rely on such tools, chances are most of the people you’ll be working with on a daily basis will require – at the very least – some degree of “enhancement” in order to compete with high modern tuning standards.
Staged Tuning
Pummeling an audio signal with a single tool isn’t always the best idea… As it can often result in fairly obvious artefacts which can sound unpleasant to the listener.
The same rule applies to pitch-correction. For this very reason, I often find that using several layers of gentle tuning produces smoother, less “obvious” sounding results.
I usually like to approach my vocal tuning in two key stages:
A – Manual Tuning
Left to Right: Waves Tune, Melodyne, Antares Auto-Tune
Q – Umm, isn’t it called “Auto-Tune” for a reason? Why should I do it manually?
A – Unfortunately, we’re yet to see a piece of single-click “Auto” tuning software that is truly automatic in the sense that it does the job perfectly every time without producing any correction errors…
Not to worry though! This simply means that the process often calls for a little bit of “human babysitting” in order to produce truly awesome results.
NOTE: Check out this awesome demonstration of manual pitch-correction in Melodyne by MusicTechHelpGuy:
B – Auto-Tuning
If you’ve already done a great job of tuning your vocals by hand, and think they’re sounding great, then this stage really isn’t completely necessary. However, I do find that using a second layer of light auto-tuning can definitely help towards tightening the subtle pitch fluctuations within words that may have slipped through the more broad “word-by-word” manual tuning we did in the previous stage.
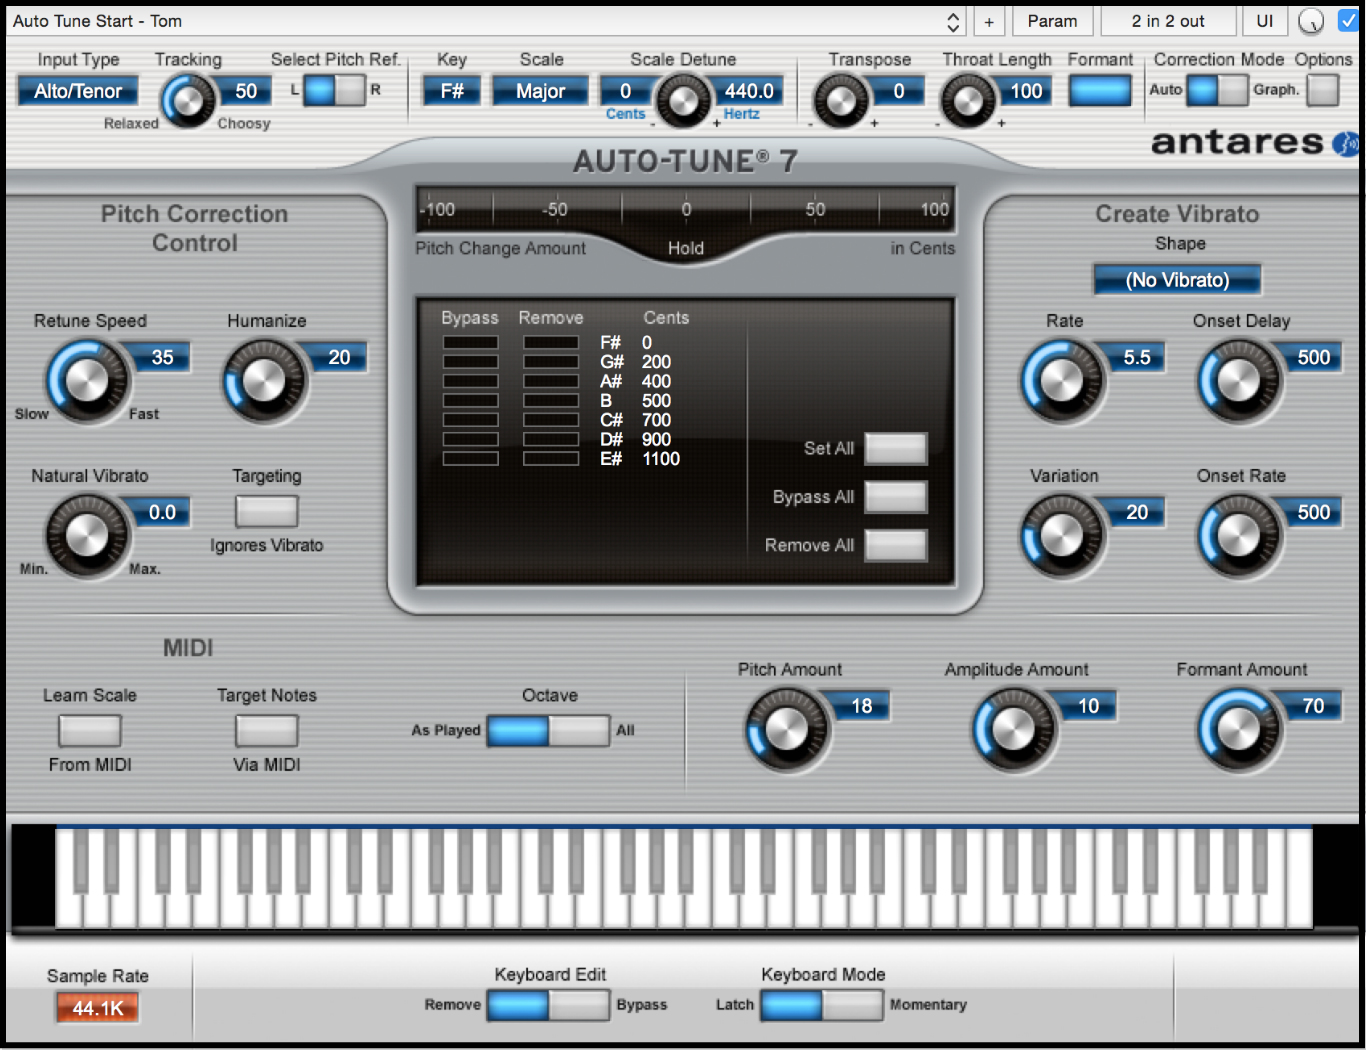
Antares Auto-Tune, The industry standard
While I may be able to get away with a quicker retune speed (correction severity) of 20ms or so while solely using Antares Auto-Tune without any prior manual tuning in place… I tend to prefer slower speeds of 35 or 40 when using this software as an additional stage of correction.
NOTE: Unfamiliar with Auto-Tune? Check out this awesome demo on the official UAD YouTube channel to learn more:
4 – Aligning (Tightening-up interactions between multiple vocals)
A simple, yet incredibly important factor which can drastically detract from the professionalism and sonic impact of a track if ignored is poor alignment between vocal layers.
Before I give you any advice on how to resolve this issue, let me take a moment to explain why it needs dealing with in the first place:
The entire point of adding in additional vocal parts alongside a lead vocal is to accentuate and build-on what’s already there. If these “additions” are interfering with the original performance in any way, you’ve missed the point entirely…
Now that you understand the importance of the matter at hand…
Here are 3 important steps you can take towards tighter vocal layers:
Sing them tight to begin with (Duh…): Back in the day, engineers didn’t have access to the amazing digital editing capabilities we possess today. This meant that rather than relying on after-the-fact “fixing” to achieve tight vocal stacks… Singers were simply having to learn how to give tightly matched performances from the get-go.
Honestly, the only piece of advice you can really give in this area is to practice, and practice hard… Although it may take a few years for a singer to truly master the art of mimicking themselves perfectly, the payoff is that you’ll potentially save yourself from hundreds of hours of tedious editing work, and ultimately end up with much more natural sounding vocals in your productions!
Manual alignment: As boring as it is to do, manually chopping & lining up your backing vocals to your leads by ear will always result in the most fool-proof and musically satisfying results.
Make sure that the “reference” vocal performance you’re aligning to has been fully comped and edited to your satisfaction before starting on your additional tracks. You don’t want to spend hours editing a backing vocal… Only to realise a major problem in your leads and have to start from scratch.
How far you should take this process is entirely dependant on how much of a perfectionist you are. Just make sure that you’re not losing yourself in miniscule details which won’t really have a significant effect on the quality/success of the big picture!
Auto-alignment (Vocalign):
Q – Why not just skip manual alignment and go straight to this step?
A – Automatic alignment plugins are useful, but they’re often only as good as the raw audio you’re feeding them with in the first place…
Unless the two takes you’re trying to match are pretty locked-in to begin with, chances are the “auto aligned” vocal stack you end up with will sound pretty hideous.
NOTE: Check out this quick video from Russ from Pro Tools Expert for a great demo of Vocalign’s capabilities:
Rather than resorting to such software for the brunt of the work, I prefer to do the majority of my aligning by hand… And to only use auto-alignment software for a final layer of “tightness”.
One of the key tools for achieving consistent, in-your-face vocals is compression.
Although the use of compression on vocals may seem like a pretty straight forward process… It’s important to note that the dynamic range of the raw signal you’re feeding into the compressor to begin with can actually have a huge impact on the quality of the end result.
How so?
If your raw vocal is extremely dynamic, yet you want it to remain pinned on top of the track at all times, you’ll probably end up with a lot of compression artefacts as the compressor needle frantically jumps back-and-forth in an attempt to keep up with your audio signal.
The solution?
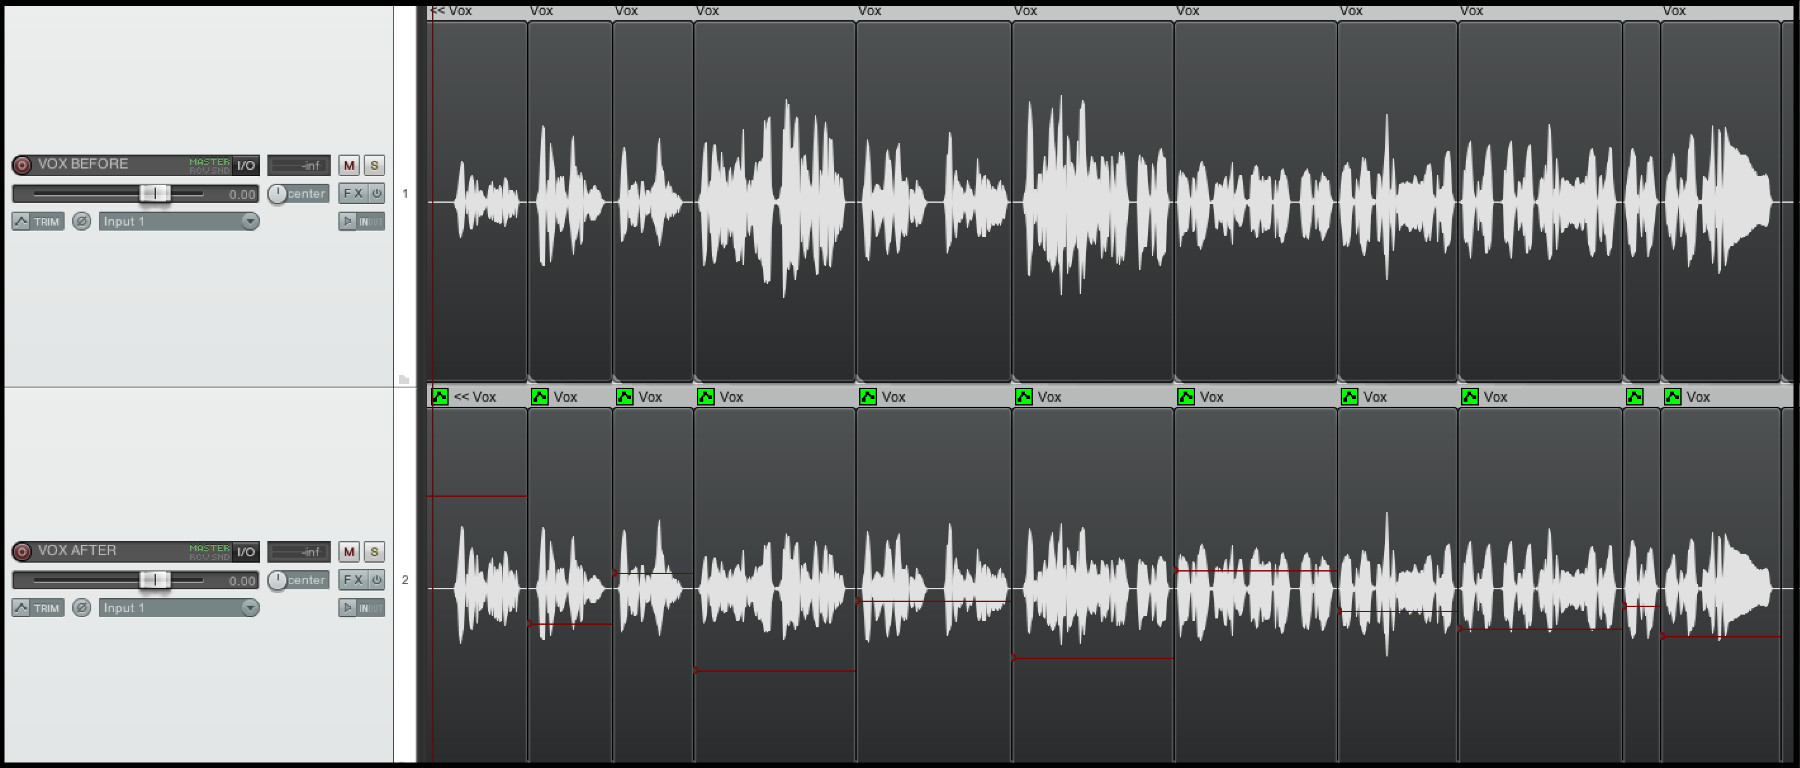
Smooth-out your vocal dynamics beforehand with some good ole-fashioned, artefact-free volume automation in order to make the compressor’s job easier!
Before/After basic pre-fx volume automation on vocals.
In the example above, I used pre-fx volume take envelopes within Reaper to quickly volume-match the different sections of a vocal performance by ear.
NOTE: Performing this task via sight does work to an extent, but I’d always recommend relying on your ears over your eyes when it comes to matters of sound engineering…
Even with this 2 minute tweak alone, the vocals are much more consistent in level. (Now, instead of triggering 20dB of compression, the largest peaks are only causing a maximum of 10dB compression, meaning less pumping & distortion artefacts are produced!)
NOTE: The exact same concept can also be applied to sibilance/de-essing. Check out my “Death To Sibilance” URM article from a while back for an in-depth guide on how to reduce the amount of de-essing is required in your mixes!
END OF PART 2:
As much as I like to talk about the various “after-the-fact studio magic tricks” we can use to fix bad performances nowadays, what I like even more is receiving a brilliant performance which allows me to bypass them all…
By all means, learn how correct problems in order to produce the best sonic results you possibly can. Just make sure that you’re also doing everything in your power to prevent them from occurring in the first place!
Final Words:
This concludes “Prepare For Perfection – Getting Vocals Ready To Mix (Part 2).” I hope that this article has given you some new ideas to try out during your next project. Be sure to comment below if any of this information has helped you out, or if you have any questions.
Stay tuned for more production/mixing related articles in the not-so-distant future!
Nail The Mix is our online mixing school that gives you REAL multi-tracks from REAL bands, plus a mixing class from the producer who recorded it. Past guests include Periphery, Chelsea Grin, Machine Head and State Champs. Join now for instant access!







 Left to Right: Waves Tune, Melodyne, Antares Auto-Tune
 Antares Auto-Tune, The industry standard
 Before/After basic pre-fx volume automation on vocals.