urmadmin, Author at Unstoppable Recording Machine - Page 40 of 45

Common Mixing Mistakes (Volume 1)

Common Mixing Mistakes (Volume 1) 

Mixing is a rather tricky business…

The thing is, if you’ve been at it for a while, it’s fairly easy to forget that there’s actually a pretty steep learning curve to overcome when you first start out. Remember, certain things which may seem “blatantly obvious” or “common sense” to you at this point probably took you years to realise/come across as a newcomer!

The truth is, a lot of the “eureka” moments we have throughout our mixing careers are the result of making mistakes until somebody points them out to us and then learning from said mistakes. This series of Blogs aims to point out some of these “not-so-obvious” common mistakes which even experienced engineers tend to make in the studio and hopefully help you course-correct as early-on as possible.

Here are a couple of common mistakes to watch out for the next time you sit down to mix:

Mistake #1 – Monitoring Too Loud

monitoring too loud

Don’t get fooled by the hype!

Believe it or not, the levels you monitor at while mixing can have a huge influence on the various balancing decisions you make during the process. If done carelessly, something that seems as mundane and simple as setting your listening volume can potentially result in a handful of issues further down the line.

Here are a few reasons why you should consider turning it down:

A – Loud Sounds Better… NOT!

There’s a valid reason why people on the audio forums and YouTube comment section get so worked up about before/after volume matching in plugin demos: OUR EARS PERCEIVE LOUDER AS BETTER.

For this exact reason we can easily get tricked into thinking the mix we’ve been working on with the speakers cranked sounds killer, when in reality we’ve probably missed the mark completely…

Don’t just take my word for it, multiple grammy award-winning engineer Chris Lord Alge is well known for avidly preaching the same advice:

“Monitoring is everything, cranking it up vs. listening to it low will give a different result to your mix. The important thing is to find the lowest volume that you feel you can balance the song at and stick with that.”

Check out the full SonicScoop interview here – https://vimeo.com/39245580

SonicScoop’s Power Sessions: Chris Lord-Alge – Part 3 “The Anthemic CLA Mix” from SonicScoop on Vimeo.

B – Ear Fatigue:

Another detrimental (and eventually serious) side-effect of listening at higher volumes for prolonged periods of time is ear fatigue. If left unchecked, this practice can lead to several issues in both the short, and the long run:

  • The short run: In my own experience, a specific balance I’ve made after listening at higher volumes for a long time will almost always need a substantial revision the next day when listened back with fresh ears.
  • It’s also fairly likely that I’ve removed too much of the high-mids around 2-3kHz in the process. My ears slowly become more sensitive to this frequency range throughout the day.
  • The long run: Our ears are very sensitive things, bombarding them with mid-heavy walls of distorted guitars and blast beats for hours on end, day after day can really take it’s toll over the years.

For these reasons I usually try and hold back for as long as possible before testing if my mixes are bangin’ at louder volumes. Sticking to this level of restraint can produce instant results in the form of allowing for longer mixing hours without any noticeable fatigue.

Give it a go!

Monitoring Too Loud Conclusion:

If you want a successful and long-lasting career in audio production then the answer is simple: YOU NEED TO PRESERVE YOUR HEARING! This isn’t something you can afford to brush to the side and worry about when you’re older. By then it’ll probably be too late.

Mistake #2 – Mixing To Your Monitoring/Room

3-mixing-to-your-monitoring

Think your mixes sound great? Think again…

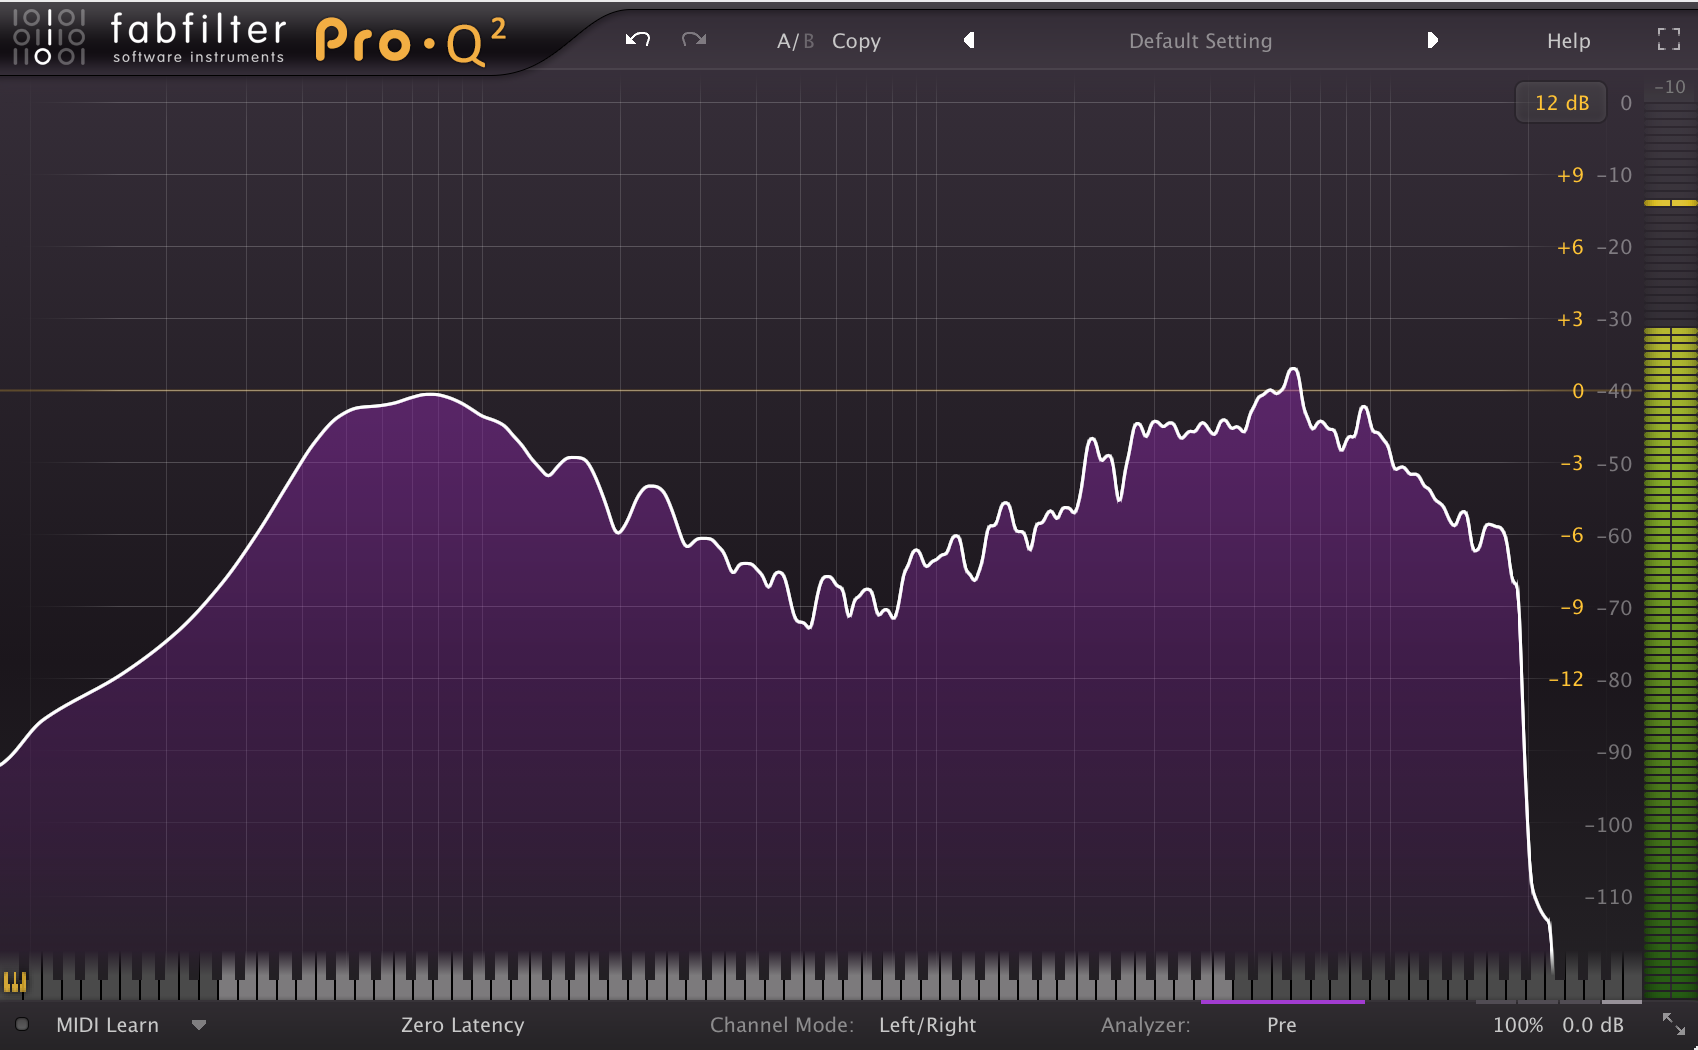
I was recently clearing out some unused gear from my studio and picking out pieces to potentially sell off on eBay. One thing I came across was a pair of Sony MDR-7506 headphones which I formerly used for monitoring while playing drums live.

In order to determine if the headphones were still in good working condition I decided to plug them in and listen with some of my go-to reference mixes. My first reaction upon hitting play was something along of the lines of: “Wow, these headphones sound much brighter than I remember! There must be something wrong with them…

As to not write them off as broken straight away, I tried listening to them through Sonarworks’ Headphone Calibration software. To my surprise, they sounded incredible and very well balanced as a result.

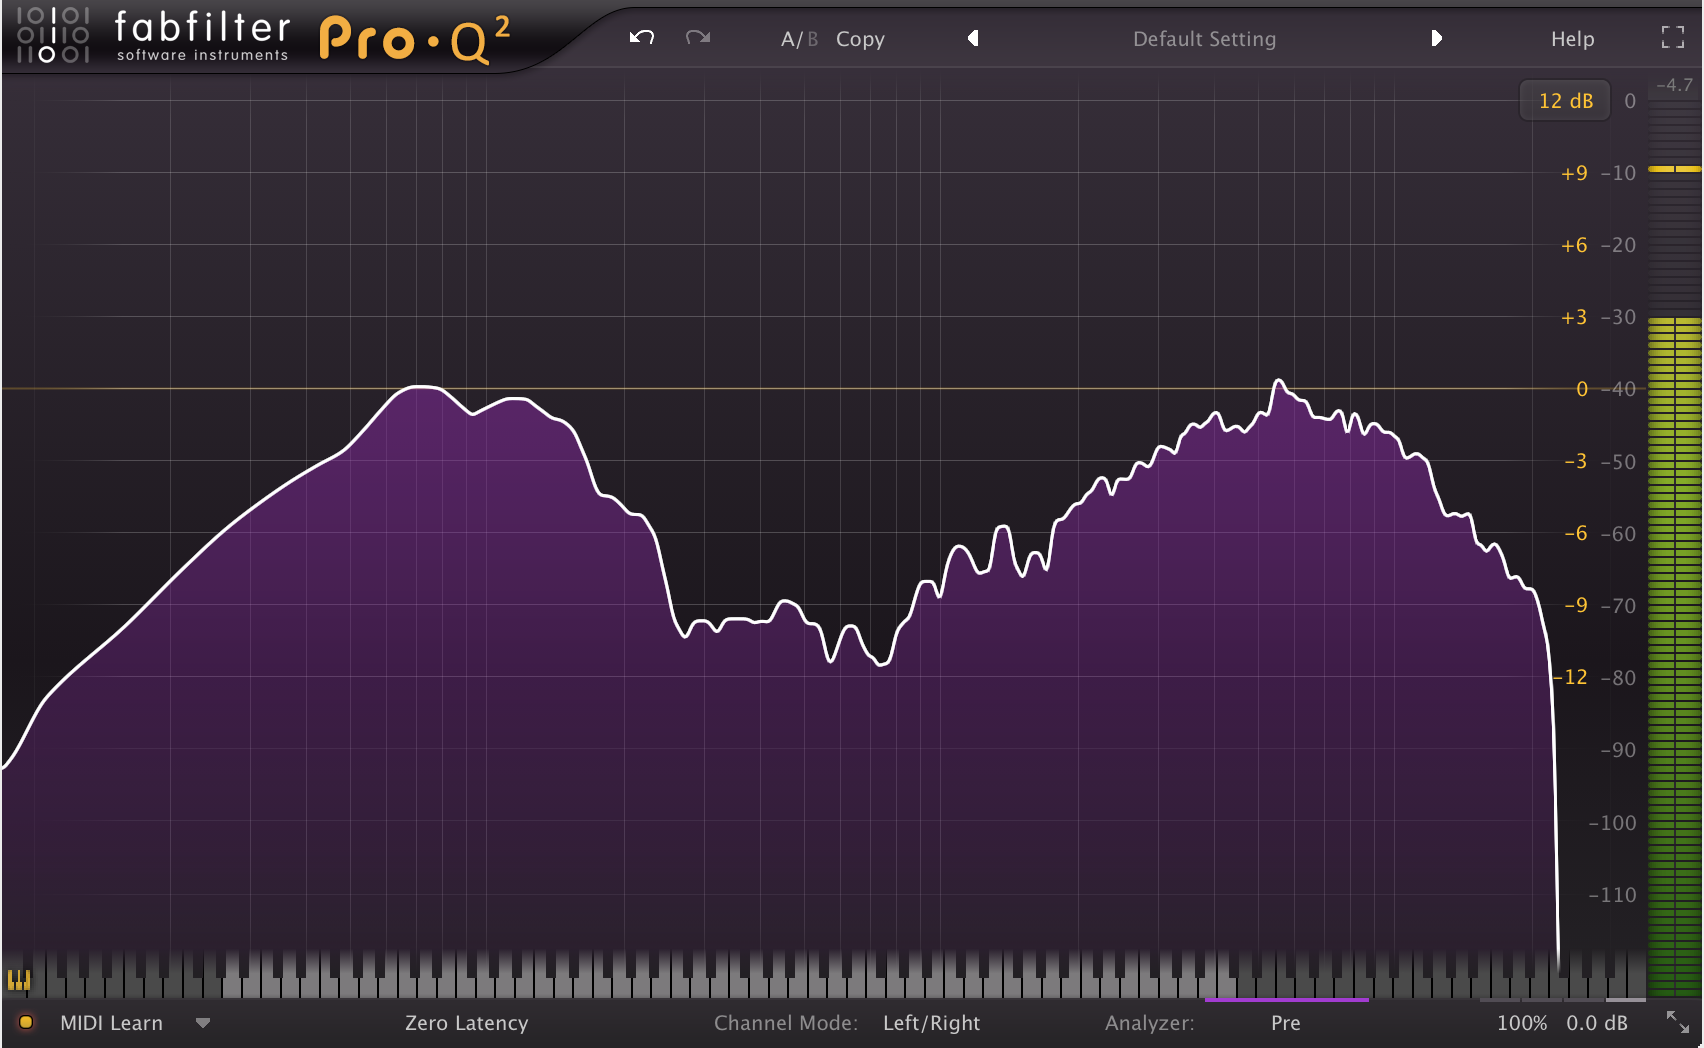
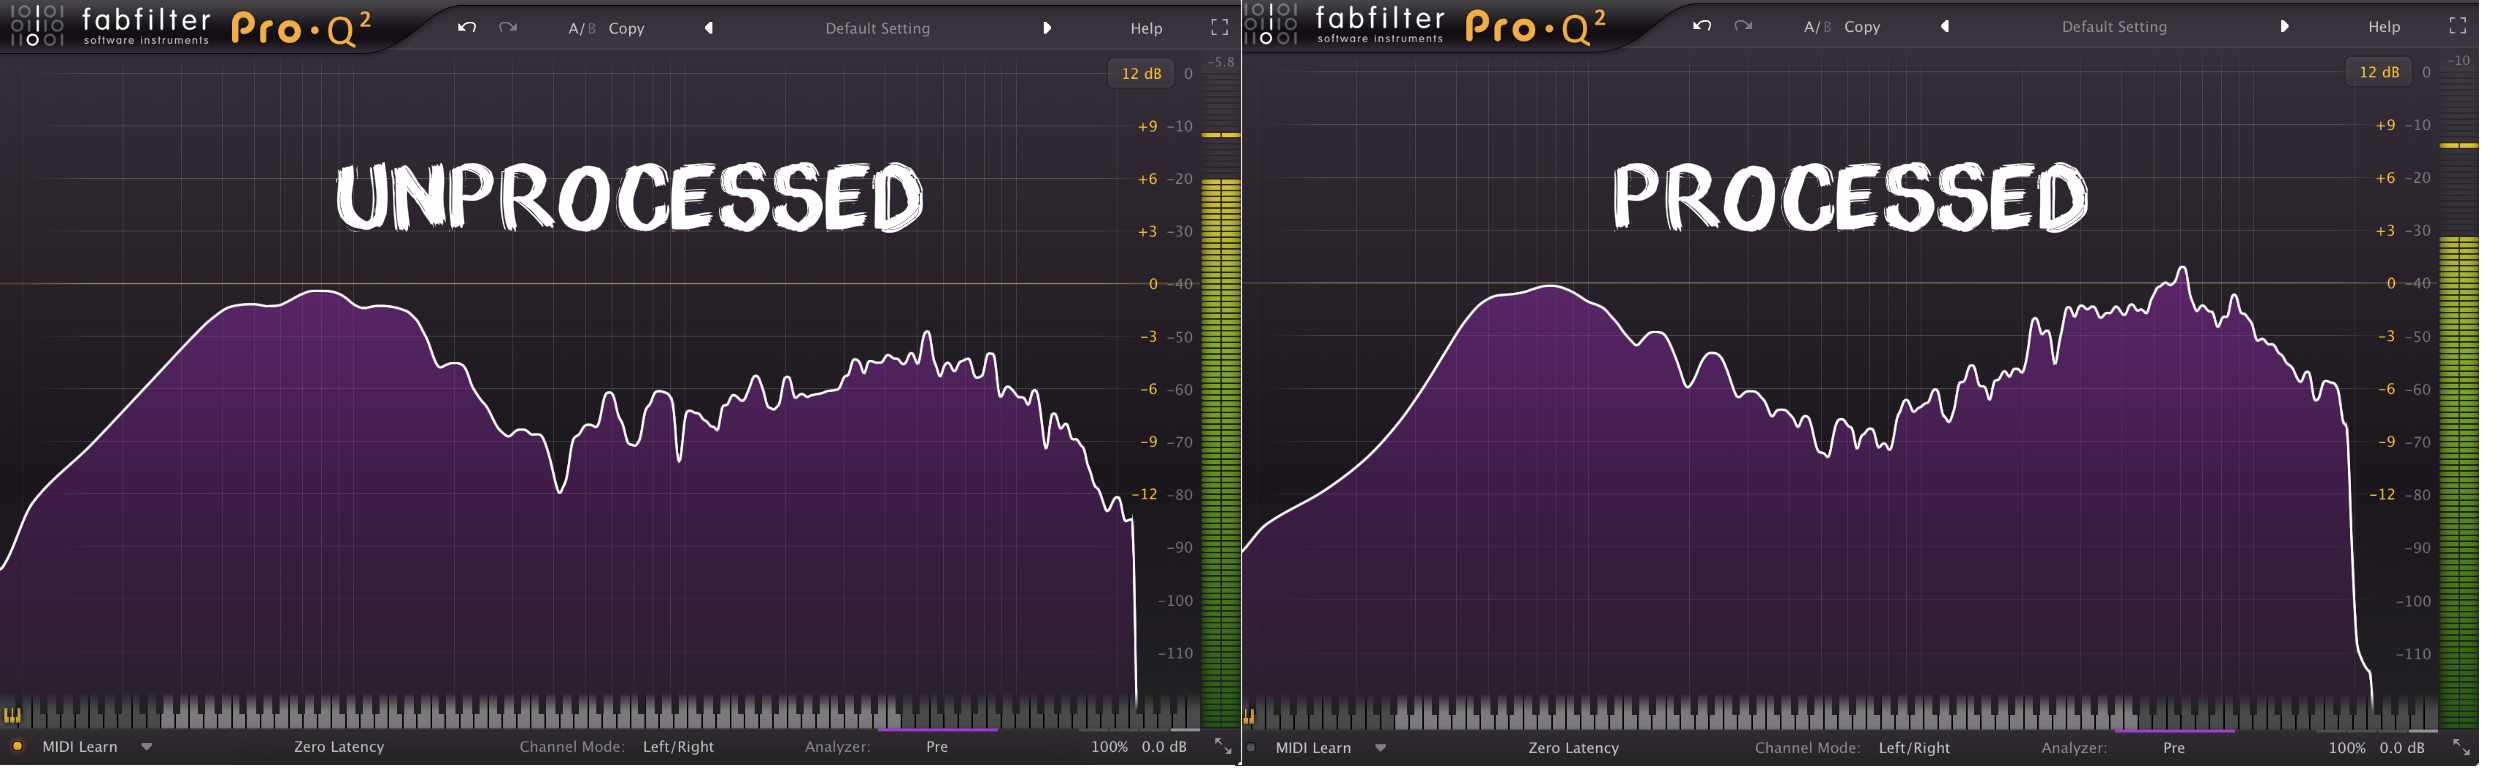
Check out the average frequency response of the Sony MDR-7506’s as determined by Sonarworks in the graph below:

sony mdr 7506

The Verdict?

Does this mean that they are bad headphones? Not necessarily. It simply means that they might be better suited to some tasks than others.

The prominent high-end boost and low-mid scoop of the Sony’s actually make a lot of sense in a live performance or studio tracking situation (similar to how I was using them in the past). These EQ moves can really improve the sound of raw instruments from the get-go. They help provide a vaguely “ready mixed” monitoring solution for the performer.

However, if the Sony’s were to be used as a primary mixing solution in the studio  without any calibration, our mixes would exhibit a bunch of pretty serious issues on other systems:

  • The huge boosts between 4-10kHz would cause us to compensate and mix very treble-light, resulting in dark mixes with reduced clarity.
  • The steep high-frequency roll-off beyond 10kHz may lead us into thinking our guitars and cymbals are fizz-free, when in reality they aren’t.
  • The large boost in the 2-4kHz presence region may cause us to “over-scoop” the harshness out of our overheads and distorted guitars, or think our drum shells and vocals are more present than they are in reality.
  • The low-end roll-off starting at 60Hz will lead us to mix sub-heavy, resulting in a boomy mix and problems during the mastering stage.

This list could go on longer, but I think you get the point…

Long story short: The severity of these boosts and cuts will vary greatly depending on the brand and price-point, but most headphones will suffer from similar issues to a certain extent. If you’re ever going to be mixing through headphones, I’d highly recommend doing some research on their shortcomings before doing so.

What about mixing on monitors?

Although a little more complex, the same principles also apply to mixing on monitors, with the added variable of the studio environment. Unless your room has been acoustically treated with panels, traps, diffusers and possibly some calibration software, then you can expect that you’re mixes will sound drastically different when taken out of it

Note: I won’t go into room acoustic treatment in this Blog, as it’s a very detailed topic which deserves a write-up of it’s own. Stay tuned for a URM room treatment guide at some point in the future!

Mixing To Your Monitoring/Room Conclusion:

If you’re unable to spend the time and/or money on optimising your monitoring, make sure you’re at least referencing your material on multiple systems. Don’t rely solely on a single representation.

INVEST IN YOUR MONITORING!

You’ll be surprised to see the difference it makes when you’re not having to constantly fight against your equipment to produce a good mix.

FINAL WORDS:

This concludes  Volume 1 of my  Common Mixing Mistakes” series of Blogs. I hope that this article has given you some new ideas to try out during your next project. Be sure to let me know in the comment section below if any of this information has helped you out, or if you have any further questions regarding anything I’ve talked about here.

Stay tuned for Volume 2 of “Common Mixing Mistakes” and more production/mixing related articles in the not-so-distant future!


Want mix tips from URM Academy? Read them here!

Nail The MixNail The Mix is our online mixing school that gives you REAL multi-tracks from REAL bands, plus a mixing class from the producer who recorded it. Past guests include Periphery, Chelsea Grin, Machine Head and State Champs. Join now for instant access!

JOEL WANASEK: Mixing Gojira’s “Toxic Garbage Island”, The Natural Drums vs. Samples Debate, Ditching Elitism

URM hosts Joel Wanasek (Blessthefall, Monuments) and Eyal Levi dive into another Mixcrit Monday, with co-host Joey Sturgis (The Devil Wears Prada, Asking Alexandria) out on site maintenance. This episode’s track is Gojira’s “Toxic Garbage Island,” a modern metal classic originally mixed by producer and former Machine Head guitarist Logan Mader. His production credits also include work with bands like Five Finger Death Punch, Once Human, and Devildriver.

In This Episode

Joel and Eyal are back for another Mixcrit Monday, this time breaking down three different takes on Gojira’s monstrous track, “Toxic Garbage Island.” They get into the nitty-gritty of why some mixes fall flat, pointing out common pitfalls like mismatched reverbs that make vocals sound like they’re in a different room from the band, and the dreaded “guitar tunnel” effect caused by over-EQing. The episode takes a hard detour into the age-old debate of natural drums vs. samples, with the guys making a strong case for why samples are essential to compete in the modern metal world. It’s a blunt, no-BS discussion about ditching elitist attitudes in favor of making powerful, professional-sounding records. They also drop some serious knowledge on what it takes to crack the Nail The Mix Top 20, emphasizing the importance of holding your work up against the pro reference mix.

Products Mentioned

Timestamps

  • [0:41] Joel’s plan for a nightclub-style studio lounge with LED furniture
  • [5:34] Why you need to get used to having your work judged
  • [7:37] A plea for more genre diversity in Mixcrit Monday submissions
  • [13:51] The importance of matching your ambiences (reverbs) across a mix
  • [15:47] Kane Churko using a single reverb for an entire mix
  • [18:18] Analyzing why the original Gojira mix is a benchmark for modern metal
  • [20:58] Identifying the dreaded “guitar tunnel” sound from over-EQing
  • [24:13] The story of getting called out for over-mixing a track
  • [25:02] Why you don’t need to do much when the source tracks are immaculate
  • [30:30] Critiquing weak drum sounds and the “naturalist” drum kick
  • [34:00] The “follow the money” argument for using drum samples
  • [35:10] Joel’s rant about drummers who can’t play but demand natural drum sounds
  • [37:37] The high opportunity cost of being a production “elitist”
  • [39:20] Shifting your elitism from “natural vs. fake” to “awesome vs. not awesome”
  • [46:27] Critiquing the final mix: good low end, but unruly bass
  • [52:15] How to get your mix into the Nail The Mix Top 20
  • [53:14] Why you shouldn’t submit a natural drum mix for a band like Gojira
  • [57:15] The right attitude: “Why isn’t my mix as good as the reference?”

LOGAN MADER: Mixing Gojira’s The Way of All Flesh, his “jump in the deep end” philosophy, and early Machine Head

As a co-founding member of Machine Head, guitarist and producer Logan Mader played on the band’s landmark first two albums before moving on to play with Soulfly and his current band, Once Human. Behind the board, his extensive credits as a producer and mixer include iconic albums like Gojira’s The Way of All Flesh, as well as records for DevilDriver, Five Finger Death Punch, and Fear Factory. He has also composed music for video games and films.

In This Episode

Logan Mader joins the podcast for a wide-ranging chat that’s packed with real-world insights for producers. He looks back at his transition from guitarist to producer, starting with his first experiences recording to tape with Colin Richardson. Logan gets into his “jump in the deep end” philosophy, sharing stories about taking on his first mix, film scoring, and video game composing gigs with no prior experience and figuring it out under pressure. He also talks shop about the importance of hiring a drum tech, the difference between studio and live guitar tones, and the eternal struggle of getting re-amps to sound right. Of course, he gives us an incredible deep dive into the making of Gojira’s game-changing album, The Way of All Flesh, breaking down the original session, Mario Duplantier’s insane drumming, and how the source tones came together for such a powerful mix.

Products Mentioned

Timestamps

  • [3:29] How Machine Head got signed to Roadrunner
  • [4:26] First time in a real studio recording to 2″ tape
  • [6:17] Remixing Burn My Eyes and the challenges of analog recall
  • [8:23] The value of committing to decisions, even in Pro Tools
  • [11:23] Why you should always hire a drum tech
  • [15:20] How a Roland VS-1680 started his journey into production
  • [16:30] Taking a $10/hr engineering job to learn the craft
  • [20:16] Diving into film scoring with no experience
  • [24:32] Translating emotion into sound for film vs. metal
  • [28:52] Composing for the video game Metal Gear Rising
  • [30:38] The producer’s job as a “musical translator” for clients
  • [36:29] Why playing it safe is riskier than going balls out
  • [41:48] A cautionary tale: Getting a huge record deal and then getting dropped
  • [46:20] Why relationships are everything in the music business
  • [54:38] Breaking down his core guitar tone ingredients
  • [55:38] Why the Kemper is the most revolutionary piece of guitar gear
  • [58:13] The crucial difference between studio tones and live tones
  • [1:00:48] The eternal struggle of getting re-amps to sound right
  • [1:10:41] How he got the gig mixing Gojira’s The Way of All Flesh
  • [1:18:58] What makes Gojira’s drummer, Mario Duplantier, so good
  • [1:23:17] Technical details from the original Gojira mix session

Jordan Valeriote: Finished vs. Perfect, Debunking Mixing Myths, and Why the Kemper Wins

Jordan Valeriote is a producer and mixing engineer from Ontario who has worked with a ton of notable bands, including Intervals, Silverstein, Nick Johnston, Structures, and Counterparts. In addition to his extensive discography, he’s also a respected educator who runs Hardcore Music Studio, where he helps fellow producers and mixers level up their skills in the heavy music world.

In This Episode

Jordan Valeriote joins the podcast for a super practical chat about what it takes to succeed as a modern producer. He gets into the entrepreneurial mindset, sharing killer productivity tips on how to manage your time, avoid distractions like social media, and understand the “opportunity cost” of every decision you make. Jordan champions the idea that “finished is better than perfect,” arguing that mixing tons of different material is way more beneficial than getting stuck perfecting a single song. The guys also get into some serious myth-busting, tackling common “rules” like the -18dB gain staging debate and the idea of top-down mixing. This leads to a fascinating breakdown of the hosts’ unique workflow of keeping faders at zero in Cubase. They also dig into gear, covering Jordan’s go-to 5150 guitar chain and the session that finally convinced him a Kemper could beat a real amp.

Products Mentioned

Timestamps

  • [2:34] Why it’s better to be a “fast starter”
  • [5:09] The “finished is better than perfect” mindset for mixing
  • [6:32] Why you learn more by mixing 60 songs than by mixing one song for a month
  • [8:52] Why being “actionable” is the key to being a good teacher
  • [11:37] Understanding opportunity cost as a producer
  • [15:06] Eliminating distractions and finding your most productive hours
  • [16:25] How Facebook and push notifications kill your momentum
  • [22:23] Book recommendation: “The One Thing”
  • [23:08] The importance of taking time to reflect and plan
  • [25:46] The pros and cons of working from home vs. a separate studio
  • [31:13] Dispelling the myth of setting all tracks to -18dBFS
  • [33:16] Top-down mixing vs. processing individual tracks
  • [38:01] The hosts’ unique gain staging workflow in Cubase
  • [41:59] How fader resolution changes at different points on the fader
  • [46:47] Why word-of-mouth is more powerful than active marketing
  • [52:19] The key to tracking amazing guitarists like Aaron from Intervals
  • [57:37] Using the stock Pro Tools Lo-Fi plugin for snare saturation
  • [59:33] Using Soundtoys Decapitator for subtle saturation
  • [1:02:02] Jordan’s go-to guitar chain for the last five years
  • [1:05:39] The moment Jordan realized the Kemper could beat real amps

Analysis As a Learning Tool (Part 1)

Analysis As a Learning Tool (Part 1)

As audio engineers we’re always looking to improve our craft and take our mixes to the next level. Two of the key methods to speeding up this learning process are:

  • Understanding the subtleties of the gear we’re using.

         AND

  • Knowing how to perform accurate analysis and comparisons.

Here are some of the primary tools which you can use in order analyze and compare between sounds or gear, while possibly gaining further insight into the techniques of the pros in the process:

Spectrum Analyzers:

2-izotope-ozone-7

A spectrum analyzer is basically a utility tool which displays a graphic representation of the frequency content present within an audio signal at any given moment.

This type of visual aid can be an invaluable tool for quickly locating issues with certain frequencies, analyzing pre-processed tracks, or providing a solid point of reference in less than optimal listening circumstances.

NOTE: Although I’m a big spectrum analyzer user myself and often need some visual aid in order to fix certain problems quickly, it’s important not to rely too heavily on visuals while mixing, as this can become a problem in and of itself.

Remember: EARS BEFORE EYES!

A prime example of a successful engineer who uses spectrum analyzers effectively and creatively in their recording and mixing process is Nolly from Periphery:

Adam “Nolly” Getgood – Drum Samples Analysis:

nolly-drum-setup

I’m a huge fan of Nolly’s productions, but more specifically, his drum sounds. Achieving clear, punchy, dynamic and natural sounding drums in a dense progressive metal mix without the use of sample replacement is no easy feat, yet Nolly seems to pull it off every time.

NOTE: Check out the new Devin Townsend Project album “Transcendence” for an example of Nolly’s amazing drum production skills.

How does he do It?

One of the clear reasons behind Nolly’s awesome drum mixing talent, is the fact that despite not being a drummer himself, he obviously has a great fundamental understanding of how drums and drummers work. I’d be willing to bet that this understanding of drums is partly owed to the large amount of time he’s spent analyzing various famous drum sounds, and the effort he’s put into attempting to replicate them in his own mixes.

How do I know this?

At some point last year I watched the Periphery CreativeLive course, which offered some great insight into Nolly’s drum mixing techniques (I’d highly recommend purchasing the course, as I learnt a lot from watching it).

One of the things he mentioned which really caught my attention, was how he had spent time analyzing a bunch of his favorite processed kick drum samples in a spectrum analyzer, and noticed that they had certain characteristic similarities between them.

One of the characteristics he mentioned in particular, was how the fundamental low and high-end information in each of these processed samples appeared to peak around the same level on the graph. At the time of hearing this I was intrigued, so I decided to test out his theory for myself using various professionally processed samples I’ve collected throughout the years.

Here are some of the results of my tests:

NOTE: Each kick sample in these examples was processed by a different A-List Mixing Engineer.

1st Famous Metal Engineer Kick:

machine-headrichardson-kick-eq

2nd Famous Metal Engineer Kick:

5-gojirarichardson-kick-eq

3rd Famous Metal Engineer Kick:

ffdpchurko-kick-eq

4 – And finally, here’s what one of the kick samples from Andy Sneap’s Metal Machine EzDrummer pack looks like on the same graph:

metal-machinesneap-kick-eq

A Few Key Observations Based on the Examples Above:

kick-comparison-collage

  • Notice how the fundamental low and upper mid-range bumps in all of the kick drums shown above are peaking around the same volume within each sample, despite the fact that they were each mixed by a different engineer…
  • Another obvious thing which these samples have in common are the various scoops in the mids.

Just to give you some extra perspective, here’s what a professionally recorded and completely unprocessed kick drum looks like on a spectrum analyzer:

Unprocessed Kick Sample:

good-tigernolly-raw-kick-eq

Some Observations On The Unprocessed Kick Sample Compared to one of the A-List Engineer Processed Samples:

unprocessed-kick-vs-processed-kick

  • Notice how the low-end of the unprocessed kick is quite broad and undefined, while the low-end in the processed sample is more focused and tight.
  • Notice the 8-10dB (ish) difference in volume between the low-end bump around 80Hz and upper mid-range slap/click of the kick between 3-8kHz in the unprocessed sample, but how the equivalent areas are both peaking around the zero mark in the processed sample.
  • Notice the large mid frequency peaks between 400-900Hz in the unprocessed sample, but how the mid range in the processed sample is a lot smoother throughout the same range.
  • Notice the difference in level between the sub low-end content in each kick and how some filtering or reduction has probably been applied to the subs in the processed sample.
  • Notice how 10kHz+ high-end content of the unprocessed kick is much lower in volume than that of the processed kick, indicating that a high-shelf was probably used to give it a lift.
Drum Sample Analysis Conclusion:

As you can see from the list of observations above, we’ve managed to pinpoint some of the key areas of kick drum processing which we might want to pay attention to, with nothing more than a simple spectrum analysis comparison.

FINAL NOTE: This doesn’t mean that you should stop using your ears and start mixing by sight in a “paint by numbers” fashion, as every kick drum is different and it most likely won’t work out very well.

Hopefully this brief demonstration has given you a new appreciation of the spectrum analyzer, and given you some ideas into how you can use it as a learning tool.

FINAL WORDS:

This concludes  Part 1 of my  Analysis As a Learning Tool ” series of Blogs. I hope that this article has given you some new ideas to try out during your next project. Be sure to let me know in the comment section below if any of this information has helped you out, or if you have any further questions regarding anything I’ve talked about here.

Stay tuned for Part 2 of “Analysis As a Learning Tool” and more production/mixing related articles in the not-so-distant future!


Want mix tips from URM Academy? Read them here!

Nail The MixNail The Mix is our online mixing school that gives you REAL multi-tracks from REAL bands, plus a mixing class from the producer who recorded it. Past guests include Periphery, Chelsea Grin, Machine Head and State Champs. Join now for instant access!