Finn McKenty, Author at Unstoppable Recording Machine - Page 33 of 51

JOEL WANASEK: The #NoSmallTime Mindset, Getting Hired in Music, and Weed vs. Productivity

Producer, mixer, and songwriter Joel Wanasek has worked with a ton of heavy bands including Machine Head, Blessthefall, Attila, and Memphis May Fire. He’s also the founder of URM Academy and the creator of the popular Speed Mixing course, helping other producers level up their workflow and career.

In This Episode

This episode is a solo session with Joel dropping some serious truth bombs in a “Dear Joel” Q&A format. He kicks things off with a fiery rant on how to actually stand out and get ahead in this business, using a killer analogy from his old-school Quake days to illustrate the power of initiative, follow-through, and brutal execution. Joel then dives into listener questions, defining his “no small time” philosophy by calling out common career-killing behaviors like self-delusion and having a know-it-all attitude. He also tackles how to navigate tricky business partnerships, gives advice for producers starting later in life, and offers a very direct opinion on weed’s impact on your work ethic. He wraps up with some practical tips on mixing backing vocals and the economic realities of starting multiple businesses. If you need a kick in the ass to get motivated, this is it.

Timestamps

  • [0:02:33] Why you need to take initiative to get hired
  • [0:03:28] The magic question to ask: “How can I help you?”
  • [0:05:59] Why follow-through is more important than just talk
  • [0:07:05] Anticipating the needs of your boss or mentor
  • [0:07:30] An analogy for success from the video game Quake
  • [0:13:42] Why most interns fail to live up to the hype
  • [0:15:55] A story about mixing 33 songs in two weeks
  • [0:19:15] What does the “#NoSmallTime” mindset actually mean?
  • [0:21:08] The biggest “small time” behavior: Self-delusion
  • [0:22:41] The “local band mentality” and why it holds people back
  • [0:28:00] The importance of fanatical commitment and discipline
  • [0:31:08] Why one failed project won’t ruin your career
  • [0:32:25] Why a “know-it-all” attitude is cancer for success
  • [0:35:50] How to tell your studio partners their business name sucks
  • [0:40:11] Advice for starting a production career in your late 30s
  • [0:45:25] How to stay motivated when you don’t feel like working
  • [0:46:20] Joel’s controversial take on weed and productivity
  • [0:58:31] Technical advice for mixing backing vocals so they sound “glued”
  • [1:01:43] Advice for a 16-year-old on starting multiple businesses
  • [1:04:20] Understanding the opportunity cost of your time

Visualising Compression

Introduction:

Without a doubt, the studio tool which people seem to have the most trouble getting their heads around when first starting out is Compression.

The most common reason for this, in my opinion, is the fact that the whole concept is often taught poorly/in the wrong way to begin with!

In this week’s URM Blog, rather than rambling on in vain about some abstract terms that most beginners don’t understand in the first place (as most tutors in “good” audio schools seem to do…), I’ll attempt to show you exactly how a compressor is affecting a signal via some easy-to-comprehend visual examples.

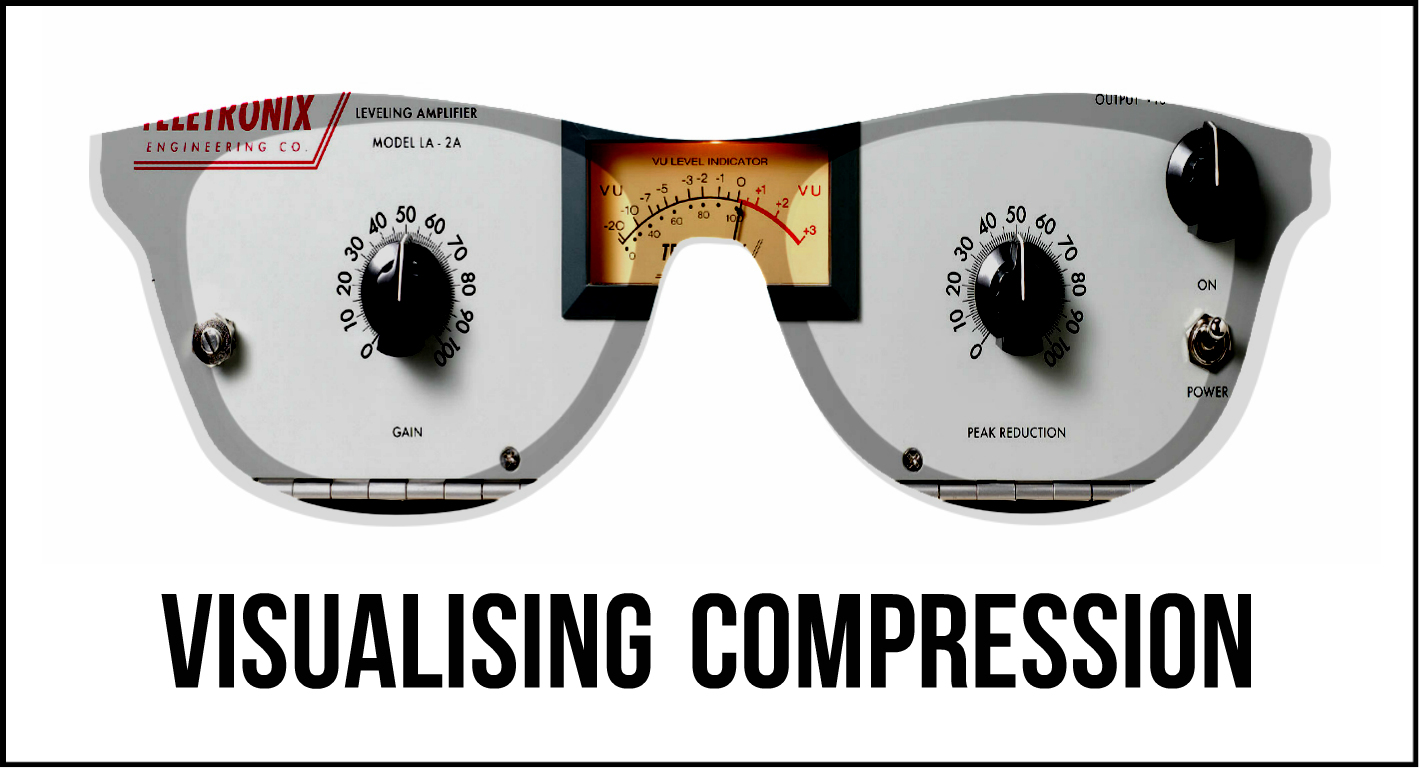
VISUALISING COMPRESSION
1 Visualising Compression

Before we dive in head first, it’s important that you have a general working understanding of the terminology, and what we’re trying to achieve with the use of compression in the first place:

Compression, In Basic Terms…

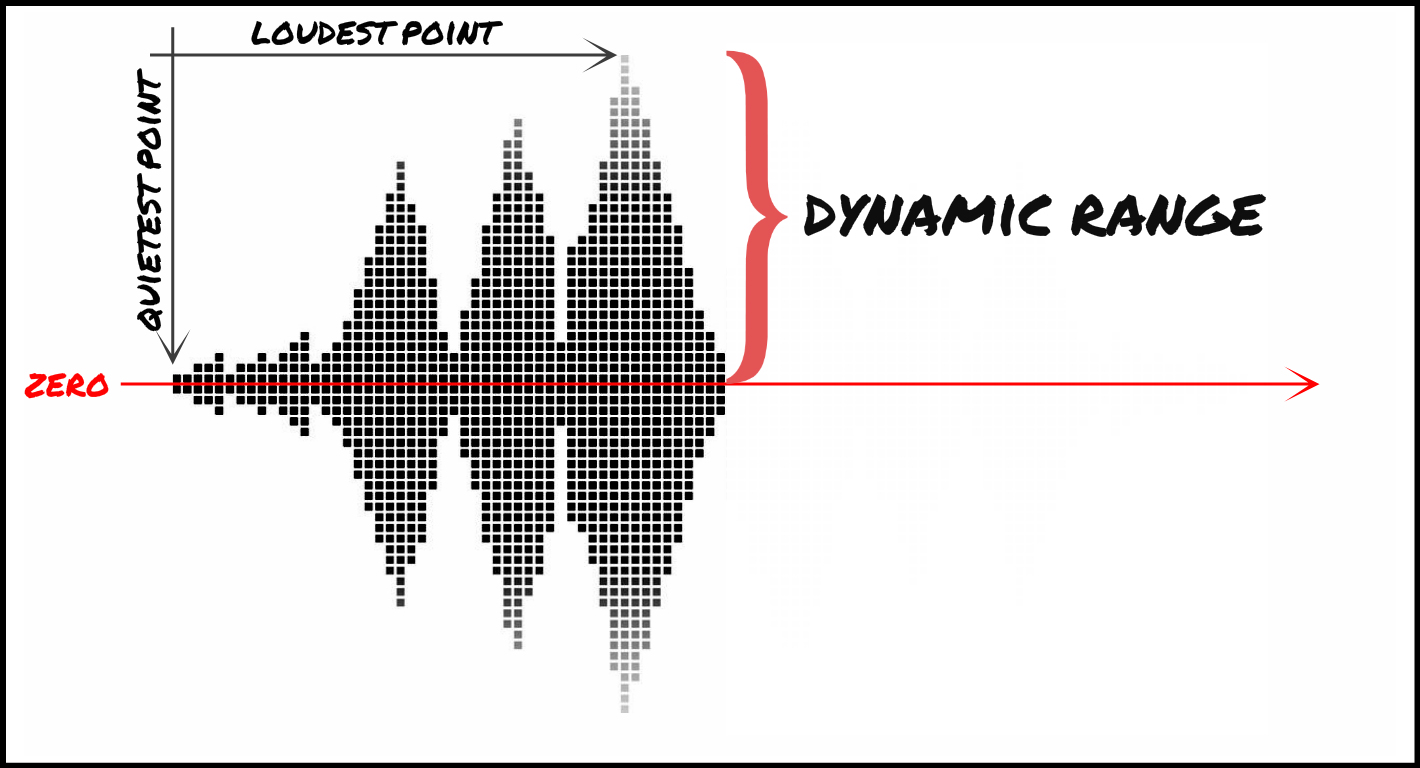
At it’s core, “compression” does exactly what it says on the tin when talked about in the context of audio: It reduces the distance between the quietest and loudest parts (the dynamic range) of an audio signal, resulting in a more consistent overall volume.
2 Dynamic Range

Beyond this primary functionality, the various controls which are available on a given compressor’s user interface simply allow us to shape how said “reduction” takes place (to a certain extent):

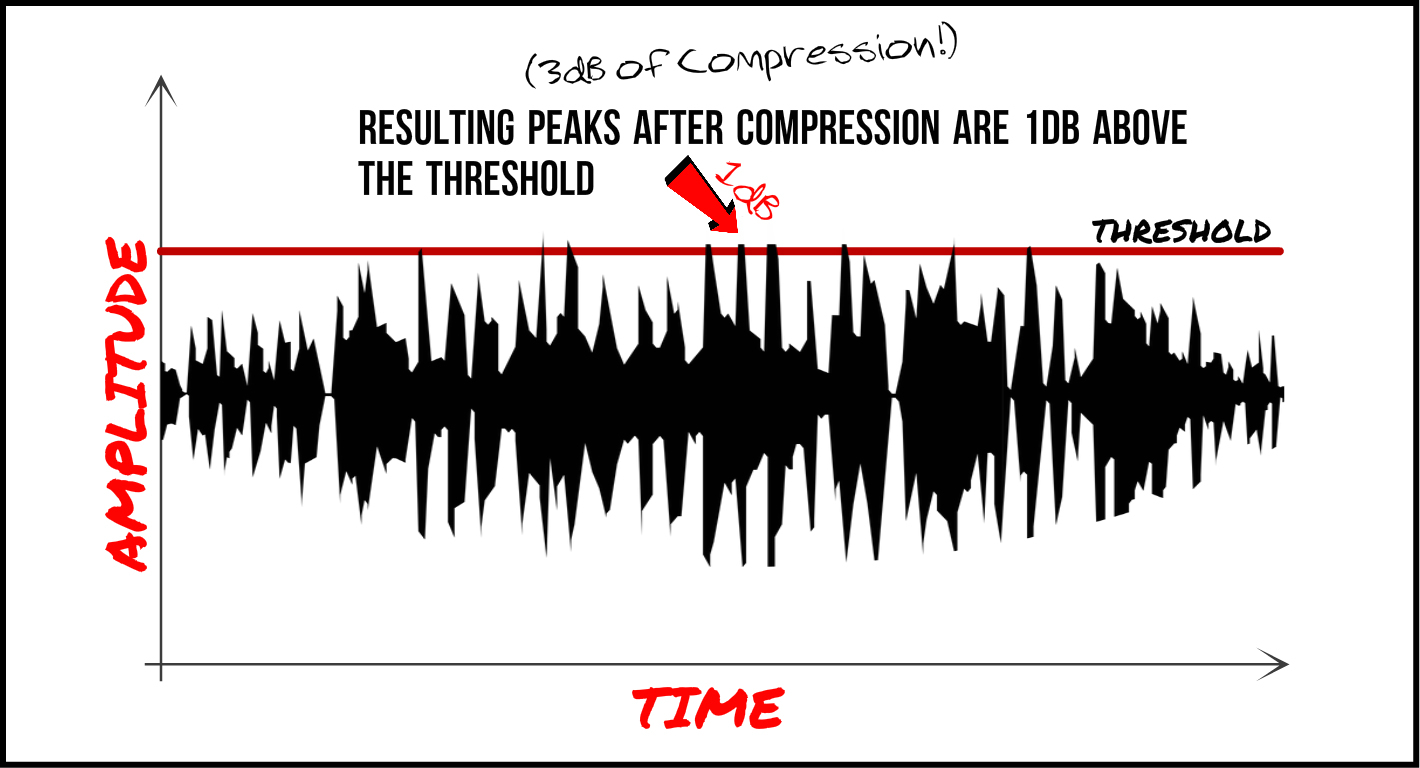
Threshold/Input: The minimum level at which compression/gain reduction starts to occur. (The crimson line in the graphics below)

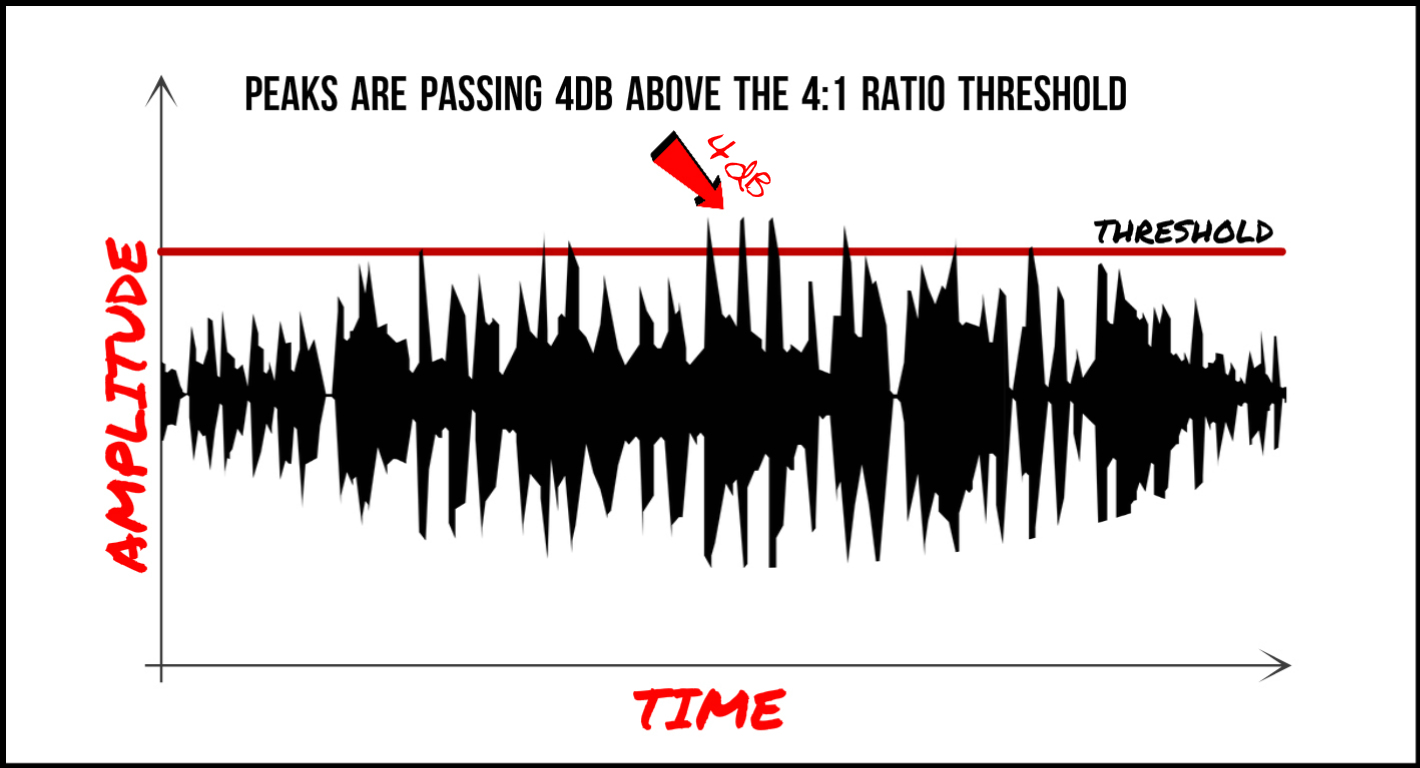
Ratio: The severity of the compression that’s being applied to the signal. Ex. A 4:1 ratio means that for every 4dB of level that goes above the threshold, only 1dB of audio will be allowed through (3dB of compression will occur).

4:1 Ratio – BEFORE COMPRESSION
3 Ratio - Before

4:1 Ratio – AFTER COMPRESSION

4 Ratio - After


Attack:
How long it takes for the compressor to “catch up” to the audio signal which has gone above the threshold / How long the compressor waits before clamping down.
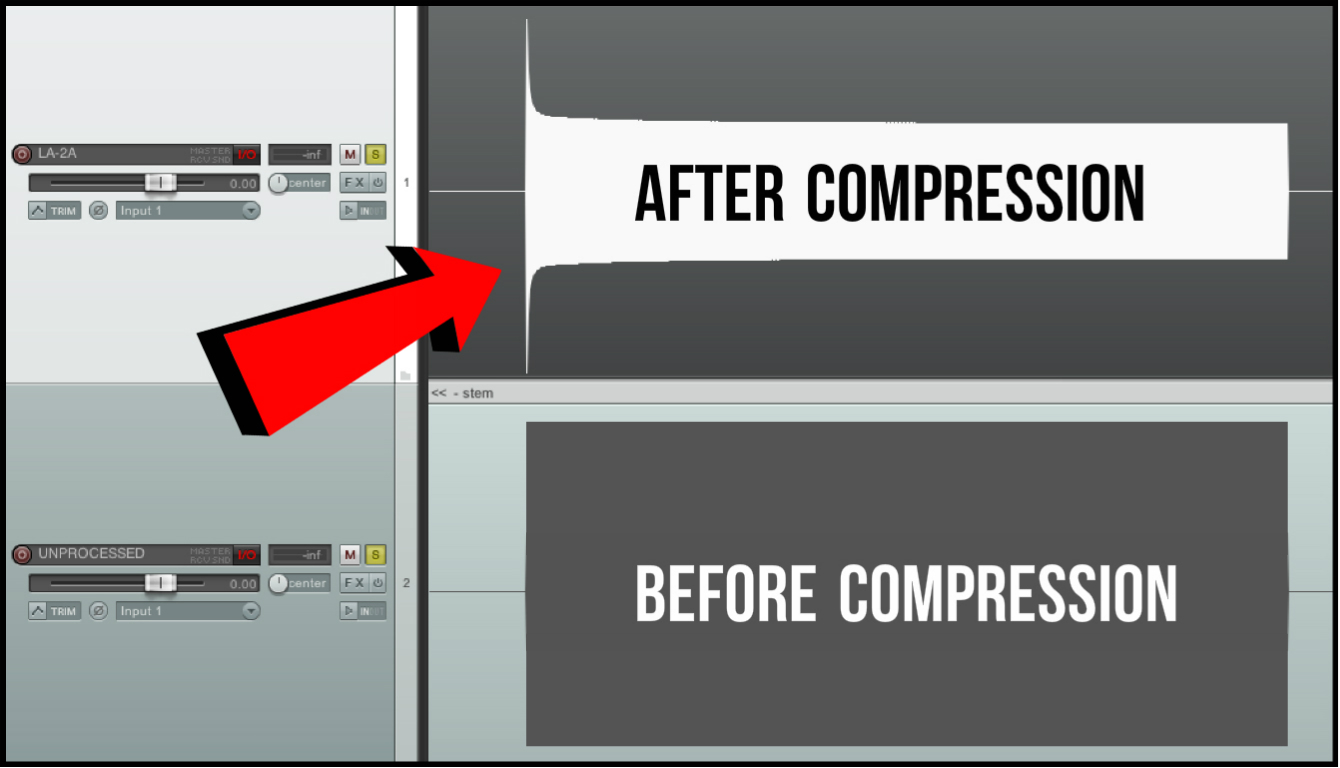
5 Attack

Image: The resulting peak from a 1kHz sine-wave being compressed by 10dB through a Waves CLA-2A Compressor (The 2A has an average attack time of 10ms)


Release: How long it takes for the compressor to “let go” of the compressed audio signal after it’s gone back below the threshold / How long the compressor waits before returning the signal to its’ uncompressed state.
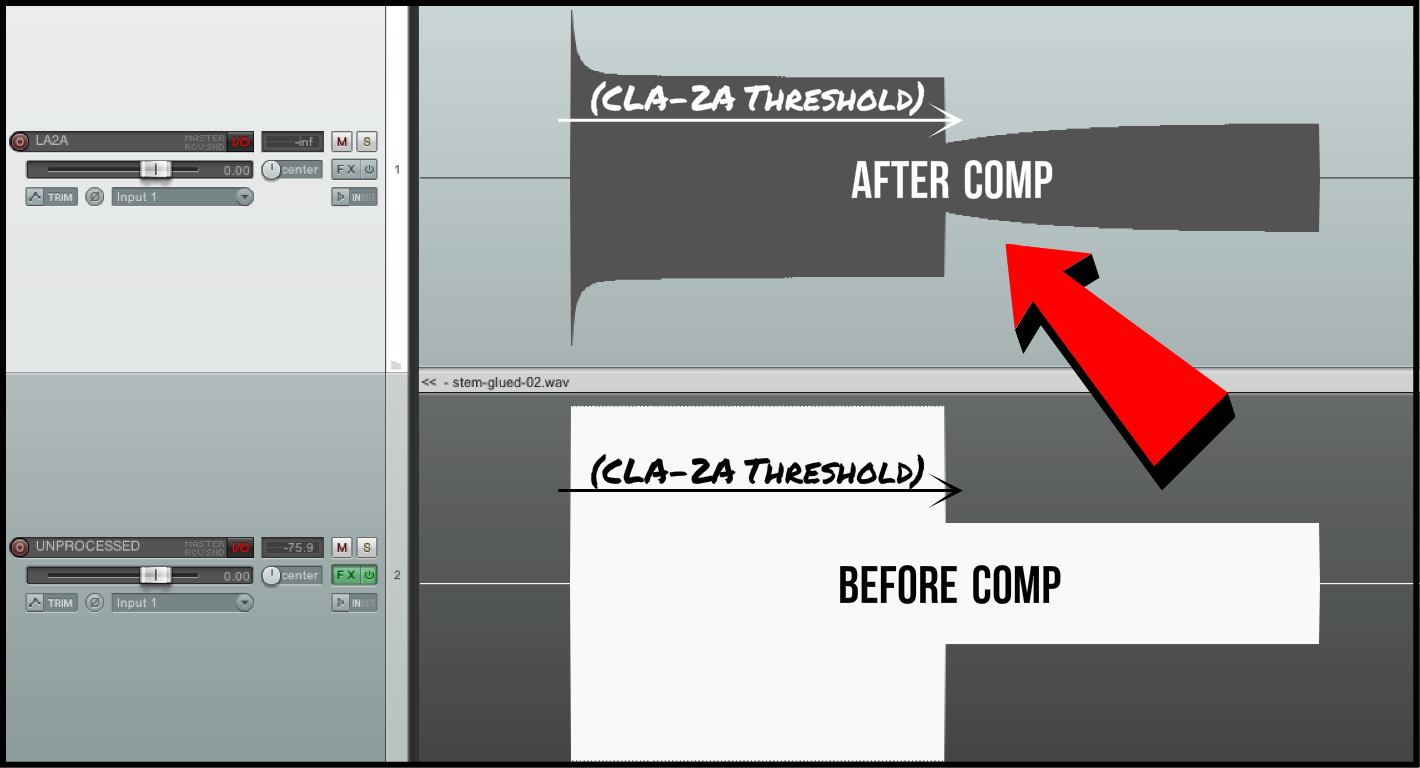
6 Release

Image: The resulting release curve from a 1kHz sine-wave being compressed by 5dB and then suddenly dropped below the compressor threshold, triggering the release.


Makeup Gain/Output: This is a volume knob for turning your overall signal back up after compression. That simple!

NOTE: Most compressors just have a regular-old output/volume knob for matching your input and output levels by ear, but some of them come with fancy “auto make-up gain” controls which attempt to do the job for you. Either way, they’re both serving the same basic purpose.

Practical Compression

Once you’re past the initial “understanding what the heck this thing does” phase, you’ll eventually learn to ignore the numbers and come up with intuitive ways of utilising compressors in a much more practical “problem solving” manner.

Here are a few practical compression examples off the top of my head:

Gentle Limiting For Transient Reduction: Come across a piano which sounds particularly tacky or brittle on the front-end? Use a limiter with a super fast attack/release to chop off those annoying transients without altering the overall dynamics of the instrument!

Tacky Keys – Before Waves’ L1 Limiting
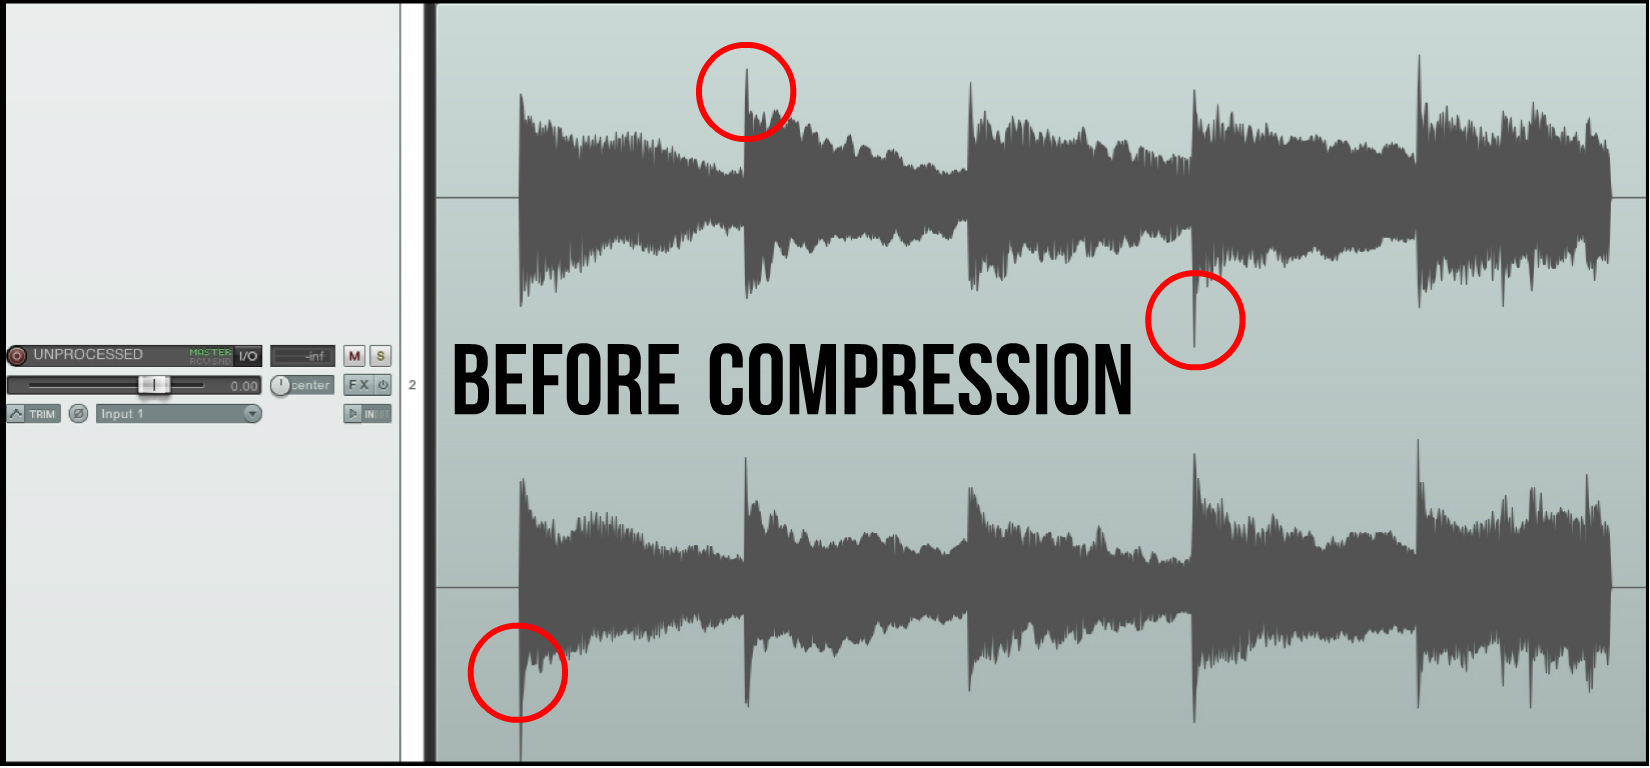
7 Tacky Keys - Before

IMAGE: Notice the sharp attack transients at the beginning of each audio blob.


Tacky Keys – Rendered With 6dB of Waves’ L1 Limiting
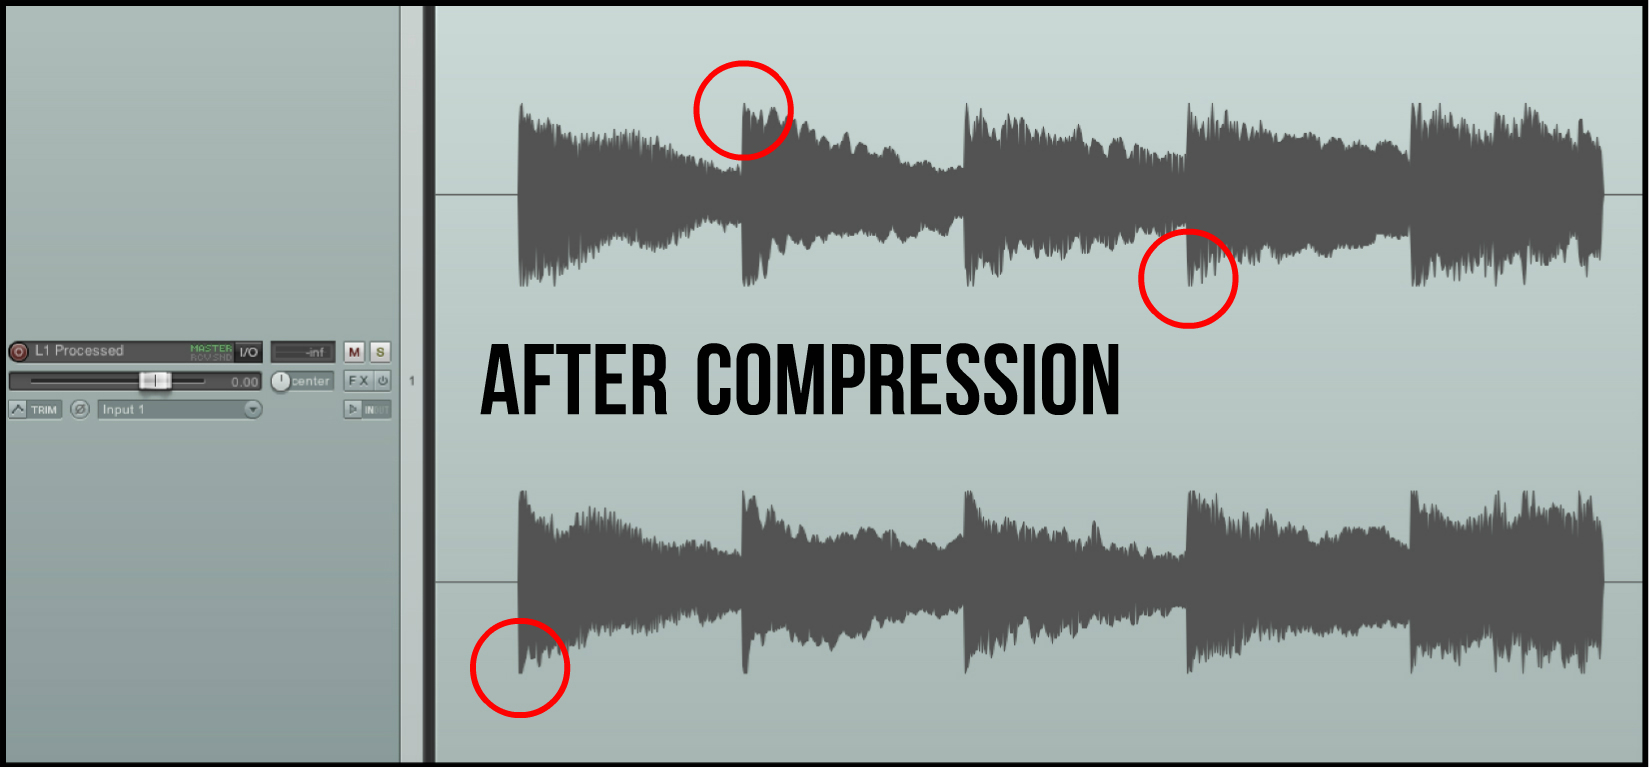
8 Tacky Keys - After

IMAGE: Notice how the transients have been smoothed out by the limiter, while the rest of the audio remains untouched.


Quick Release For Extra Room Ambience: Looking to thicken up your drum room tracks and give them some nice depth and “washiness”? Try using some fast attack / fast release 1176-style compression to reduce the initial drum hits in the mics and bring up the level of the room sustain.

Fast Attack / Fast Release 1176 Style Compression On A Kick Drum
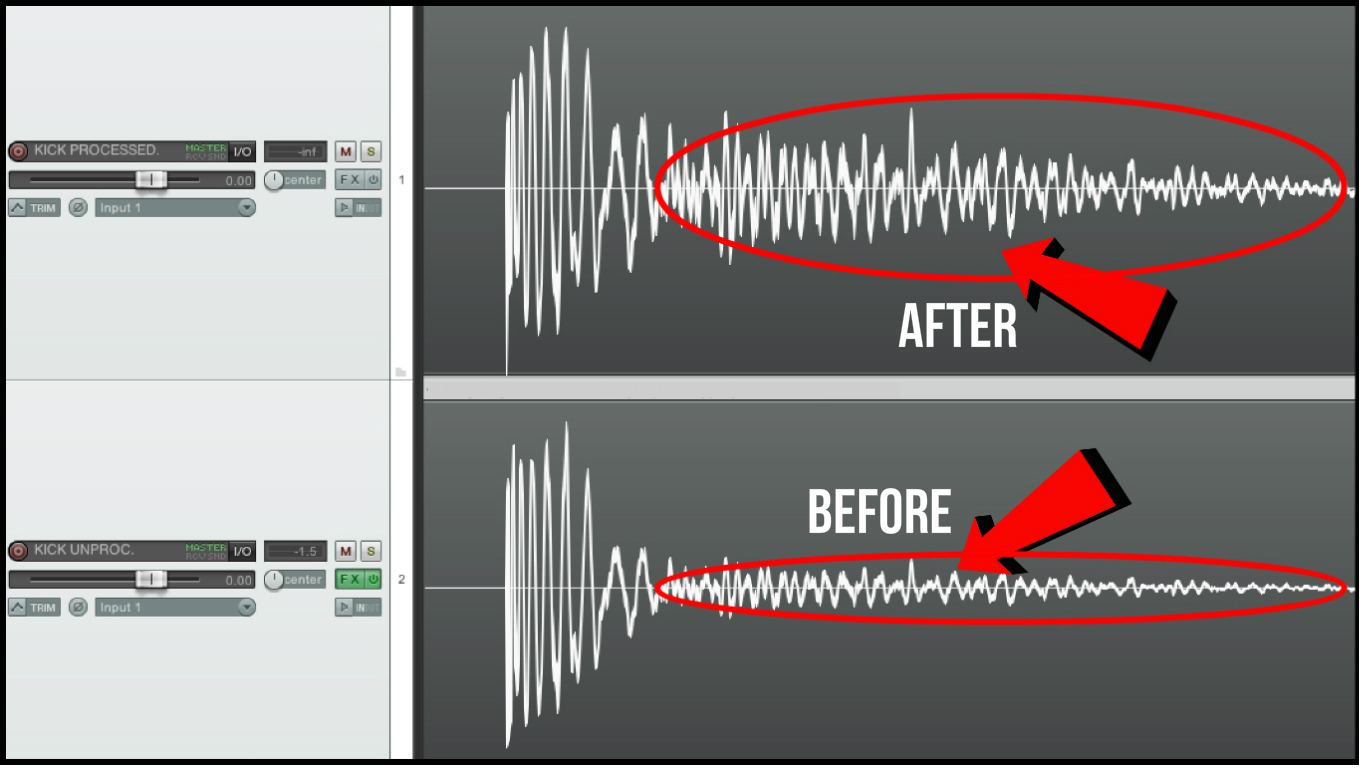
9 Kick Ambience

IMAGE: This kick drum was compressed by 10dB with an 1176 style compressor set to a fast attack/release. Notice how the direct “shell sustain” portion of the kick is still around the same overall volume (with a reduced attack transient due to the fast-attack compression), while the ambience/room sound/reverb of the kick that was below the compressor’s threshold is greatly increased in volume after the make-up gain was applied.


NOTE: In cases where there isn’t much room sound in the signal to begin with (Ex. A vocal which was recorded in a great isolation booth), using a quick release will really help towards bringing up the the volume of the intimate details in the signal (such as mouth noises & consonants) and really help level-out the performance. On the flipside, ”fast-release compressing” a vocal track which has a lot of bad room resonance baked into the sound will most likely accentuate the problem, making it even worse.

Slow Attack / Fast Release For “In Your Face” Punch: Using a slower attack setting allows for the initial “attack” transient of a sound to pass through the compressor untouched, resulting in an increased sense of aggression and impact when the processed signal is volume-matched to the uncompressed signal using the makeup-gain control.

Smack Attack – Slow Attack SSL Compression On A Snare
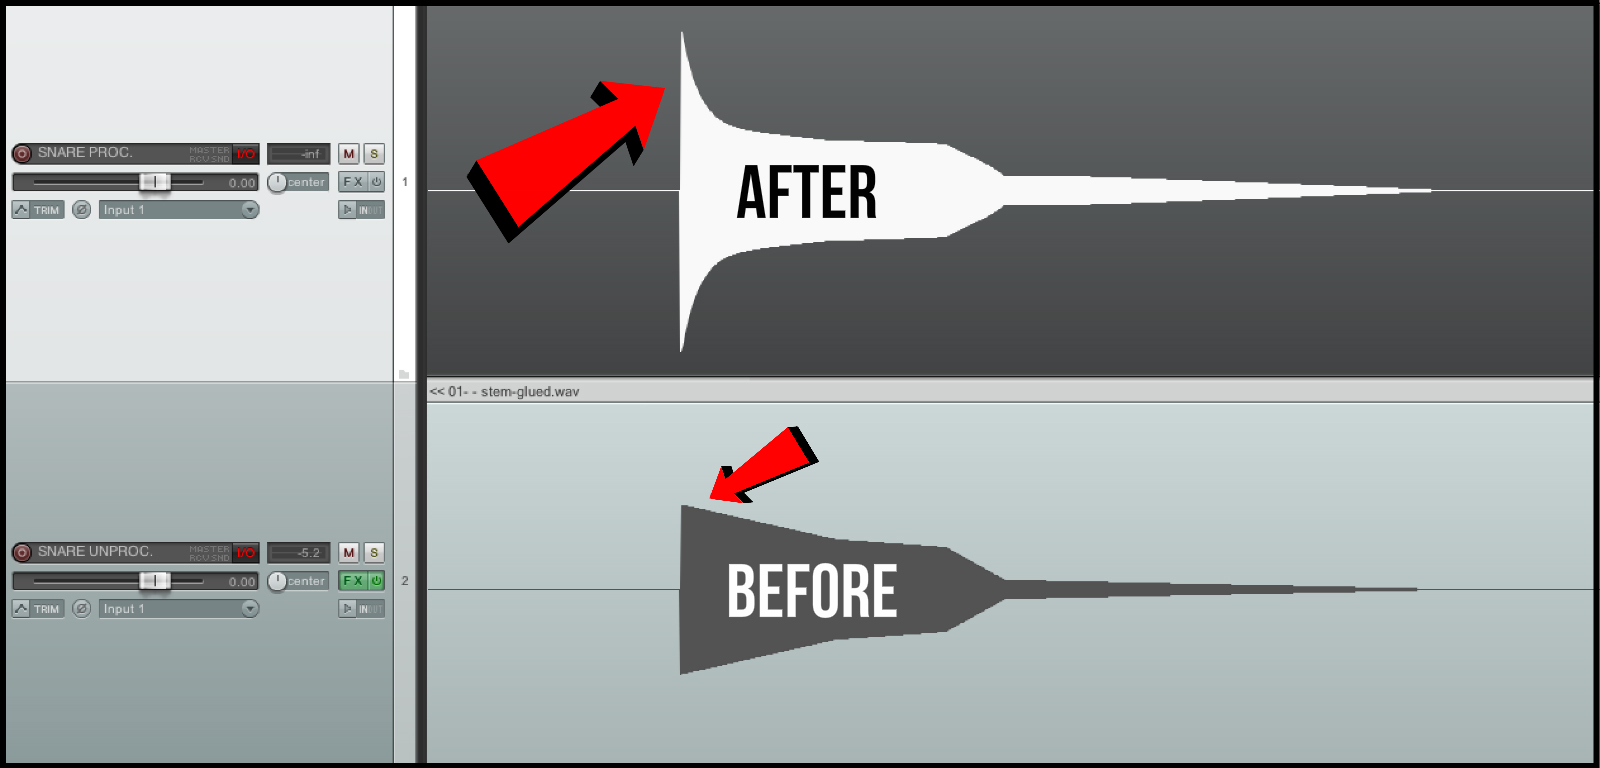
10 Smack Attack

Image: On the slow-attack setting, the SSL E-Channel compressor waits for around 30ms before acting on my fake sine-wave snare, resulting in a giant transient “click” when compressed by 6dB and volume matched to the unprocessed signal.


Limiting To Even-Out Sustained Instruments: Heavily sustained instruments such as pads, synths, keys, ambient swells and sub-basses don’t have much to offer in the area of transients, and are often very gradual in the way they rise & fall in volume. These inherent characteristics make them excellent candidates for limiting, as there won’t be any sudden jumps in volume to mess with the attack/release cycle of the compressor, or cause any annoying “fast release” distortion artifacts.

L1 To Oblivion – Evening Out A Highly Dynamic Signal
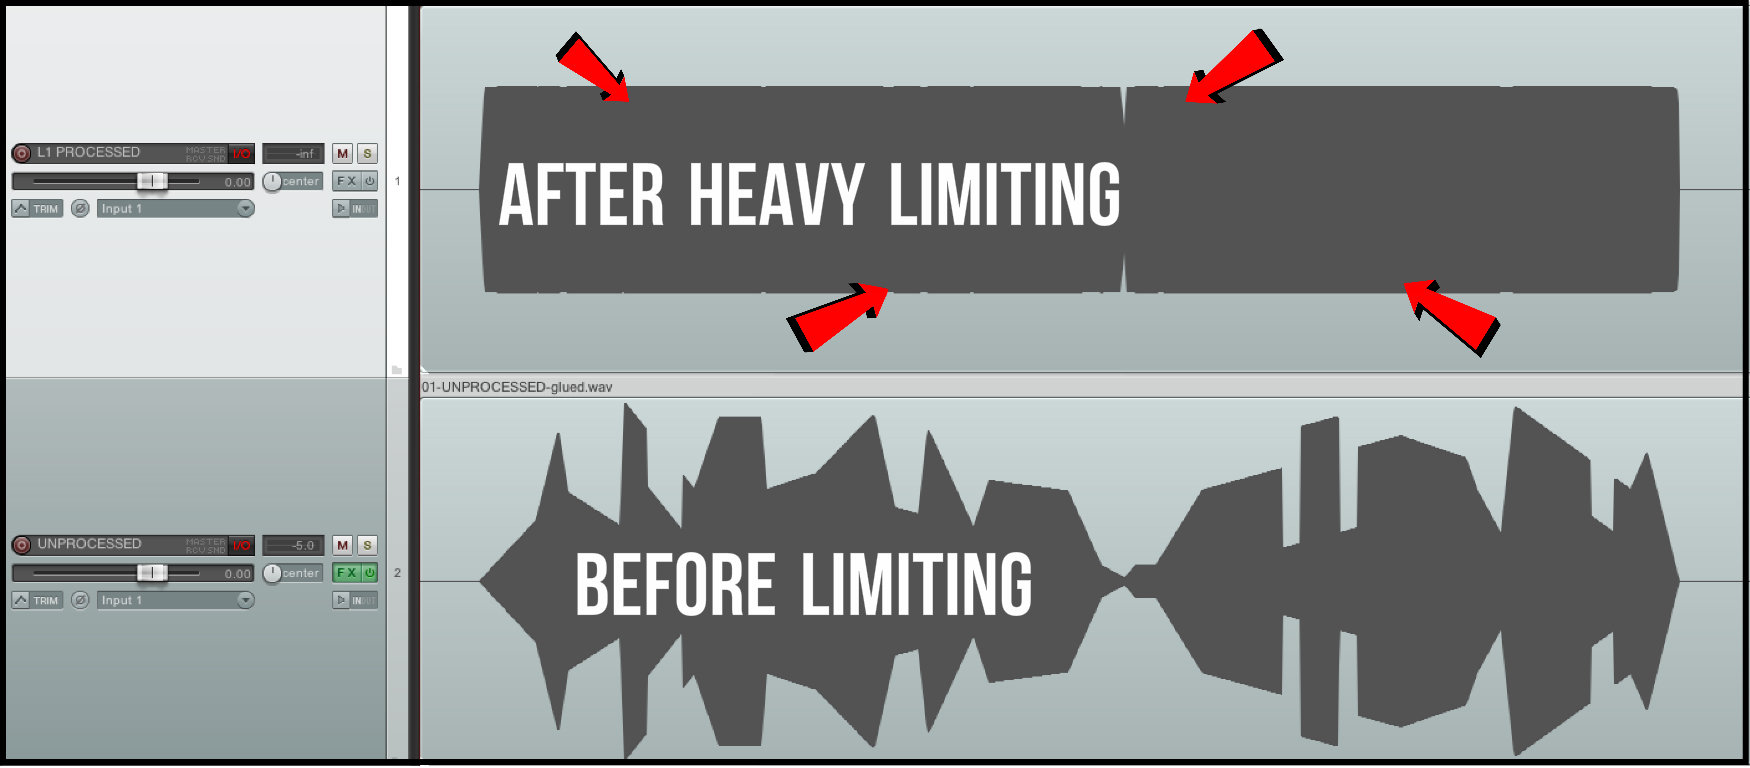
11 L1 Obliteration

IMAGE: In this drastic example I’ve put together to prove my point, notice how the super-dynamic and random signal I’ve generated via volume automation gets completely obliterated or “dynamically flatlined” by the heavy-handed “brickwall” limiting of the Waves’ L1 limiter & some make-up gain.


NOTE: There are obviously a lot of additional scenarios and examples I could give to further demonstrate the way compression applies to audio, but I think you get the point by now…

CONCLUSION:

Compression is awesome… And not nearly as daunting as you’d originally think once you buckle-down and really get a practical grasp of it!

Similar to what I talked about in my Are You Overthinking EQ?” URM Blog from last week, the best piece of final advice I can possibly give you in regards to learning compression is to stop worrying about the numbers.

Remember, everything is source dependant, so stop trying to blindly copy other people’s compression settings and simply get on with using your own ears to determine the right course of action!

Final Words:

This concludes “Visualising Compression.” I hope that this article has given you some new ideas to try out during your next project. Be sure to comment below if any of this information has helped you out, or if you have any questions.

Stay tuned for more production/mixing related articles in the not-so-distant future!


Want mix tips from URM Academy? Read them here!

Nail The MixNail The Mix is our online mixing school that gives you REAL multi-tracks from REAL bands, plus a mixing class from the producer who recorded it. Past guests include Periphery, Chelsea Grin, Machine Head and State Champs. Join now for instant access!


Richard Chycki: Mixing Rush, John Petrucci’s “Chocolate Cake” Tone, and Gaining an Artist’s Trust

Richard Chycki is a producer and engineer who has worked on a massive list of acclaimed records across rock and metal. His impressive discography includes work with Rush on albums like Snakes & Arrows and Clockwork Angels, as well as projects with Dream Theater, Aerosmith, Def Leppard, Alice Cooper, and Mick Jagger.

In This Episode

Richard Chycki joins the podcast for a super chill but insightful chat about what it’s like to work with some of the most respected musicians on the planet. He gets into the practical side of being a traveling engineer, from acclimating to new studios to his preferred monitors. Richard shares his philosophy on gaining an artist’s trust quickly and explains how being prepared is the ultimate key to handling big personalities. He also breaks down the art of being a “musical translator,” recounting the story of how he dialed in John Petrucci’s famous “chocolate cake” guitar tone. He offers a ton of perspective on what separates the pros from the rest, discussing the importance of “the hang,” and sharing his approach to mixing legendary artists like Rush—including why you’ll never find a sample on a Neil Peart drum track. It’s a masterclass in psychology, preparation, and respecting the artist’s vision.

Products Mentioned

Timestamps

  • [2:15] How Richard acclimates to a new studio environment
  • [4:09] The monitors he’s considering for his next setup
  • [7:36] The story of how working with Jeff Healy led to engineering for Aerosmith
  • [9:26] The rarity of spending 10-11 months on a single album
  • [11:07] The symbiotic relationship of working with top-tier players
  • [13:51] Why you need to speak the artist’s language, even if you can’t play like them
  • [17:17] Translating John Petrucci’s request for a “chocolate cake” guitar tone
  • [19:30] Using prototypes of the Mesa/Boogie JP-2C on Dream Theater’s “The Astonishing”
  • [22:09] The common trait of all great musicians: They aren’t chasing success
  • [27:46] How to deal with larger-than-life personalities in the studio
  • [31:32] Why being prepared is the fastest way to win an artist’s trust
  • [35:31] Using mix templates vs. starting from scratch
  • [37:53] Why he mixes drums from an audience perspective
  • [41:10] Preserving Rush’s legacy and why he never uses samples on Neil Peart’s drums
  • [48:59] How he broke into the industry without going to a recording school
  • [52:24] The importance of “the hang” and why your people skills matter
  • [54:30] The approach to mixing Mike Mangini’s complex and dense drum parts

Overheads: your misunderstood friend

Looking for more presence, punch and depth in your drums?

Many of us (including me when I was starting out) don’t really appreciate the nuances and power of overheads. All too often you see mixers just high pass them and call it a day! *horrified face emoji*

But the truth is that while they aren’t as straightforward as close mics or shells, they’re oftentimes the key to giving your drums the kind of size, presence and depth that makes the difference between good and great – so don’t let yourself get away with half-assing them!

Take your drums from good to GREAT [w/ Henrik Udd + Architects]

Overheads can be a tricky beast – it’s not as simple as HPF + forget! Henrik Udd brings out the overhead magic in Architects’ “Gone With The Wind.” Want this session and the full mixing class?

As one example, check out this clip from Henrik Udd’s Nail The Mix session featuring “Gone With The Wind” by Architects – he spends quite a bit of time painstakingly notching out these overheads, and while the dummies in the YouTube comments think it’s “just basic subtractive EQ,” this is the kind of attention to detail and patience it takes to really get the most out of your drums (or anything else in your mix). If it’s so basic, why don’t your drums sound this good? 🙂

Challenge yourself to really listen to the overheads and ask yourself if you’re getting everything you possibly can out of them before reaching for reverbs or samples!


Nail The MixNail The Mix is our online mixing school that gives you REAL multi-tracks from REAL bands, plus a mixing class from the producer who recorded it. Past guests include Periphery, Gojira, Meshuggah, Machine Head, A Day To Remember and State Champs. Join now for instant access!

TREVOR STRNAD: Overcoming rejection, relentless work ethic, and building a fan community

Trevor Strnad was the vocalist and a founding member of The Black Dahlia Murder, one of the most successful and enduring bands in modern melodic death metal. Known for his versatile range, blending high-pitched shrieks and guttural lows, he fronted the band on all nine of their studio albums, including fan-favorites like Nocturnal, Ritual, and Abysmal. He was also a passionate champion of the underground metal scene, frequently using his platform to promote up-and-coming artists.

In This Episode

Trevor Strnad of The Black Dahlia Murder hangs out to share the inside story of the band’s journey from underdog hardcore kids to death metal titans. He gets into the importance of having a killer work ethic, maintaining high standards, and fostering a positive band dynamic—especially when you’re crammed in a van for months on end. Trevor shares the nitty-gritty of getting signed back in the day, from dealing with 28 rejection letters to finally landing a deal with Metal Blade Records, proving that persistence is everything. He also drops some serious wisdom learned from early tours, including how getting schooled by The Red Chord changed their entire approach to playing live and why it’s crucial to be professional and respectful on the road. For anyone working with developing bands, this episode is a masterclass in what it actually takes to build a lasting career, straight from a guy who lived it.

Timestamps

  • [00:02:55] How Trevor uses his column on Metal Injection to champion underground bands
  • [00:07:15] Dealing with being mislabeled as a metalcore band early on
  • [00:09:21] The importance of having an authentic, fun image
  • [00:13:27] The band’s intense work ethic and high musical standards
  • [00:14:31] Their rigorous vetting process for new members and splitting everything five ways
  • [00:15:30] How negative attitudes can drain a band’s soul on tour
  • [00:25:14] The band’s non-stop, two-year album cycle
  • [00:30:29] Trevor’s advice for young musicians trying to get signed
  • [00:32:01] Using mp3.com to get noticed before MySpace existed
  • [00:37:40] Where the band found the confidence to push through constant rejection
  • [00:44:46] The inspiration found in Henry Rollins’ book “Get In The Van”
  • [00:49:10] Why Trevor quit guitar after seeing how good his bandmates were
  • [01:10:08] Learning the touring ropes from bands like Goatwhore
  • [01:11:54] How seeing The Red Chord live inspired a band meeting that changed everything
  • [01:22:24] Learning professionalism by observing unprofessional bands
  • [01:25:42] Clueless mistakes made on early tours with As I Lay Dying and Every Time I Die
  • [01:31:48] The reality of having no stage room as an opening act
  • [01:35:23] The story of “The Blast Fiends” and how they built a powerful fan community