We’ve all been there: the band said they’d pay you weeks ago, you’ve followed up a million times, and still no money. And worse, you already gave them the final mixes so you have no cards left to play… Or you sent the label an invoice, they keep telling you the check is in the mail, but it never shows up… The rent is due and your frustration is building– what do you do??
Unfortunately, this is a fact of life in our industry. You don’t have to like it (who does?), but you DO need to learn how to handle it the right way – because musicians and people in this industry are flaky and disorganized, and these situations are going to come up many times in the course of your career.
The key is PATIENCE and PERSISTENCE – yes, you need to get your money, but sending that “eff you” email is NOT going to help. It won’t get you paid any faster; it will just ruin your relationships and earn you a reputation as a hothead (which is a great way to get shut out of the industry). Understand that they almost certainly aren’t trying to screw you, they’re just disorganized, busy, and/or forgetful – so you need to have a set of tactics for nudging them until they pay you, without being a pushy dickhead.
In this episode of The Career Builder Show, Eyal Levi gives you the do’s, don’ts and some important lessons about how to get your money without burning bridges!
Nail The Mix is our online mixing school that gives you REAL multi-tracks from REAL bands, plus a mixing class from the producer who recorded it. Past guests include Periphery, Gojira, Meshuggah, Machine Head, A Day To Remember and Bring Me The Horizon. Join now for instant access!
From his studio in London, Dan Lancaster has become a go-to producer and mixer for some of modern rock’s biggest acts. His impressive discography includes work with bands like Bring Me The Horizon on their pivotal album That’s The Spirit, as well as massive records for Blink-182, Good Charlotte, Don Broco, and Lower Than Atlantis. Known for crafting polished and powerful records, Dan seamlessly moves between production, songwriting, mixing, and even his own artistry, making him one of the most versatile figures in the scene.
In This Episode
Dan Lancaster gets real about his unconventional journey, from actively *not* wanting to be a producer to becoming one of the top names in the game. He talks about the grind of teaching himself through trial and error before YouTube tutorials were a thing, and how his strategy of treating every single project with the same level of dedication was the key to getting noticed. Dan breaks down the pivotal moment when mixing for Bring Me The Horizon changed everything, leading to calls from producers like John Feldmann to work on records for Blink-182. He also shares a wild story about mixing a crucial BMTH track entirely on consumer headphones, his philosophy on balancing intense focus with necessary breaks, and his approach to getting massive guitar tones. This is a super insightful look into the mindset, hustle, and career trajectory of a world-class producer.
It’s a big decision that we all have to make as we level up our audio careers: work out of a home studio, or “graduate” to building/renting a commercial space.
And the truth is, there’s no right or wrong answer– both options have their pros and cons, and it really just comes down to what’s right for you. Going to a commercial space could be that boost you’re looking for, OR it could completely destroy your life… so think it through carefully!
Run your studio out of your house, or take the plunge and rent a space?? The truth is that there’s no right or wrong answer here – it’s just about what’s right for YOU. Joey Sturgis explains the pros and cons of each!
Starting to get nervous? Don’t worry homie, we’ve got you covered as always 🙂 Joey has been down both roads, having worked out of both a commercial space and his house for many years– and he breaks down the pros and cons of each in this episode of The Career Builder Show!
Nail The Mix is our online mixing school that gives you REAL multi-tracks from REAL bands, plus a mixing class from the producer who recorded it. Past guests include Periphery, Gojira, Meshuggah, Machine Head, A Day To Remember and Bring Me The Horizon. Join now for instant access!
Jake Subin is the Chief Engineer for Telefunken, where he splits his time between two critical roles. On one hand, he’s the final line of defense in quality control, performing real-world listening tests on every condenser microphone before it ships to ensure it meets their standards for noise and polarity. On the other, he’s the in-house engineer, running sessions for Telefunken’s “Live from the Lab” series and for clients at their commercial studio. Jake also maintains a freelance career doing studio work and live sound and previously worked in commercial facilities in New York City.
In This Episode
Jake Subin joins the podcast for a conversation that’s all about the intersection of the technical and the practical. He gets into why real-world testing and using your ears will always trump relying on spec sheets, offering a peek behind the curtain at Telefunken’s QC process for their classic tube mics. The chat also explores the crucial soft skills of the job, like how to communicate technical feedback to non-technical musicians without killing the vibe. Jake discusses the importance of having enough technical know-how to troubleshoot on the fly, the ongoing pursuit of work-life balance, and why you should always be learning something new—like the room-tuning software he’s currently mastering. This episode is packed with great perspective on building a sustainable, multifaceted career in audio.
A common misunderstanding among audio newcomers is that mixing is the most important part of the music production process.
Sure, it’s an important part of the process… But the reality is, a well recorded, precisely edited, carefully preparedsong will pretty much mix itself anyway!
“Well begun is half done.” – Aristotle
On that note, this week we’ll be guiding you through 5 all-important “mix-prep rituals” you should check-off before every single mix:
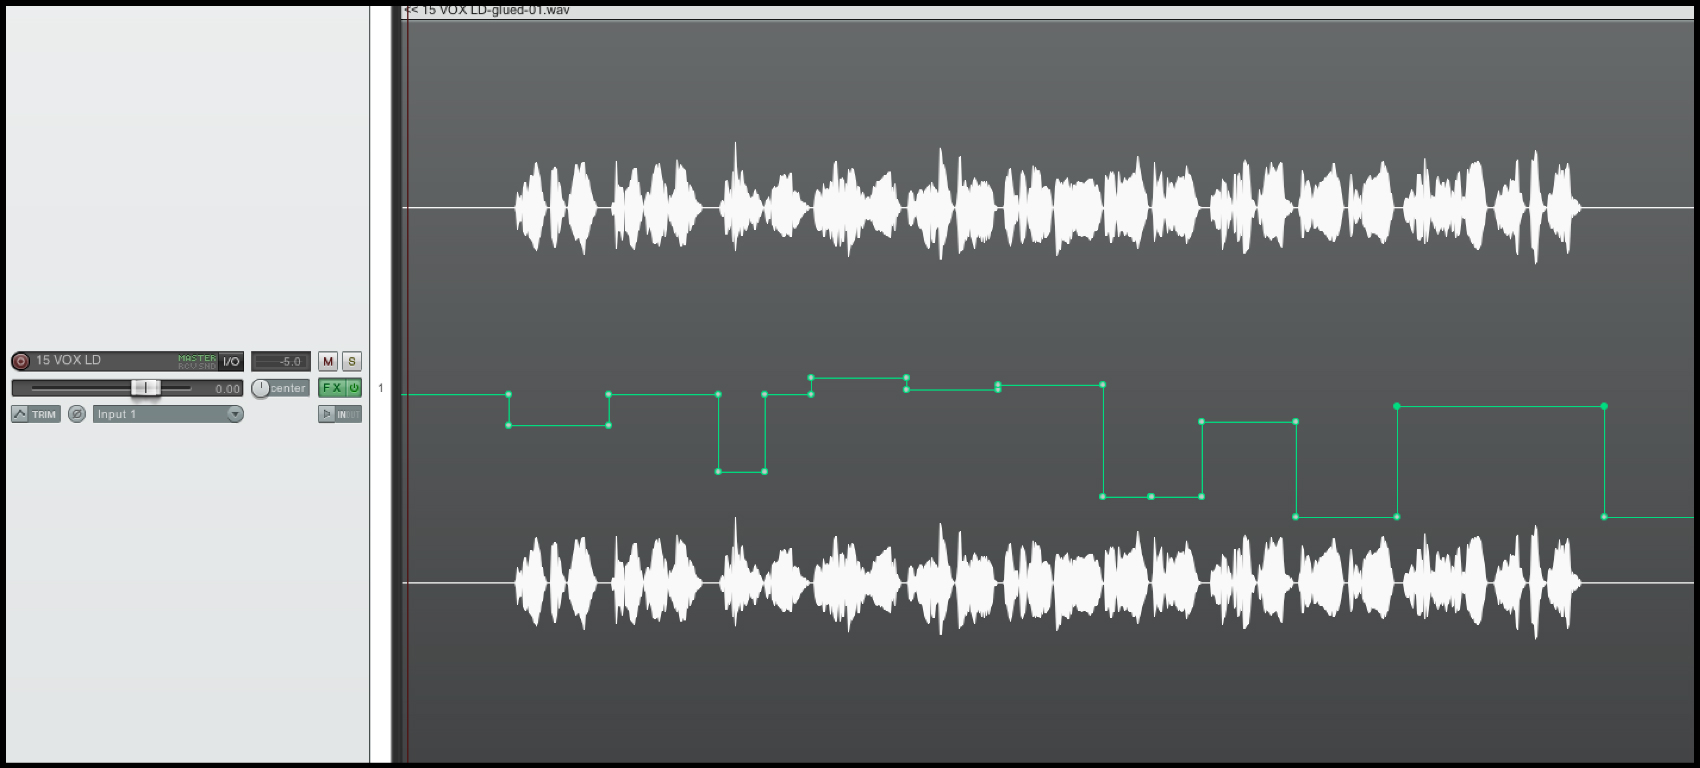
1 – CLIP GAIN THE VOCALS! (AND EVERYTHING ELSE…)
If you’re only relying on compression to get your vocals upfront and in-your-face, you’re probably gonna end up with some pretty heavy artifacting by the time you actually reach that point…
A foolproof way of counteracting this issue is to go in and manually reduce your raw vocal’s dynamic range so that the compressor isn’t having to work so hard to begin with.
This is as simple as opening up the pre-fx volume automation lane for the given track, and writing in a few dB of volume increase/decrease per word/sentence until the overall performance is dynamically consistent from start to end. (Or slicing up the performance into individual words and clip-gaining them up/down – Whichever method works best for you in your particular DAW!)
IMAGE: Basic Pre-FX Volume Automation On A Vocal In Reaper.
It’s crucial that you’re actually listening to the dynamics of the audio and not just writing in your automation based on sight, as two audio blobs which look equal in size can actually vary greatly in perceived volume due to differences in frequency content.
VIDEO: In the following video, mixing educator David Glenn demonstrates how he often likes to apply pre-fx volume automation to his vocal tracks on a word-by-word basis in order to manipulate their character to his liking.
How scrutinously you should approach this process is entirely dependent on how much time you’re willing to spare for the cause. Even just skimming through quickly and roughly leveling things out a bit on a large-scale, section-by-section basis can mean a huge improvement in the overall consistency of the vocals throughout the track!
Although this process may seem a bit overly-tedious and time consuming to you if you haven’t done it before, I guarantee you it’s worth the pay-off in the form of loud, clear vocals that punch straight the track with minimal pumping or release-artifacts.
NOTE: This technique isn’t just exclusive to vocals either… Always start by squeezing as much “clean volume” as you possibly can from any instrument via level automation before resorting to compression!
2 – STOP THE BLEEDING! (MANUALLY STRIP THE DRUM BLEED)
Gating-out drum bleed is fine, but why not just eliminate the need for any gates in the first place by cutting out most of said bleed manually before you even start mixing?!?
The way I see it, if there’s a simple task that can be completed super-discreetly by hand without having to instantiate a plugin, it’s probably worth doing.
In this case, I’m talking about manually going in and stripping out the bleed from your drum spot-mics so that you have a lot more control over each individual element, and a lot less noise needlessly filling up your valuable frequency real-estate.
Rather than me trying to explain this highly-visual process through writing, I’ll simply leave you to watch the video below for a great practical example of exactly what I’m talking about!
VIDEO: In the following NailTheMix excerpt, Andrew Wade (A Day To Remember, Wage War, Neck Deep) demonstrates how he manually strips out drum bleed from a tom track, while also using basic volume automation to even out each drum hit. (Perfectly showcasing BOTH of the mix-prep tips we’ve discussed so far in this Blog!)
If your drum mics and layered samples aren’t in phase with each other, you’ll most likely just end up fighting against yourself for ages while trying to EQ them into shape…
Let’s forget about our fancy EQ and compression techniques for a second and take a step back to consider whether we’re truly nailing one of the absolute basics of mixing drums, aka: Phase Correlation.
Simply put, if two (or more) similar audio signals which are “out of phase” with each other are played back simultaneously, there will be an element of destructive frequency cancellation that occurs in the resulting combination sound.
In the context of drums, this cancellation primarily presents itself as a lack of low-end punch and overall sense of transient “blurriness”.
The quickest method of fixing any major phasing issues between drum tracks is to simply go through each part of the kit one-by-one and flip the polarity switch on their respective channel on/off while comparing each variation to one of the overhead mics that we’ve designated as our drum phase “control track”.
For each drum, the polarity variation which has the most low-end in combination with our overhead is the one which is more in-phase.
PS. It’s important to realise that most of the time, flipping the polarity of a drum track doesn’t guarantee a 100% perfect solution to the problem, but rather an “in-between” variation which either sounds better or worse. A more accurate way of bringing multiple tracks into-phase with each other is to visually move around their audio clips until the waveforms are perfectly aligned with each other.
VIDEO: In the following clip, Jonathan Roye from Mixnotes demonstrates how you can use Sound Radix’ “Auto Align” plugin to automatically correct all of the phase issues between drum tracks for a much more defined and punchy overall sound.
4 – BABYSIT YOUR TRIGGERING!
You can’t afford to have a “set and forget” mentality when it comes to sample replacement. You need to make sure that every drum track is doing what they’re meant to be doing at all times!
Even when triggering from a great raw drum performance, chances are there are gonna be a few missed & mistriggered hits scattered throughout the duration of each replaced individual drum track. (Primarily due to certain hits not being strong enough, or the bleed in the microphones causing mistriggers.)
For this reason, it’s a good idea to go through and “babysit” each triggered channel from start-to-finish while manually correcting any issues as they pop-up BEFORE you begin your mixing process.
Fixing these issues is often as simple as writing in a few dB of pre-fx volume boost/cut automation to correct each of the problematic raw hits into going above or below your triggering software’s threshold. (Depending on whether they’re a missed hit or a mistrigger, respectively.)
I personally like to do all of my drum triggering in a dedicated DAW session prior to any mixing, and to bounce-down all of my “babysitted”, perfectly sample-replaced “new” drum tracks to audio files which can then be imported into my mixing session.
This way, I’m not having to think about my triggering during mixing, and can simply focus on getting everything to sound good with full confidence in the “correctness” of my drum tracks.
5 – CONTROL YOUR TRACK COUNT!
Having hundreds of messy, disorganised tracks cluttering up your session window is a surefire way of slowing your progress and periodically distracting you!
When working on a complicated mix session, you want everything to be streamlined and laid out for maximum work-efficiency and minimum time-waste.
If you’re always having to navigate your way through hundreds of channels and random audio clips in search of the right track then you simply can’t expect to get much actual work done.
The obvious solution to this problem is to simply commit to certain sounds and comp things down to a more manageable number of tracks before you even begin your mixing!
Mixing legend Chris Lord-Alge (Green Day, Nickelback, Rise Against) is well known for his ability to reduce the huge 150+ track-counts he receives on a daily basis to fit across the 44 channels on his SSL desk. This is partially why he’s able to mix so quickly: HE’S NOT MICRO-MANAGING ANYTHING!
“You actually end up being more creative because you’re making a lot of your magic happen in your comps. If you look back at Sgt Pepper’s, everything was comped, four tracks on four tracks. In most early records it was all about submixing, and about mixing from the word go.” – Chris Lord-Alge
THE MIX-PREP CHECKLIST – CONCLUSION:
A mixer’s skills are important, but not nearly as important as we kid ourselves into believing when trying to justify why our productions pale in comparison to our heroes’.
The biggest reason those guys are able to work as fast as they do and achieve such great results is simply the fact that they’re working with A-Grade musicians, producers, recording-engineers and editors at every step of the process, meaning that the raw tracks they’re receiving to mix are already 90% of the way there by the time they get their hands on them!
The bottom line is, if you’re looking to simplify your mixing process then there’s just no substitute for putting in the hours to prepare things properly beforehand!
Final Words:
This concludes “The Mix-Prep Checklist”. I hope that this article has given you some new ideas to try out during your next project. Be sure to comment below if any of this information has helped you out, or if you have any questions.
Stay tuned for more production/mixing related articles in the not-so-distant future!
Nail The Mix is our online mixing school that gives you REAL multi-tracks from REAL bands, plus a mixing class from the producer who recorded it. Past guests include Periphery, Chelsea Grin, Machine Head and State Champs. Join now for instant access!
![Do THIS when bands owe you money [ The Career Builder Show ]](https://urm.academy/wp-content/uploads/2018/05/Ad_CBS_EP08_GettingYourBread_thumbnail-100x56.jpg)
 Nail The Mix is our online mixing school that gives you REAL multi-tracks from REAL bands, plus a mixing class from the producer who recorded it. Past guests include Periphery, Gojira, Meshuggah, Machine Head, A Day To Remember and Bring Me The Horizon. Join now for instant access!
![Should you work from a home studio?? [ The Career Builder Show ]](https://urm.academy/wp-content/uploads/2018/05/Ad_CBS_EP07_HomeOrStudio_thumbnail-100x56.jpg)