
How To Mic Up Pretty Much Anything
urmadmin
Introduction:
Tired of looking up microphone placement “cheat-sheets” every time you come to record? Wish you knew the “secret techniques” that the professionals use to capture their pristine raw tracks? Sick of always trying to “fix it in the mix”…?
You’ve come to the right place!
In this week’s Blog, We’ll be teaching you how to set up a microphone to capture any source as accurately as possible so that you won’t have to resort to guesswork ever again:
1 – CHOOSING THE RIGHT MICROPHONE – TONE AND DYNAMICS
Unfortunately, there’s no such thing as a “one size fits all” microphone that sounds best on everything… This is simply due to the fact that every instrument and human voice is different, meaning they each require a custom-tailored tool to handle their unique sonic characteristics appropriately.
Two of the primary factors that can help determine which microphone you should choose are the Tone and Dynamic Range of the instrument:
A – Tone: The overall frequency balance of a sound. (Ex: A tambourine has a bright tone. An upright bass has a dark tone.)
- Assuming the #1 goal of recording is to capture and reproduce a sound as accurately as possible, you want to make sure that the microphone you choose for a task is complimenting the instrument’s tone rather than negatively over-accentuating it.
- Ex: If you use a bright microphone to record some already-bright cymbals, the end result might sound too ear-piercing. (And vice-versa with darker instruments…)
- Generally speaking, ribbon microphones are fairly dark, while condensers and dynamic microphones are often on the brighter side. Knowing the tonal strengths and weaknesses of each microphone can go a long way towards using them in the most effective manner.
Here’s A Quick Tonal Comparison Of 3 Classic Microphones (One Of Each Type):
RIBBON MICROPHONE – AEA R84
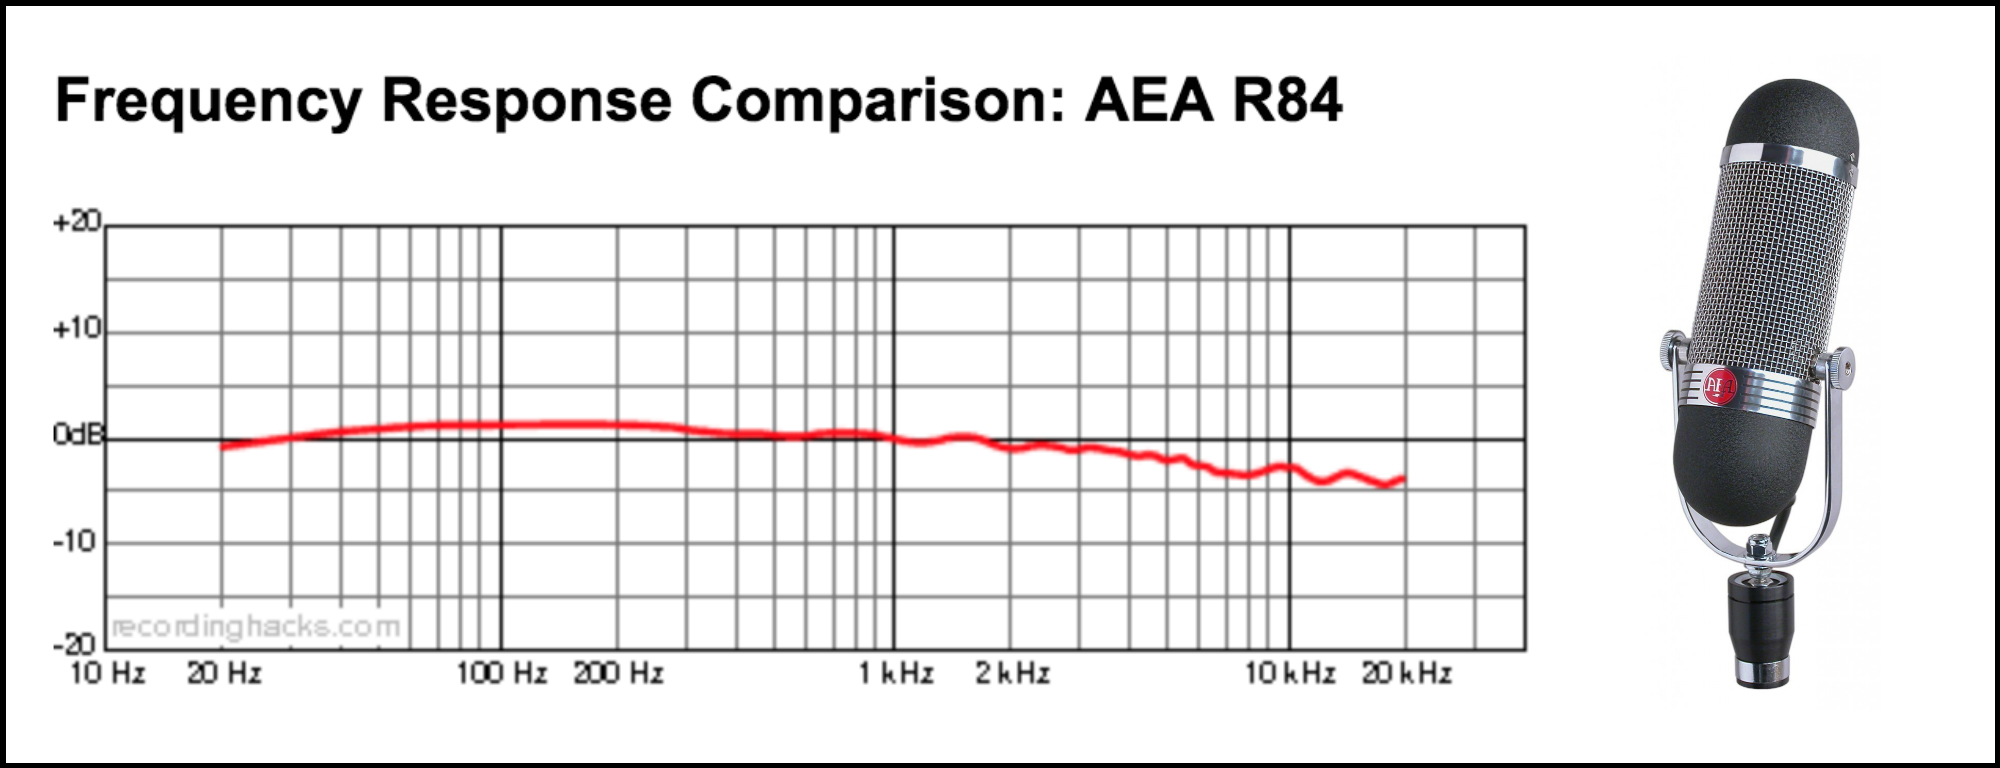
AEA’s classic R84 ribbon microphone has a broad low-end boost and a drastic high-end roll-off starting at 3kHz. If you have a brittle sounding instrument (such as a saxophone or harmonica), you might wanna try recording it with a ribbon mic in order to balance things out a bit.
DYNAMIC MICROPHONE – SHURE SM57
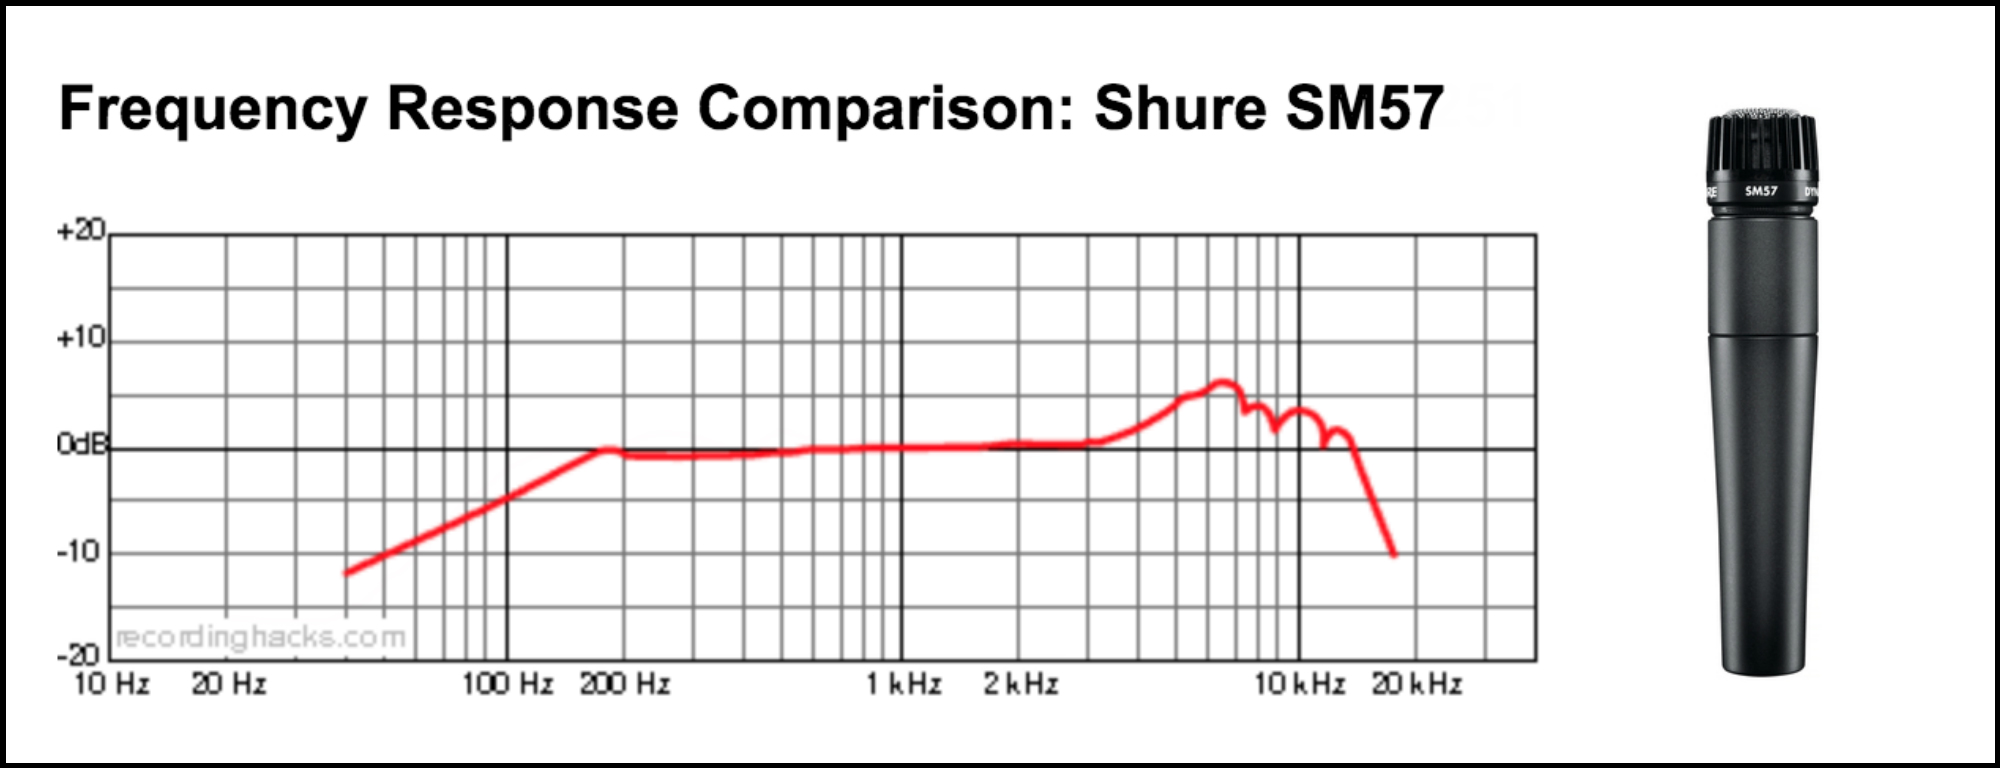
Shure’s “affordable workhorse” SM57 dynamic microphone is fairly thin below 150Hz, with a bold high-end boost between 4-12kHz. Given its aggressive nature, it’s no wonder the SM57 has been the go-to on distorted electric guitar and snare for the last 50 years!
CONDENSER MICROPHONE – TELEFUNKEN ELA M 251E
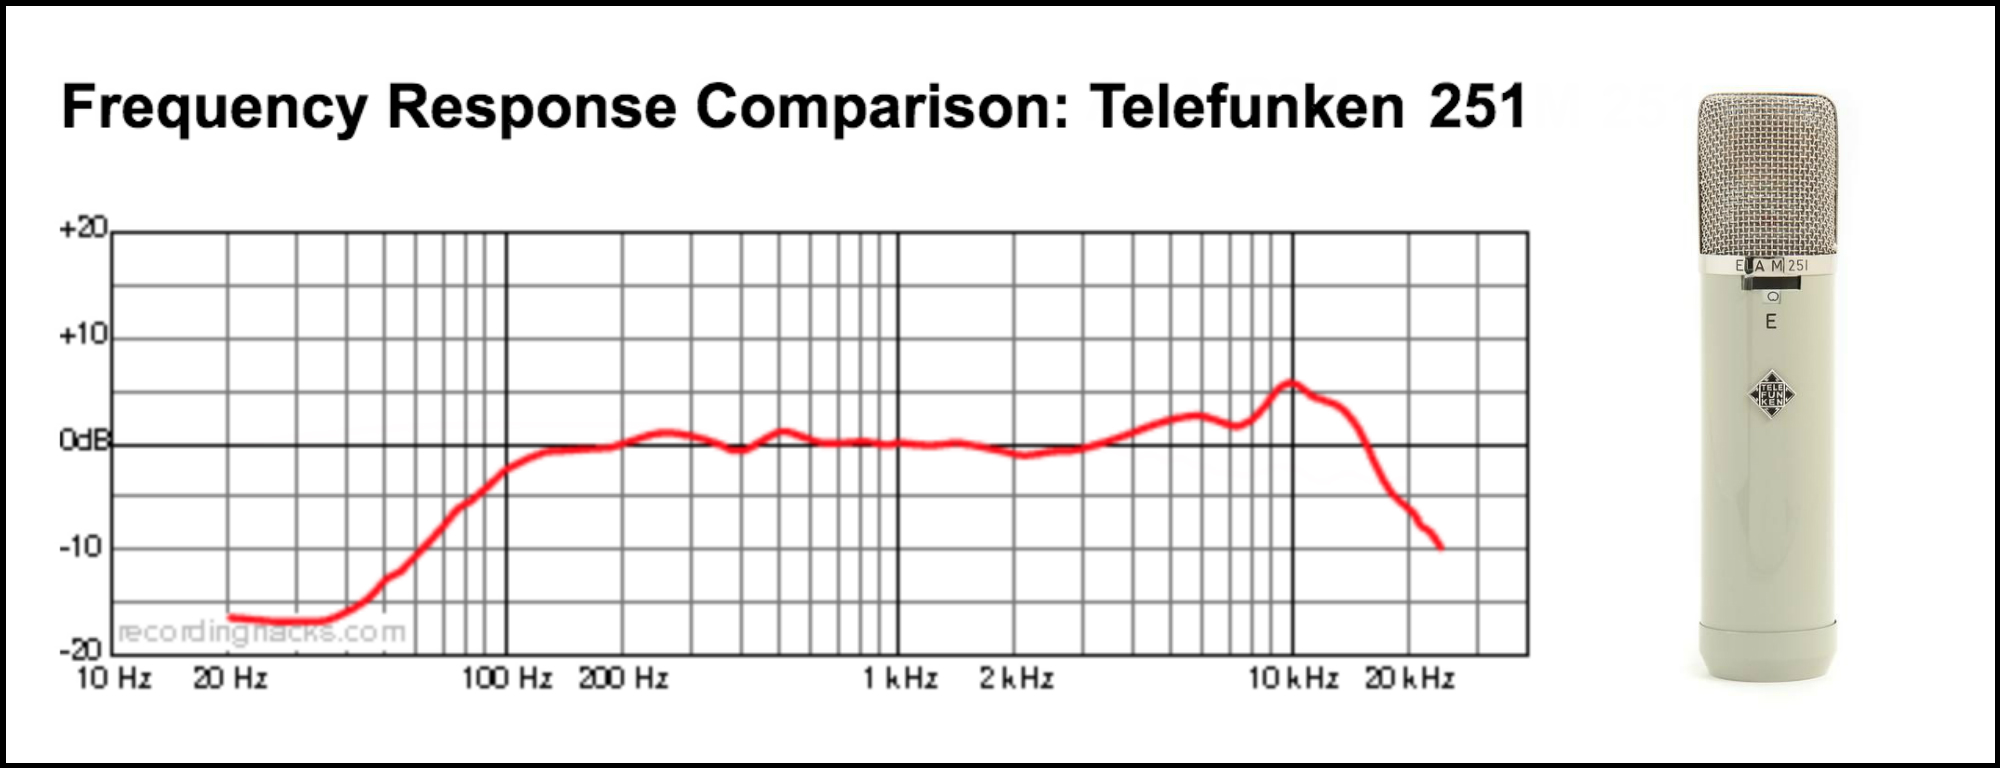
The prestigious ELA M 251 has a steep low-end roll-off starting from 100Hz and an airy high-end peak centered around 10kHz. This “tight & bright” frequency response gives it an almost “pre-processed” quality when used to record vocals.
VIDEO: If you’re looking for some great practical examples on microphone choice and placement, look no further than Eyal Levi’s “Recording Metal Bootcamp” masterclass series on CreativeLive!
B – Dynamic Range: The softness/loudness of an instrument. (Ex: A finger-picked classical guitar is much quieter than a snare drum…)
- This is actually a fairly simple one – Just make sure that the microphone you’ve chosen to record with actually performs well at that specific instrument’s maximum SPL. (Sound pressure level, measured in dB.)
- A common misconception among audio newcomers is that a microphone’s maximum SPL is the point at which it will get damaged, when in reality, it’s simply the level at which the sound will start to audibly distort.
- Luckily, at this point in time, maximum SPL is only really an issue when dealing with certain vintage microphones which are more fragile in nature. (Even then, you’d have to be recording something REALLY LOUD for them to present with any obvious issues…)
- With most modern microphones, the maximum SPL is so much higher than anything you’ll record in the studio that you shouldn’t have to worry about ever exceeding it during “normal”, everyday use! (Ex. A Shure SM7B has a maximum SPL of 180dB, which is equivalent to standing next to a space shuttle during launch!)
2 – CHOOSING THE RIGHT MICROPHONE – SITUATIONAL CONSIDERATIONS
The tone of a microphone is important, but it’s not the only variable you should be focusing on when making your choice…
A few additional variables which come into play when choosing microphones are The Proximity Effect and The Mic’s Polar Pattern:
The Proximity Effect: A disproportionate low-frequency volume boost that occurs as a microphone is moved closer to the sound source.
- The proximity effect is neither good nor bad, but rather something that you should be aware of and utilise/avoid depending on your particular recording needs.
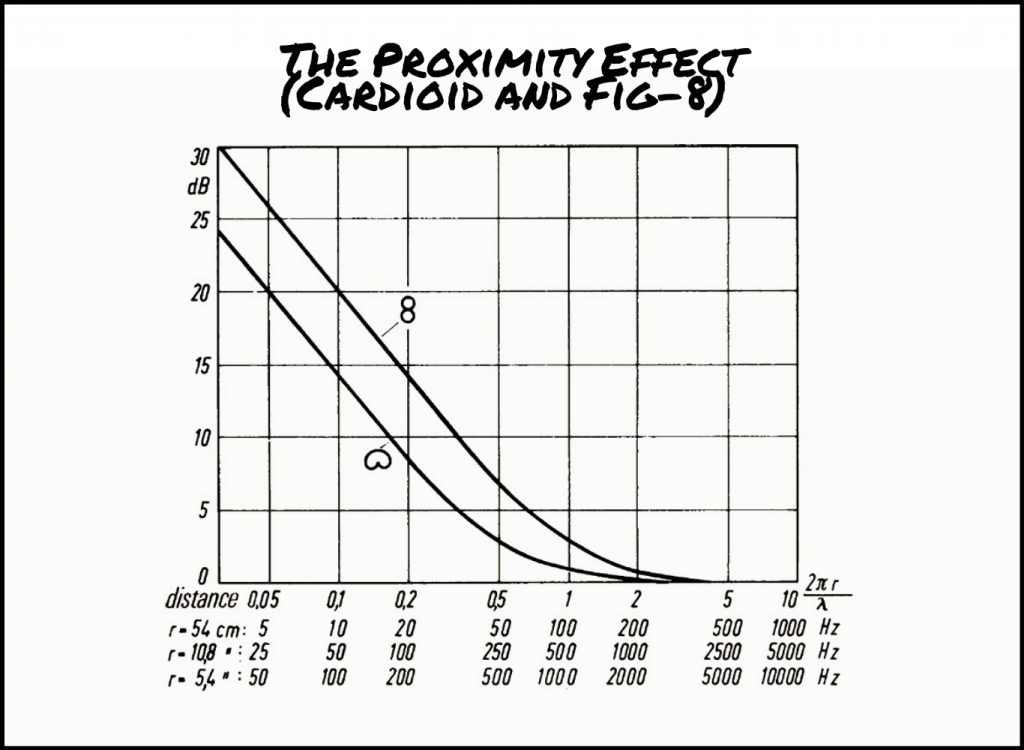
- Ex: If the sound source you’re trying to capture is deep and boomy, you might want to avoid making it worse by placing the microphone too close. If you’re trying to record somebody with a thin voice on the other hand, you might want to thicken them up a bit by getting them to perform in close proximity to the capsule.
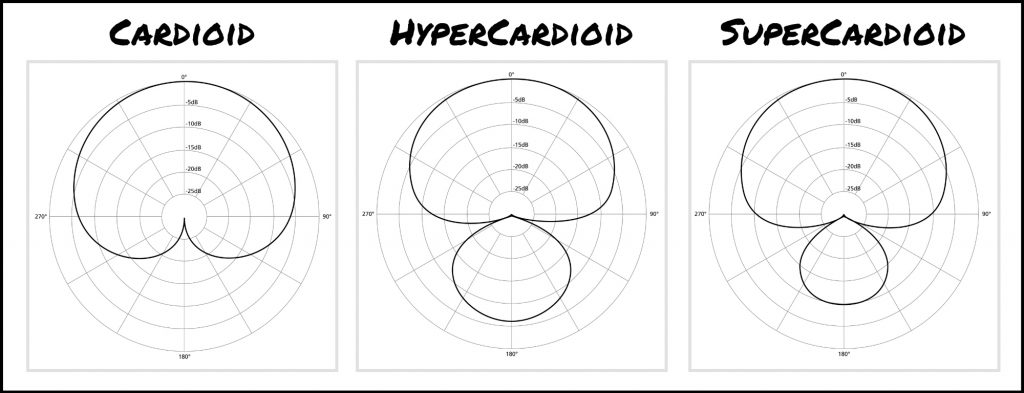
Picking A Polar Pattern: The pickup radius of a microphone. A lot of microphones give you the option to switch between several polar patterns.
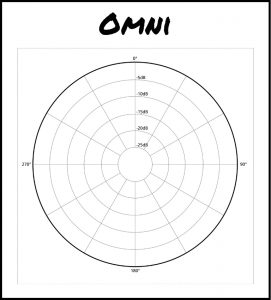
- The primary polar patterns you’ll come across are Cardioid, Figure-of-eight and Omni.
- Cardioid: The most commonly used polar pattern. Offers a wide capture radius at the front of the capsule and good rejection at the rear. (There are also HyperCardioid and SuperCardioid variations of this pattern which offer even greater side rejection.)
- Figure-Of-Eight: Offers equal capture at the front/back of the capsule and has excellent side-rejection. (Very useful when recording singer-songwriters who like to play guitar and sing simultaneously! Use two figure-of-8 microphones. Position them both in an X configuration with one pointing at the singer’s mouth and the other at the guitar so that each mic’s null-points are rejecting the opposing instrument.)
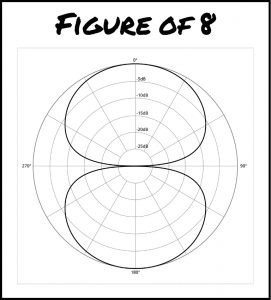
PS. The Figure-of-eight pattern has an exaggerated proximity effect compared to cardioid, and can come in handy when a drastic low-end boost is desired!
- Omni: Picks up sound equally from every direction and is completely unaffected by the proximity effect. (An excellent choice when trying to capture the ambient sound in a room, or when looking to prevent unnecessary low-end build-up.)
NOTE: There is no “right” or “wrong” when it comes to selecting a polar pattern, only what works best given your recording objectives and environmental circumstances.
3 – PLACING THE MICROPHONE

Choosing the right microphone is a great start, but it’s not enough to guarantee a great capture.
You also have to nail the positioning of the microphone in relation to the sound source in order to achieve the absolute best results.
I can’t tell you the exact spot to place your microphone, as there are simply too many variables involved in the process. However, I can teach you how moving a microphone around affects the sound so that you can figure that out for yourself!
Here are a few key things to think about while placing your microphone:
Distance: The distance between the microphone and the sound source.
- The closer the microphone gets to the source, the more low and high-end information will be captured due to the proximity effect and directional nature of high-frequency content.
- Think of the microphone’s distance to the sound source as a wet/dry ratio between the instrument and the room ambience. The closer you get, the louder the direct signal will be in relation to the room reflections. (And vice-versa…)
- Generally speaking, you want to try and capture each instrument as purely as possible in order keep your options open during mixing. This means that unless you’ve got a great sounding recording space at your disposal, you’ll probably want to close-mic things as much as possible.
NOTE: The ideal close-mic’ing distance varies greatly for each instrument, therefore it’s difficult for me to go any more specific than what I’ve talked about above. I’d highly recommend checking out Bobby Owsinski’s audio literature classic “The Recording Engineer’s Handbook” if you’re trying to determine how far you should place a microphone from a specific instrument, as it offers some great example placements for pretty much all of them!
Directionality: How the microphone is being aimed/angled at the sound source.
- “The capsule is like the eye of the microphone. It’s gotta be facing what it’s trying to capture!” – Chris Lord Alge
- High-end frequency information travels fairly unidirectionally, while low-end is more omnidirectional. This primarily means that if you want to capture a bright sound, you have to aim the microphone towards the voice/instrument’s main source of brightness.
- Ex: In the context of recording an acoustic guitar for example, if you want to capture more of the high-end pick attack, you can just angle the capsule so that it’s aiming somewhat towards the picking hand. (The same logic applies to a snare or kick drum. If you want the microphone to pick up more stick/beater attack, you simply aim the capsule where they’re striking the skin!)
VIDEO: In the following clip, rock mixing legend Bob Clearmountain (Bruce Springsteen, The Rolling Stones) demonstrates how he mic’s-up an acoustic guitar to capture a good balance between the high-end pick attack and low-end body.
Practicality: Whether the microphone position you’re considering is actually practically feasible.
- Ex#1: Just because you can doesn’t always mean you should! Although your vintage Neumann U67 may sound the best on snare, you wouldn’t want to risk the drummer accidentally destroying it due to a misplaced rimshot…
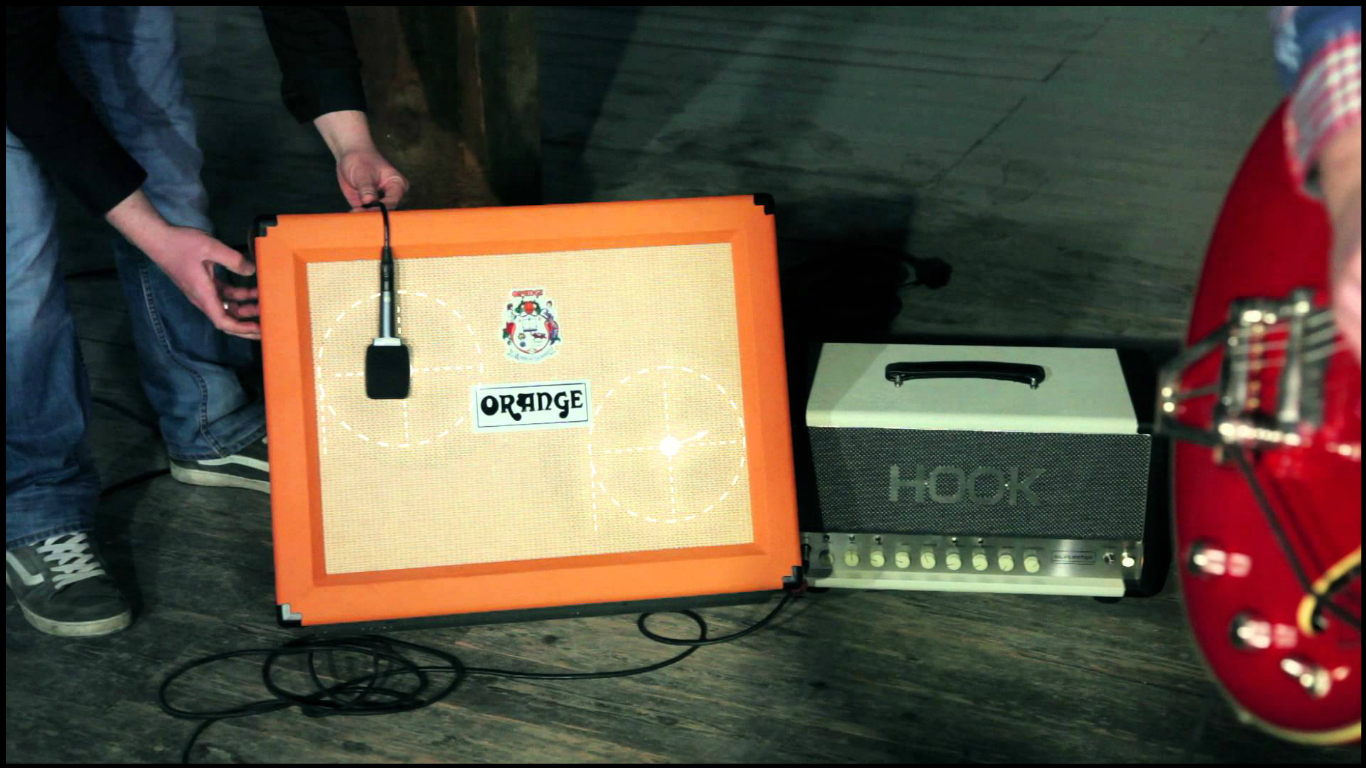
- Ex#2: In a live performance scenario, you need to keep the stage as tripping-hazard-free as possible. This being the case, you might wanna ditch the “several mics on clumsy stands” guitar recording setup you’d normally use in the studio for a single, elegant Sennhesier e609 hung from the top of the cab… (See the image below.)
- Ex#3: Although it technically makes sense to distance a drummer’s cymbals and hi-hats from the shells for minimum bleed between microphones, it’s not worth doing just for the sake of it at the expense of the drummer losing his ability to perform comfortably.
NOTE: I have many more examples of situations where you should opt for common sense over technical perfection when placing/choosing a microphone, but I think you get the point… Don’t underestimate the importance of convenience!
CONCLUSION

Learning how to make the most of the microphones at your disposal requires a fair amount of trial and error, but is definitely a process you should start chipping-away at sooner rather than later in your career.
Using techniques you’ve read about in books or seen on the internet is ok for while when you’re first starting out, but you’ll never truly get the best results until you start listening, diagnosing, and tweaking things according to your own personal tastes!
Final Words:
This concludes “How To Mic-Up Pretty Much Anything”. I hope that this article has given you some new ideas to try out during your next project. Be sure to comment below if any of this information has helped you out, or if you have any questions.
Stay tuned for more production/mixing related articles in the not-so-distant future!
Want mix tips from URM Academy? Read them here!
 Nail The Mix is our online mixing school that gives you REAL multi-tracks from REAL bands, plus a mixing class from the producer who recorded it. Past guests include Periphery, Chelsea Grin, Machine Head and State Champs. Join now for instant access!

