Become A Better Audio Engineer By Turning Off Your Phone | By Joel Wanasek
Why I turn off my phone on the weekends:
It’s Saturday afternoon.
You’re supposed to be relaxing.
You’re sitting outside, doing something you enjoy with family, friends, or individually, and then something happens… Your phone vibrates.
You look at it, knowing you shouldn’t. It starts burning a hole in your mind. You NEED to know why someone called or texted you… Maybe it’s an emergency right?
You pick up the phone. Unlock it. There it is… a punishing text from a client with some sort of problem. In your mind you’re thinking, “it can wait until Monday (it really can).”
You go back to doing what you are doing. But, your mind keeps thinking about the situation. It’s distracting you. Others observe you as having “changed” or notice that you’re “zoning out” a lot.
You make excuses like “I’m just relaxing.” In reality you’re working on everything but relaxing. Thinking about solutions to the problem, outcomes, brainstorming, etc….
A few hours go by. You keep thinking about it. It’s eating you alive.
You text the person back eventually and exchange some thoughts.
You decide to sneak into work for an hour and fix the problem. This of course happens on Sunday. Monday rolls along and you still feel burnt out from last week, but you’re wondering why. I mean, you had the weekend off, right?
Ever have this problem?
It happens to me every weekend that I leave my phone on. Probably hundreds of times by now in my career. You’d think I would learn by now!
If you do not detach yourself physically via the phone’s power button and place it in an inconvenient location, that little piece of evil plastic doom will haunt you.
Mentally you NEED to relax at least 1 day a week if you want to stay super sharp and keep peak performance.
Being a workaholic myself who has put in more 80+ hour weeks that I’d ever want to admit to anyone, I will say that if you don’t pick at least 1 day a week to totally relax without distraction, you will burn out. Stress is cumulative and your can never restore your nervous system.
My recommendation is for you to choose 1 day a week and stay as far away as possible from the recording studio and music. Do something completely unrelated. When you return to work you will feel refreshed and excited about work instead of drained and punished by it.
Now let us extrapolate this on a yearly scale.
Not only am I a strong advocate of taking a day off each week, but I think you should take 1 month off a year and enjoy yourself. I’ve even spent as much as 2 ½ months off on vacation abroad in a year!
Why? Because the cumulative stress of work grinds down on you over time. It can kill your passion, your productivity, it can make you short tempered with your clients, and it can make you a miserable person.
A single day off a week should be viewed like maintenance. However, nothing relaxes you deeply and brings back your passion for work like a vacation of a minimum of 3 weeks. These 3 weeks need to be 100% totally interrupted with no email or phone. Trust me on this. I’ve made this mistake before! One phone call or email can set your mind back into stress. Having a few weeks with absolutely no distraction is amazing for the mind and body.
I suggest that If you really want to maximize this and if you have the money, then get on a plane and go to a different country with a unique culture.
The further you separate yourself from things that are familiar to you, the more you relax and enjoy yourself.
What bad habits do you have when it comes to interruptions of relaxation time?
What are you going to do to change those?
Pick a day of the week and mark it on your calendar as your own personal time. Guard this time aggressively and use it wisely.
Get notified when our blogs are published – [clickfunnels_clickpop exit=”true” id=”5j5usoiqwzl4doja” subdomain=”unstoppablerecordingmachine”]Join our mailing list![/clickfunnels_clickpop]
Nail The Mix is our online mixing school that gives you REAL multi-tracks from REAL bands, plus a mixing class from the producer who recorded it. Past guests include Periphery, Chelsea Grin, Machine Head and State Champs. Join now for instant access!
Guitar virtuoso, Per Nillson (Scar Symmetry, Kaipa, Zonaria) joins the show to discuss how to write and record great guitar solos.
“The way that you know that you know a piece is that you can imagine yourself playing it from beginning to end.” – Eyal Levi
[smart_track_player url=”http://media.blubrry.com/urmpodcast/s3.amazonaws.com/urmpublicpodcast/season1/july2015/URMPCTNT005-PerNillson.mp3″ title=”TT5 | Writing and Recording Great Guitar Solos w Per Nillson” image=”https://s3.amazonaws.com/urmpublicpodcast/Images/square+covers/URM_customPodcast_standard_14.jpg” social=”true” social_twitter=”true” social_facebook=”true” social_gplus=”true” social_email=”true” ]
IN THIS EPISODE:
How much Per Nillson practices
Should you really autotune that guitar track?
Is it more important to practice or to immerse yourself in music?
The advantages of true temperament frets and evertune bridges
What to do with uninspired guitar players
A great trick for consistently upping your guitar game
How to actually become as good as your influences
Why you shouldn’t focus on the response of others on videos
Thanks for listening! Sign up to our [cp_modal id=”cp_id_7934d”]mailing list[/cp_modal] to discover more!
Nail The Mix is our online mixing school that gives you REAL multi-tracks from REAL bands, plus a mixing class from the producer who recorded it. Past guests include Periphery, Chelsea Grin, Machine Head and State Champs. Join now for instant access!
Leave any questions, comments, or feedback in the comment section below.
20 Simple Tricks To Make Your Next Mix FREAKIN SWEET (Part 1) | By Thomas Brett
As mix engineers, we sometimes get too caught up in our EQ and compression based decisions during a mix. For this reason we can often fail to notice some of the equally important issues we should be dealing with through alternate means, and in return end up trying to fix these problems by using the wrong tools.
Here are 10 ideas/techniques that you might not have tried before, which you might want to consider trying while working on your next mix:
NOTE – I haven’t gone in to much detail on how to set up the following techniques in this blog post, as this is meant to be a list of ideas and not an in-depth tutorial on each of these subjects. I might write individual guides for the following in the future, but for the moment, I’d recommend just googling anything in particular which you don’t quite understand.
1) Check for phase issues:
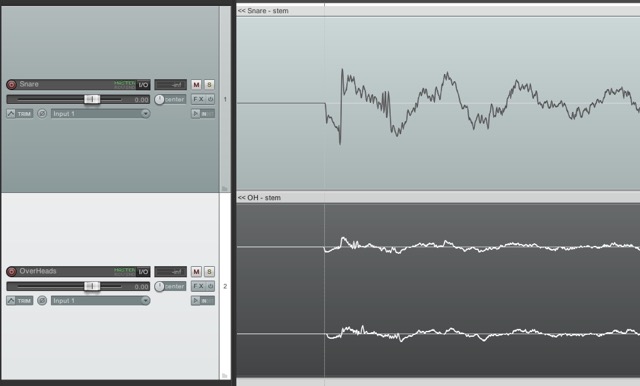
The waveforms of the snare in the direct mic and overheads
Drums sound weak and thin? Might be a phase problem…
Phase related issues only really appear between tracks which are playing the same thing at the same time as each other. E.G – A drum direct mic and the same drum in the overheads, a bass DI track and a bass Amp track, layered guitar parts, etc.
The main reason behind this issue is that when these sounds don’t align perfectly they can start to cancel out each other at certain frequencies. This effect is usually more apparent in the low end of the combined sounds and tends to result in them sounding thin when played in unison.
How can I resolve phase issues?
The simplest way to resolve this problem (although not a %100 fix…) is to solo the two tracks you want to check the phase relationship of and flip the polarity switch on one of them. Whichever combination has more low end is the one which is more in phase. This method will usually do the trick if you’re looking for a quick fix, but will realistically only fix the problem by a certain percentage most of the time.
A more accurate way of fixing this problem is to align the transients of the tracks manually. You can do this by zooming in on the waveforms of the two tracks and sliding one of the tracks forwards or backwards so that the peaks and troughs align with each other as accurately as possible. This is a guaranteed way of making sure the tracks are perfectly aligned and delivering maximum punch and clarity.
Whichever of these routes you choose to go down, this process is something you should be going through way before you reach for your go-to EQ and start boosting up the low-end.
Here are a few other things to consider regarding phase interactions:
– The phase relationship between the drum shells and the overheads.
– The phase relationships between layered samples and the drum shells.
– The phase relationship between your bass guitar DI track and Grit tracks.
– The phase relationship between your dry tracks and any parallel processing tracks you might have sent them to. (This can can cause phase related issues if your DAW is not applying automatic delay compensation correctly)
– The phase relationships between lead vocals and doubles. (This only really applies if these tracks have been heavily tuned)
Who should dominate the low end? the kick, or the bass? WHY NOT BOTH!?!
You’ll often see certain engineers talking about the issue of the kick and the bass not playing well together, and how it’s important to pick which one you’d like to dominate the low-end.
I don’t really agree with this idea personally… Sure, it’s important to try and get the kick and bass to work well together naturally, but there are multiple ways of combatting this problem with excellent results:
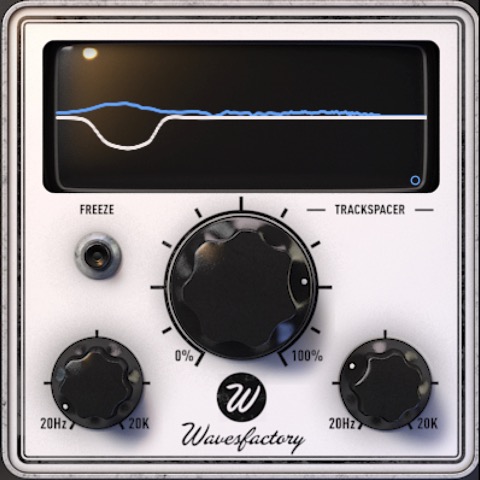
– Try side-chaining the kick drum to the bass guitar/synth: This is a tried and true method of carving out space in the bass guitar for your kick to live every time it hits. The goal here is to get these instruments to interweave between each other without the side-chain effect being too obvious to the listener’s ears. Once you get the hang of it, you’ll notice how these elements seem to get along with each other much more easily without stepping into each other’s space.
– Try side-chaining a Multi-Band compressor to your bass channel: This is similar to the regular side-chain compression method explained above, but instead of affecting the whole bass level, only the user-specified frequencies within the bass will be affected. This technique is a more transparent way of dealing with the same issue, as it means your bass won’t totally disappear every time your kick drum hits.
Other uses for side-chain compression:
– Try side-chaining your snare to your overheads: This is a technique which I regularly reach for when I’m going for a primarily sample based snare sound. By doing this you can effectively duck the original snare sound out of the overheads every time your sample is triggered.
– Try side-chaining your vocal FX to your vocal: This will help to keep your vocal upfront in the mix and basically automate your reverb and delay tails to become more prominent during the gaps in between words and at the ends of sections.
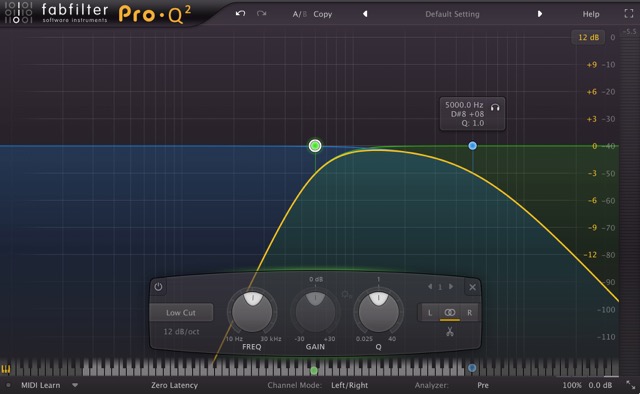
3) Give your effects a diet plan:
Filtering an FX send at 600HZ and 5KHZ
Free up some valuable frequency real-estate in your projects.
Rolling off excess highs and lows on your effect sends is a great way to gain some extra space and clarity in an already dense mix.
A lot of the time these frequencies aren’t really all that necessary when it comes to adding a sense of depth to an instrument or vocal, and only really contribute to introducing extra mud and clutter to your overall sound.
How to combat this issue?
– Try applying a high-pass (low-cut) filter at anywhere between 250-600Hz to get rid of unnecessary low-end rumble and a low-pass (high-cut) filter at anywhere between 8-3kHz to get rid of the high-end splatter effect on your FX sends.
– Experiment with reducing some of mid-range boxiness between 500-800Hz on your drum reverbs in order to help the reverbs sink into the mix in a more natural way.
– Another thing you can try is to dip out some of the presence range between 2-4kHz on your vocal FX. This can give your vocals more space to cut through your mix and prevent them from fighting your effect tails for dominance.
Note –Make sure you’re not using these techniques just for the sake of it, as within a sparse mix you can get away with keeping more of these frequencies intact to fill out the extra space.
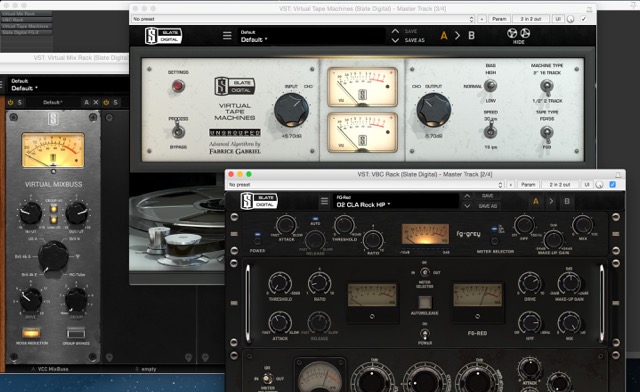
4) Mix through your master chain:
An example of some typical mix bus processing
Start your mix with the end result in mind.
If you’re planning to add a bunch of saturation and compression onto your entire mix then it’s probably a better idea to mix through this processing from the beginning instead of leaving it to the end. The main reason for this is because this kind of processing can change the tonal balance and dynamics of your mix, as well as undoing some of the work you’ve done on your individual channels.
Why work this way?
Slapping on a bunch of extra processing after you’ve already spent ages trying to get everything nicely balanced doesn’t make much sense, and pretty much defeats the purpose of balancing instruments in the first place! Try setting up your master buss processing at the beginning of the mix so that this processing is aiding your progression by getting you to the end-result faster.
Here are a few examples of the added benefits to mixing through your master-buss processing from the start:
NOTE – You don’t want to be hitting any of this processing TOO hard during the mixing stage. You can always make this processing more drastic at the end to enhance the overall effect.
Tape + Console Emulation:
– Smooth, natural sounding high frequency roll-0f and extra fatness in the low-end depending on type of console, tape type and tape speed used.
– Pleasant harmonic enhancement which makes your individual tracks sound thicker + more alive from the beginning.
– Rounded and less “peaky” sounding transients which are less fatigue-inducing to listen to.
Buss compression: (2-4 dB reduction MAX)
– Extra mix glue which will make your individual tracks sound more cohesive with each other.
– Enhanced transient punch from the get-go.
– Added harmonic saturation which will fatten and smooth out the mix. (if the compressor is analog hardware modeled)
Limiter +/or Clipping: (Minimal gain reduction during mixing, only on errant peaks)
– Will give you a better idea of what your mix is going to sound like when it’s mastered, helping you to pass better judgement on things such as drum levels.
– Will prevent your mix from continuously triggering your peak indicator.
Conclusion:
If you haven’t tried this workflow before then I’d highly recommend you give it a go. You’ll find that your mixes come together quicker and sound closer to a finished product earlier on in the process.
5) Saturation/distortion can slice through a mix:
Soundtoys Decapitator – An excellent distortion plugin
Having trouble getting your vocals to cut through that wall of distorted guitars?
Try adding/blending in some tasteful saturation (or heavy distortion!) to get certain instruments nice and in your face. You can use pretty much anything to get this distortion as long as it sounds good. Guitar amps, FX pedals, saturation units, you name it!
A great method of using this trick is to blend the saturation/distortion in under your dry tracks by using a the mix knob on the plugin or by using the distortion as an FX send in parallel. By doing this you can process the distorted signal separately from your dry tracks, and also preserve more of the transient detail and intelligibility of the dry tracks.
Here are a few places to try adding saturation and distortion:
– Your lead vocals: Try blending in some fairly heavy distortion underneath your dry vocal channel in parallel to give it that extra bit of bite and presence.
– Your drum shell mics: Saturation/distortion does a magical thing to the sustain and thickness when applied to a snare track, or any drum track for that matter!
– Your bass DI track: Try duplicating your bass channel so that you have one clean “low-end” channel and one heavily distorted “grit” channel. Filter these channels differently so that the clean channel consists of only the low-end information and the grit channel consists of only the high-mid/treble information. This is a great way of maintaining clarity in your low-end while also helping your bass to cut through a dense mix.
Note – Remember, all things in moderation!
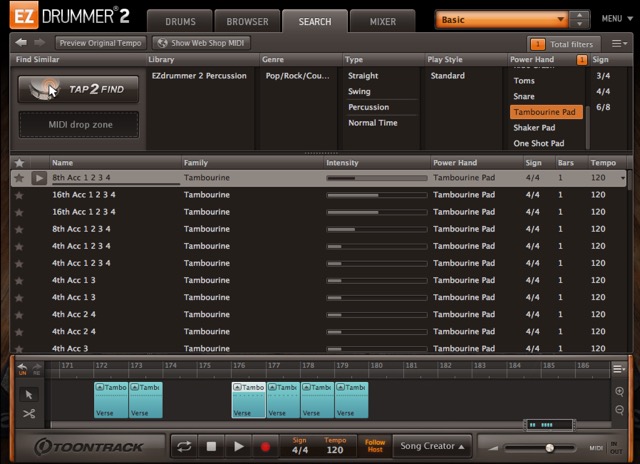
6) Add and Juggle extra elements to maintain interest:
EZDrummer 2 includes great sounding, easy to use percussion loops
Do you have any percussion in your track? Why not give it a go?
I bet you’d be surprised if I told you that by adding a simple tambourine or shaker into certain sections of a track you can really accentuate the groove and pulse while also enhancing the sense of progression throughout the duration of the song.
Note –When I say percussion I’m not necessarily just talking about tambourines or shakers. I’m mainly talking about anything that can give a bit of extra movement and excitement to the feel of the track.
After reading what I’ve just written you’re probably thinking something along the lines of: “Yeah, I get it… but this definitely doesn’t apply for heavy metal and hard rock…” or “Percussion is lame, no way it’s making it’s way on to my records…“
Well… tell that to these guys:
Killswitch Engage – My Last Serenade + Hate by Design: 16th note Tambourines throughout the choruses.
Metallica – Sad But True + Wherever I May Roam: 16th note Shakers going for almost the entire duration of each song.
Alice in Chains – Man in The Box: Tambourine accenting the downbeat on the snare during the chorus.
Avatar – Torn Apart: 16th Note Tambourine in the Instrumental sections after each chorus. (Check out this band if you haven’t heard of them before, this song has one of the coolest music videos I’ve ever seen).
Nickelback – Dark Horse: Shakers and Tambourines throughout almost every song on the album.
Note – Think what you want about Nickelback, but there’s no denying that the production quality and mixing on their material is absolutely top-notch, which I’m willing to bet plays a huge role in the success of their albums.
ALSO: Producer Mutt Lange REALLY knows what he’s doing when it comes to arrangement, instrumentation and making a hit record (just check out his discography and you’ll know what I mean).
Conclusion:
Now don’t get me wrong… I’m not saying that you should go and add percussion to EVERY song you record, or even have it that loud in the mix when you do for that matter. I’m simply letting you know that it can be exactly what your track needs to gain a bit of a necessary lift in certain sections.
Just give it a go!
7) Listen to your mix through the public’s ears:
Your average listener’s monitoring rig
Your listeners don’t have $1000+ monitoring systems…
Lets face it, probably around %90 of the people who are going to listen to your mixes are going to be listening through less-than-stellar monitoring in less-than-optimal listening environments.
-Shops and malls, usually through tiny speaker systems.
Realistically it’s near-impossible to mix a song which is going to translate well when played back on ALL systems without doing multiple mix versions to accommodate them. BUT… there is still definite value in testing your music out on different speakers in order to try and get it to a happy medium of balance and consistency for every listener, no matter how they choose to listen.
Application:
Try listening to your mix through some laptop speakers and a car stereo system. The biggest issues that will usually stick out when you try this are your mid-range and your low-end (or lack thereof…).
Here are some things to look out for/try out on your next mix:
– If your low-end isn’t audible through a pair of regular laptop speakers then maybe it’s time to try out some harmonic enhancement plugins like Waves MaxBass or R-Bass. These types of plugins can help the bass content in your mixes to become audible through smaller speakers which don’t go as low as a full range speaker system.
– Home stereo systems can sometimes have a rather scooped sounding mid-range. You might want to combat this by being careful with how much mid-range you’re removing while mixing.
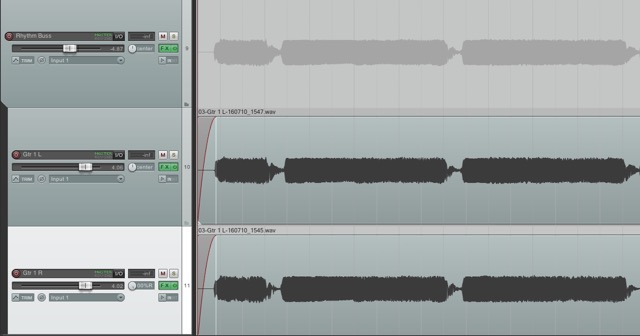
8) Difference is the key to width:
Double tracked rhythm guitars
If your left and right signals are too similar, it’s not REALLY in stereo…
I had to learn this lesson the hard way… When I first started mixing I used to edit my double tracked rhythm guitars to the point that they were basically identical to each other. I thought that by doing this, I could achieve a super-tight and punchy guitar section. The truth is I’d pretty much missed the mark completely…
How come?
One of the main reasons for double tracking guitar parts in the first place is to get them out of the centre of the stereo field. By making your left and right too similar via editing you are basically making them more mono.
How to maintain stereo width?
– Your best bet to achieve tight, punchy and wide double-tracked guitars is to record the takes really well in the first place.
Instead of having a “comp and edit hundreds of mediocre takes into a perfect take” mentality, try and get the guitarist to track the doubles as tightly as possible (although sometimes you simply don’t have any other option but to polish the living life out of a turd in order to get anywhere close to the guitar tracks you need). If done right, this will result in tight, punchy and natural sounding doubles with just enough difference to maintain a good level of left-right separation and overall width.
– Another way to increase the stereo separation between the two sides is to use a slightly different recording setup for each double. Try using a different amp/cab combination for each guitar track in order to introduce further separation between the two sides (the classic “dual rectifier + 5150” combo comes to mind).
Note – Make sure that the individual tones compliment each other in a pleasing way, otherwise you’re just gonna make it sound weird.
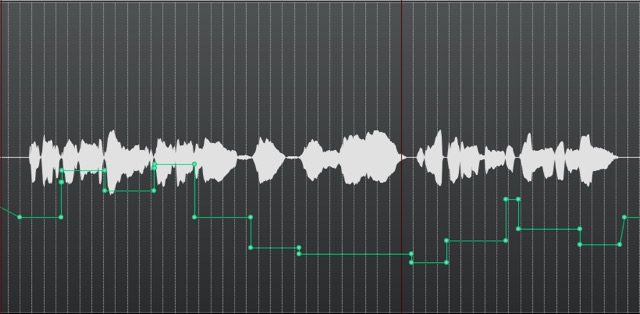
9) Automation before compression:
Pre-FX volume automation on a vocal track
Ease the load on your compressors!
There’s a reason top dogs in the mixing game like CLA and Andy Wallace are always talking about the importance of volume automation. It’s because it’s one of the most effective ways to craft yourself a loud and punchy sounding mix without having to use stupid amounts of compression to get everything upfront and in your face.
Sure, compression is pretty much a necessary evil at this point when it comes to getting something extremely dynamic like a vocal pinned on top of the music at all times… but by using some good old-fashioned volume automation beforehand, you can reduce the amount of work the compressor is having to do, and in return introduce less compression-caused issues such as pumping and distortion.
How to apply this concept?
This approach can be applied to pretty much any instrument with a fairly dynamic nature. Here are a few of tips on using volume automation before you reach for a compressor:
– Try automating your pre-fx vocal level section-by-section (or word-by-word in some cases) so that it’s more consistent throughout the song before it hits your first compressor. This will ease the load on the compressor and prevent it from jumping all over the place, resulting in fewer noticeable artifacts.
– Make sure you’re not ruining the flow and realism of the vocals by over-flattening the performance. Hopefully this goes without saying, but don’t go and start automating all of the transients at the start of each word and try to make them the same level as the decays, as this is a sure-fire way of making your vocal sound like garbage.
– You can also use pre-fx volume automation to reduce the sibilance in vocal tracks by reducing the level of the harsh “s,t,ch,th” sounds. These sounds will usually appear like dense blobs within your waveform and are quite easy to spot and automate.
10) Have you been EQ’ing in solo?
Tunnel Vision – Eqing in solo/out of context
WARNING: EXTREMELY FAR FETCHED METAPHOR INCOMING!
EQ’ing individual instruments in solo, to later on just throw them all together at the last minute and hope for the best, is like cooking each individual ingredient of a cake separately and then blending all of the ingredients together and hoping for it to form a solid result.
Terrible metaphors aside though: How any single element of your mix sounds while it’s being listened to in solo is unimportant! (unless it’s the only thing playing)
The only people who are ever going to hear those instruments on their own are yourself and the band you’re recording with. According to that statement, surely the measure of how good any particular instrument in the mix sounds should be based on how it sounds in the context of the mix, when it’s fighting against dozens of other elements for the same space.
Now you might be thinking: “{Insert famous engineer name here} spends a lot of time EQ’ing in solo in their demo videos…“
That’s a pretty accurate observation, but it’s important to remember that those guys have completed hundreds, if not thousands of mixes, and trained their ears to the point that they know exactly what a solo’d instrument should sound like in order to compete within a full mix.
This doesn’t mean soloing is wrong, as it’s still an amazing tool for focusing in on issues within the individual tracks without getting distracted by all of the other sounds in your mix.
Conclusion:
It’s important to remember that we call this process “mixing” for a reason… I can personally vouch for the fact that your mixing ability and final products will improve drastically if you stop focusing on the individual and start focusing on the whole.
Final Words:
I hope that this article has given you some new ideas to try out during your next project.
Be sure to let me know in the comment section below if any of this information has helped you out, or if you have any further questions regarding anything I’ve talked about here.
Stay tuned for part 2 in the not-so-distant future!
Thomas Brett is a producer, mixing engineer and songwriter at Brett Brothers recording studio in the UK. Check out the Brett Brothers studio website for more information and articles on all things mixing www.brettbrothersstudio.com
Having trouble understanding De-essers? Check out Thomas Brett’s URM Blog,Death To Sibilance!
Nail The Mix is our online mixing school that gives you REAL multi-tracks from REAL bands, plus a mixing class from the producer who recorded it. Past guests include Periphery, Chelsea Grin, Machine Head and State Champs. Join now for instant access!
SICK OF BANDS COMING TO RECORD UNPREPARED? WE’VE GOT YOUR SOLUTION.
– By Joey Sturgis
Nothing makes a session suck worse than when you’re planning on producing great material with a band that’s just not ready to record in any way, shape or form. They book enough time for a 10 song album, but arrive with 1 song and 5 riffs written… and they can barely play those 5 riffs!
There are plenty of reasons for this disconnect:
Inexperience
Lack of practice
Too many distractions
Laziness
Lack of discipline
The list goes on and on…
Band members run into enough stress in their careers between label demands and touring, or day jobs and family life. Many see the studio as a getaway from the day-to-day.
So what can you do as an engineer/producer to keep the session moving in the right direction?
You need to be flexible with your workflow above all else. No two bands are the same. It stands to reason that no two recording sessions will be the same either. Even if a band fits a certain style, you’re going to take different approaches in tracking that coax the best performance out of the musician.
Here are a few of my favorite ways to switch things up:
Record Vocals on Day 1
Too often vocals are saved for last. When a vocalist walks into the vocal booth after weeks of tracking other instruments, it can be overwhelming. You might be throwing your vocalist’s performance under the bus by not including him sooner.
Whether or not you choose to keep the Day 1 vocals at the end of tracking is up to you. These vocals aren’t necessarily made for the final mix. They’re captured for the sake of inspiration.
Your singer will feel more included in the overall process by being included from the get-go. The rest of the band will have, at minimum, a reference vocal to help them dial in the groove of a song. Hard drive space is cheap. Capture everything and you might be pleasantly surprised when those Day 1 vocals were exactly what your mix needs.
No Demos? Make Them
You’re going to make me say it twice: Hard drive space is cheap.
If the band doesn’t have a demo or rough track when they’re walking into the studio, make one. It can be a microphone or two in a room with the band. It doesn’t have to sound amazing, and the performance doesn’t have to be perfect.
The point is to capture a “rough draft” of what the song should sound like. Without one, you don’t have anything to fall back on when the bassist suddenly forgets his transition leading into the bridge. Throughout recording, things can change. Parts get added and cut to make the song work. The demo provides a starting point, a reference for where the song originated.
Speaking of changing parts…
Record The Drums Last
If the band hasn’t finalized a song down to the last note, you’ve got little to lose by trying this approach. The benefit to recording drums last is that the band has a chance to iron out any in-studio changes beforehand.
Feel free to start off with a scratch drum track when trying this approach. Some musicians just can’t find the groove with a click track but can do wonders with a basic drum pattern. Have the drummer leave space for the others to find their sound.
Then, once everyone’s happy with their parts, have the drummer play through. They’ll benefit from having full instrumentation in their headphones, and they’ll be able to confidently play fills/complex sections with less fluctuation between takes because of it.
Best Practices for Tracking an Unprepared Band
Maybe you’re not ready to mess with your workflow to try out the techniques we’ve talked about so far. Don’t worry, every single engineer (and band) can take advantage of these last two helpful techniques:
Record with a DI Whenever Possible
We preach this approach whenever possible, but it’s because it works! Live amps are noisy, inconsistent, and often compressed/overdriven to the point where editing in your DAW after tracking can be a monumental nightmare.
Don’t rely on a band’s gear when it comes to the quality of your session. A band just starting out may not have the best equipment to begin with. Couple that with the limitations mentioned above, and you’ll quickly see how the guitarist’s tone issues become your issues.
Instead, invest in a good DI so that you can track the clean signal of guitars & basses. Having that DI signal provides you with a quick way to punch in and out without having to worry about cutting off the sustain and room tone of a miced up amplifier.
You can run your amp alongside the DI, or reamp later. You could also use an amp simulator if the guitarist is cool with trying out some new sounds (heads up, they usually are – we’re all dirty gear sluts at heart). The point is to have that clean signal as the least common denominator, giving you a fallback to use later if the performance was good but the sound needs adjusting.
This rule is the absolute easiest way to get an unprepared band up to snuff without having to overhaul your workflow.
Give your bands homework. Be crystal clear with them – this is your job. You take it seriously. Their job is to know their part. Make sure they feel a sense of pride in what they’re doing and they’ll practice when you tell them to. Better yet, they’ll want to do it.
This step is just as much about psychology as it is about the need for rehearsal. By having band members take ownership of their part, they become the biggest advocate for its success. The more you get into the habit of having this conversation with clients, the easier it becomes to have.
At it’s most basic level, you need to ask the question: “Do you feel confident enough in your playing on this song that no one else could play your part better?” If there are any doubts, the seed has been planted and you can bet they’ll find time to practice.
Time to Get Prepared
Feel ready to give some of these a try? Excellent.
Remember, even the most unprepared band can be turned into a successful session if you find the obstacle they’re facing and remove it. Once you find a transparent and honest way to communicate with your artists, creativity will soar (taking your end product’s quality with it).
Have a story to share where you were able (or unable) to turn an unprepared band’s session around? Add it to the comments section below!
For more awesome tips on becoming a better producer, head on over to the URM Academy blogand subscribe to our podcast or [clickfunnels_clickpop exit=”true” id=”5j5usoiqwzl4doja” subdomain=”unstoppablerecordingmachine”]join our mailing list[/clickfunnels_clickpop].
Nail The Mix is our online mixing school that gives you REAL multi-tracks from REAL bands, plus a mixing class from the producer who recorded it. Past guests include Periphery, Chelsea Grin, Machine Head and State Champs. Join now for instant access!
Michael Keene is a multi instrumentalist, producer, and visionary behind tech metal legends The Faceless. Keene also owns a studio called KeeneMachine Studios, located in North Hollywood, California, where he has produced albums for bands such as The Faceless, Born Of Osiris, and Veil Of Maya.
We discuss how he has developed careers both as a prolific well known musician, as well as a producer, and how he approaches getting his recorded guitars to be so damn tight. As a result of having worked with some of the best of the best musicians in progressive metal, he’s got some very specialized insight into how to approach in-studio collaborations.
[smart_track_player url=”http://media.blubrry.com/urmpodcast/s3.amazonaws.com/urmpublicpodcast/season1/july2015/URMPC020-MachineTightWithMichaelKeene.mp3″ title=”EP20 | Machine Tight w Michael Keene” image=”https://s3.amazonaws.com/urmpublicpodcast/Images/square+covers/URM_customPodcast_standard_10.jpg” social=”true” social_twitter=”true” social_facebook=”true” social_gplus=”true” social_email=”true” ]
“You’re gonna be a better producer if you are a musician” – Michael Keene
IN THIS EPISODE YOU’LL LEARN:
– What it takes to record super tight guitars
– Why he loves Waves GTR
– A comparison of real amps vs amp simulators
– Guitar EQ
– Capturing great sounding DIs
– Reamping
Thanks for listening! Sign up to our [cp_modal id=”cp_id_7934d”]mailing list[/cp_modal] to discover more!
Nail The Mix is our online mixing school that gives you REAL multi-tracks from REAL bands, plus a mixing class from the producer who recorded it. Past guests include Periphery, Chelsea Grin, Machine Head and State Champs. Join now for instant access!
Leave any questions, comments, or feedback in the comment section below.

 Nail The Mix is our online mixing school that gives you REAL multi-tracks from REAL bands, plus a mixing class from the producer who recorded it. Past guests include Periphery, Chelsea Grin, Machine Head and State Champs. Join now for instant access!


 [/clickfunnels_clickpop]