In this solo “Dear Joel” episode, host Joel Wanasek answers listener questions and shares some hard-won wisdom. A producer, mixer, and co-founder of URM Academy, Joel has helped shape the sound of modern metal and rock for years, having worked with bands like Machine Head, Monuments, and Blessthefall. He also dives into other genres, discussing a recent J-pop record he mixed for the popular Japanese guitarist Miyavi.
In This Episode
Fresh off a six-week vacation, Joel is back on the mic and fired up. He kicks things off with a few crucial rants for anyone trying to build a career in audio, covering the importance of taking care of your physical health, learning to turn off your analytical “producer brain” to avoid burnout, and taking personal accountability for your goals. The rest of the episode is a deep dive into listener questions, where Joel offers practical advice on topics that hit home for working producers. He gives his take on clipping plugins (spoiler: if it sounds good, it is good), shares a brilliant strategy for using 0% credit to build out your studio without going broke, and gives a motivational kick-in-the-pants for a listener who’s terrified of going full-time freelance. He wraps up with a technical tip for fixing a kick drum that’s poking out of the mix without losing its power.
Guaranteed you’ve effed yourself many times because of this.
You’ve heard people tell you countless times to watch out for phase issues, but if you’re like most people it went in one ear and out the other because phase issues can be hard to spot, hard to fix, and definitely aren’t a sexy or fun part of the mixing process (“blah blah blah i can’t hear you!!!!!!!” *spends 100 more hours on guitar tone*).
But you know what? I’m 1000% sure that you’ve spent hours beating your head against the wall fighting a phase issue that you didn’t even know was a phase issue! If you’ve stacked EQ after EQ and compressor after compressor with no luck… I’ll bet you lunch that you were fighting phase, and could have saved yourself a whole lot of time (and come out of it with a much better mix) if you’d fixed the real problem instead of throwing plugins at it.
Sooooo many snare drum mixes get effed up by snare phase problems most people aren’t even aware of – don’t mix another snare until you watch this! Beau Burchell of Saosin shows a few common ones + how to fix them in your mixes using Pro Tools and Fab Filter Pro Q.
Nail The Mix is our online mixing school that gives you REAL multi-tracks from REAL bands, plus a mixing class from the producer who recorded it. Past guests include Periphery, Meshuggah, Machine Head and State Champs. Join now for instant access!
Jeff Dunne is an engineer and mixer known for being the “secret weapon” behind many modern metal records. He has worked extensively as a key engineer for producers like Drew Fulk (Wzrd Blood) and Joey Sturgis, contributing his sharp editing and mixing skills to a wide range of projects, including the Emmure album that was featured on Nail The Mix.
In This Episode
Jeff Dunne gets real about what it takes to be a successful “secret weapon” engineer in the modern metal scene. He dives deep into the mindset required to thrive in a supporting role, working with producers like Drew Fulk and not always getting public credit. Jeff breaks down his methods for handling high-pressure situations, like a band changing an entire song arrangement two days before a mix is due. He explains how he uses mindfulness to take a breath before reacting emotionally and to treat tedious tasks like editing frustrating drum takes as objective data, not personal attacks. The conversation explores the crucial role of expert communication in setting expectations with clients and collaborators without sounding entitled. He also weighs in on remote work versus being physically present in a hub like LA, stressing that “face time” is still key for creating opportunities. For anyone trying to stay focused, Jeff shares killer strategies for eliminating digital distractions in a world designed to steal your attention. Finally, he offers a candid look at how he balances a demanding day job with a top-tier audio career, providing a roadmap for sustaining a career at the highest level.
The secret to amazing guitar tone? A great bass tone!
You’ve heard us say a million times that the key to great guitar tone is dialing in the right bass tone – and you know why we keep saying it? Because it’s effing TRUE – and yet you still see people spending a fraction of the time on bass that they do on guitar. I get it: nobody gets excited about bass. But the cold truth is that you better LEARN to get excited about it because you simply aren’t gonna get good guitar tone without it.
The key to great metal guitar tone in a mix? The bass guitar tone! Watch + learn as WZRD BLD and Jeff Dunne dial in an absolutely crushing and ridiculous bass tone on the latest EMMURE album. Want this session and the full mixing class?
In this clip from July’s Nail The Mix session, WZRD BLD and Jeff Dunne dial in an absolutely CRUSHING bass tone using the session from EMMURE’s “Flag Of The Beast.” They use the familiar 3-track splitting technique you’ve probably seen before (one track each sub, clean and distorted tones) but with a couple cool details you probably haven’t, such as editing the distorted track to kick in only during key parts of the arrangement and getting great tones out of a few rarely-used Pod Farm amps.
Nail The Mix is our online mixing school that gives you REAL multi-tracks from REAL bands, plus a mixing class from the producer who recorded it. Past guests include Periphery, Meshuggah, Machine Head and State Champs. Join now for instant access!
The Acoustic Guitar is one of the most commonly used instruments in the world, and has been a staple of the recording studio for the better part of the last century.
Given the fact that you’re very likely to encounter this instrument fairly often in your day-to-day recording work, it’s crucial that you know how to capture it as accurately as possible.
Now that you understand the importance of the topic at hand…
Here are 5 steps you can take towards reaching “Acoustic Guitar Heaven”:
NOTE: I won’t be covering acoustic pickups / DI acoustic recording in this Blog, as the quality of electronics varies massively between different guitar models, and they rarely produce great results below a certain price threshold anyway…
1 – Selecting Your Strings
Rather than ranting about how “X” brand or “X” model of strings is better than all the rest (like a lot of people on the forums seem to preach these days), let me introduce you to a much more productive way of thinking:
Everything Is Situational!
FACT: There isn’t really a be-all end-all pack of acoustic guitar strings which is hands down the “best” option for every single genre, playing style or recording situation…
The best piece of advice I can give you in regards to selecting which pack of strings to use, is to do an in-depth shootout with your own personal instrument of choice, and to take note / record the results for future reference.
You’ll be surprised at just how much of a difference there can be between the way two different guitars interact/react with the same pair of strings! For this very reason, it’s not a good idea to base your string choices solely on what you’ve heard in other people’s demos or read on the internet.
This being said, here’s a quick overall breakdown of the primary characteristics you can expect from the most popular acoustic string types you’re likely to come across:
Phosphor Bronze: The most commonly used acoustic strings. Quite warm, with a nice metallic sheen on the high-end. Great for beefing-up thin sounding guitars. The added phosphorus helps them last longer.
80/20 (Bronze): The more traditional string choice. Bright and present in the upper-mid range (but not over-bearing). Typically paired with larger “dreadnought” style guitars with prominent low-end in order to tonally balance them out. They don’t last quite as long and start dulling quicker.
Coated: Both of the string types I’ve talked about above can be purchased in a coated variation. The primary purpose of this coating is to prolong the lifespan of the strings and prevent corrosion. Although the coating definitely does what it says on the tin, the payoff is that they usually sound slightly darker than their non-coated counterparts.
NOTE: Here’s a great side-by-side comparison of the strings I’ve mentioned above by JustinGuitar on YouTube:
In the case of the Martin D-28 Dreadnought guitar we use primarily at my studio:
Bronze strings seem to provide the best tonal balance, with a tight/defined low-end punch, and a bright, yet smooth high-end sheen. Given the fact that we tend to replace the strings on a per-song basis anyway, the shorter lifespan of the strings isn’t much of an issue.
Phosphor bronze strings also work well, but can end up sounding overly boomy due to the already “cannon-like” low-end projection of the large dreadnought body shape.
This being said, phosphor bronze strings can be the perfect choice when a slightly different, “metallic” high-end character is desirable for certain tracks. It all depends on the song!
2 – Picking The Right Pick
Honestly, there’s not much to say when it comes to discussing guitar picks…
Simply put, which pick to use is %100 dependant on what feels and sounds best to you personally.
Rather than me rambling on about the various differences between guitar picks, simply check out this awesome demonstration video from Martin Guitar’s Dave Doll on how pick size and material can affect the sound of an acoustic guitar and hear them for yourself:
3 – Polar Perfection
From left to right: Omni, Cardioid & Figure 8
Before you can even begin to think about where you’re gonna place the microphone, you need to determine which microphone pickup pattern is going to work best based on your given situation and sonic intentions.
Here’s a quick breakdown of when and why I’d opt for a certain polar pattern while recording acoustic guitar:
Omni:
The proximity effect isn’t an issue: You can afford to place the microphone closer to the sound hole of the acoustic guitar without over-accentuating the low-end representation of the instrument.
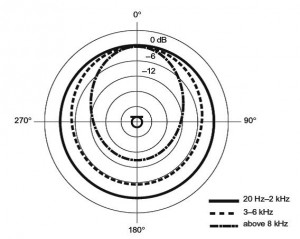
The mids & treble aren’t as directional: Unlike the cardioid pattern, in which the frequency information in these ranges are extremely dulled towards the rear capsule of the microphone, the omni pattern allows for a fair capture of information up to around 6 kHz in all directions before noticeably beginning to roll-off on the sides and rear of the spherical radius. (Refer to the image below)
Frequency directionality of the Omni polar pattern.
When talking about omni microphones in the context of acoustic guitar recording, this functionality allows for a great all-round capture of the high-end pick attack of the instrument without having to worry too much about aiming the microphone in the exact direction the treble is emanating from.
The recording space is more of a factor: As you can also determine from the image above, omni microphones are great at capturing room reflections almost-equally from every side due to their linear sensitivity between 20Hz – 2kHz. (This range is where most of a room’s tone comes from anyway…)
Whether or not you actually want to be capturing any of the room tone while recording acoustic guitars however, is completely dependant on the quality of the acoustic space itself. (aka. Omni might be the blatant worst choice if your room is crap/untreated…)
Cardioid:
Tight pickup radius / Good room rejection: In cases where you’re having to track your acoustic guitars in less-than-ideal rooms, the cardioid polar pattern is the obvious first choice due to it’s front-only pickup pattern and excellent “reflection rejection”.
It’s important to keep in mind that good side and rear rejection also means that the cardioid pattern is very unidirectional in the way it picks up treble, and as a result needs to be aimed/angled fairly precisely in order to achieve the most desirable high-end balance.
Figure of Eight:
Ultimate side-rejection: This polar pattern isn’t used too commonly in regular “acoustic only” tracking sessions, however, can be the perfect choice when recording multiple musicians simultaneously, or a singer-songwriter who likes to play and sing at the same time.
By carefully positioning the “null” sides of multiple figure of 8 microphones, it’s possible to achieve excellent separation and minimal bleed between the sources being captured by each microphone.
Increased proximity effect: Another unique side-effect of the figure 8 pattern is the fact that it causes an over-emphasized proximity effect. Although not usually very desirable, this phenomenon can come in handy when dealing with a thin sounding instrument that needs some extra low-end “oomph”.
4 – Wooden Wonders: The Basics Of An Acoustic Guitar
In order to determine the best microphone position for capturing an acoustic guitar, you first need to understand some of the key mechanics of how the instrument actually produces sound.
PS.I won’t go into the minute technical differences between construction materials and hardware components in this Blog, as the importance of details are fairly debatable and subject to personal taste.
This being the case, here are some of the bare-basics you absolutely need to know before you set up a microphone:
Most of the low-end information is generated from the sound hole
A lot of the high-end comes from the pick attack / strings themselves
Much like recording a speaker cone, a single inch of microphone movement can make all the difference in how the acoustic comes across in the microphone
Unlike e-guitars, bass, drums or keys, you can’t re-amp a DI or use the Midi to change the tone of the instrument, so you better get it right at the source!
Now that we’ve covered the key preliminary essentials, let’s dive into the actual process of recording an acoustic guitar!
5 – Precision Placement
A Good Starting Point:
Industry standards exist for a reason, and therefore tend to be a great starting point when you’re trying to learn a new skill (such as recording acoustic guitars).
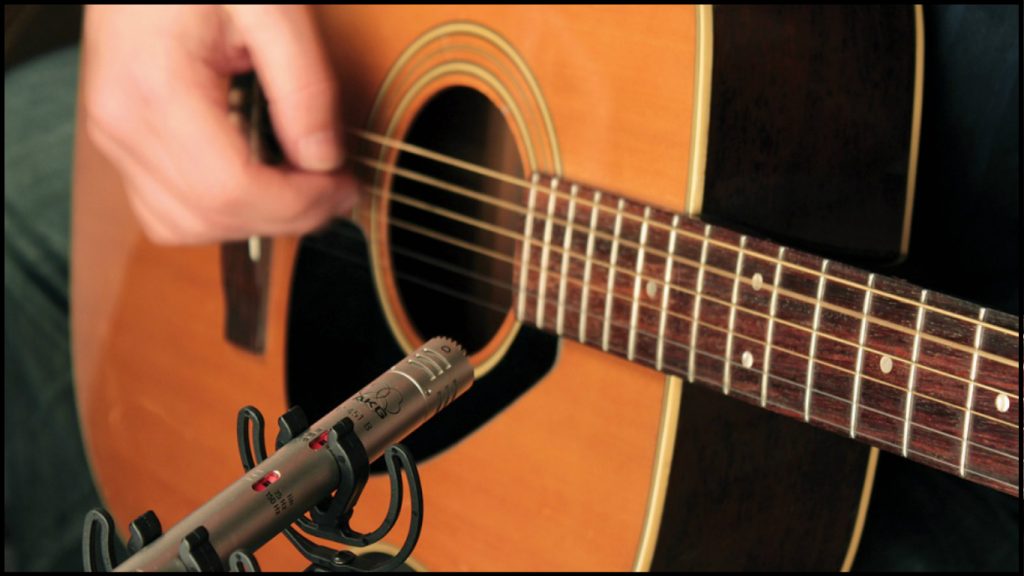
Probably the most widely used method of mic’ing up an acoustic guitar in the studio is to place the microphone about 6-8 inches away, pointing directly at the 12th fret of the instrument as shown below.
The industry standard “8 Inches from the 12th fret” mic position
This spot is generally chosen because it offers a good balance between bass and treble, and is out of the way of the huge amount of air excursion produced by the sound hole.
Tweaking The Industry Standard:
Although this setup tends to produce good results as is, and has been used on countless amazing albums to great effect, there are a few subtle tweaks which you can apply to optimise the sound to better fit the particular track you’re working on.
Here are a few simple placement factors to consider while coming up with your own microphone placement variations:
Microphone Distance:
Think of the distance between the microphone and the guitar as a wet/dry slider for adjusting the balance between the direct and room sound being captured.
Anything closer than 6 inches probably won’t sound too pleasant – It’s important to remember that sound needs travel before properly developing!
On the other hand, recording the instrument from too far back can result in a lack in pick definition and mid-range presence.
NOTE: In the following video, grammy-award-winning super-engineer Bob Clearmountain demonstrates one of his favourite acoustic guitar mic-ing techniques (which also happens to be very similar to my favourite positioning):
Microphone Angle:
When using a cardioid microphone, you can angle the capsule’s direct line of sight horizontally towards or away from the picking hand in order to adjust the amount of attack and brightness being captured. Ex. Capsule aiming towards the picking hand = More high-end and pick “click” or “definition” (and vice versa).
You can also afford to experiment with the vertical angle of the microphone (up/down), however most engineers prefer to place the microphone directly parallel to the fretboard for the sake of capturing each string equally (and sheer simplicity…).
CONCLUSION:
Now that I’ve given you more of an awareness as to the steps you can take to improve your acoustic recordings, don’t just lazily/blindly “steal” any of my personal preferences which I’ve mentioned above…
COME UP WITH YOUR OWN!
They’ll work out better for you. I promise!
More experienced engineers telling newcomers to “experiment and use your ears” might seem vague and annoying to begin with, but it is honestly the most genuine piece of advice which can be given to those who are truly looking to understand the art of recording.
No two musicians, instruments or pieces of recording gear are the same. Heck, not even two different ears hear in exactly the same way! There is always going to be an element of personal taste involved in sound, so stop relying on other people’s opinions and start experimenting for yourself!
Final Words:
This concludes “5 Steps To Acoustic Guitar Heaven.” I hope that this article has given you some new ideas to try out during your next project. Be sure to comment below if any of this information has helped you out, or if you have any questions.
Stay tuned for more production/mixing related articles in the not-so-distant future!
Nail The Mix is our online mixing school that gives you REAL multi-tracks from REAL bands, plus a mixing class from the producer who recorded it. Past guests include Periphery, Chelsea Grin, Machine Head and State Champs. Join now for instant access!