20 Simple Tricks To Make Your Next Mix FREAKIN SWEET (Part 1)

20 Simple Tricks To Make Your Next Mix FREAKIN SWEET (Part 1) | By Thomas Brett

As mix engineers, we sometimes get too caught up in our EQ and compression based decisions during a mix. For this reason we can often fail to notice some of the equally important issues we should be dealing with through alternate means, and in return end up trying to fix these problems by using the wrong tools.

Here are 10 ideas/techniques that you might not have tried before, which you might want to consider trying while working on your next mix:

NOTE – I haven’t gone in to much detail on how to set up the following techniques in this blog post, as this is meant to be a list of ideas and not an in-depth tutorial on each of these subjects. I might write individual guides for the following in the future, but for the moment, I’d recommend just googling anything in particular which you don’t quite understand.

1) Check for phase issues:
Check For Phase

The waveforms of the snare in the direct mic and overheads

                                           
Drums sound weak and thin? Might be a phase problem…

Phase related issues only really appear between tracks which are playing the same thing at the same time as each other. E.G –  A drum direct mic and the same drum in the overheads, a bass DI track and a bass Amp track, layered guitar parts, etc.

The main reason behind this issue is that when these sounds don’t align perfectly they can start to cancel out each other at certain frequencies. This effect is usually more apparent in the low end of the combined sounds and tends to result in them sounding thin when played in unison.

How can I resolve phase issues?

The simplest way to resolve this problem (although not a %100 fix…) is to solo the two tracks you want to check the phase relationship of and flip the polarity switch on one of them. Whichever combination has more low end is the one which is more in phase. This method will usually do the trick if you’re looking for a quick fix, but will realistically only fix the problem by a certain percentage most of the time.

A more accurate way of fixing this problem is to align the transients of the tracks manually. You can do this by zooming in on the waveforms of the two tracks and sliding one of the tracks forwards or backwards so that the peaks and troughs align with each other as accurately as possible. This is a guaranteed way of making sure the tracks are perfectly aligned and delivering maximum punch and clarity.

Whichever of these routes you choose to go down, this process is something you should be going through way before you reach for your go-to EQ and start boosting up the low-end.

Here are a few other things to consider regarding phase interactions:

– The phase relationship between the drum shells and the overheads.

– The phase relationships between layered samples and the drum shells.

– The phase relationship between your bass guitar DI track and Grit tracks.

– The phase relationship between your dry tracks and any parallel processing tracks you might have sent them to. (This can can cause phase related issues if your DAW is not applying automatic delay compensation correctly)

– The phase relationships between lead vocals and doubles. (This only really applies if these tracks have been heavily tuned)


2) Side-Chaining is your friend:

Side-Chaining

Wavesfactory Trackspacer – Sidechain Multiband Compression

Who should dominate the low end? the kick, or the bass? WHY NOT BOTH!?!

You’ll often see certain engineers talking about the issue of the kick and the bass not playing well together, and how it’s important to pick which one you’d like to dominate the low-end.

I don’t really agree with this idea personally… Sure, it’s important to try and get the kick and bass to work well together naturally, but there are multiple ways of combatting this problem with excellent results:

– Try side-chaining the kick drum to the bass guitar/synth: This is a tried and true method of carving out space in the bass guitar for your kick to live every time it hits. The goal here is to get these instruments to interweave between each other without the side-chain effect being too obvious to the listener’s ears. Once you get the hang of it, you’ll notice how these elements seem to get along with each other much more easily without stepping into each other’s space.

Try side-chaining a Multi-Band compressor to your bass channel: This is similar to the regular side-chain compression method explained above, but instead of affecting the whole bass level, only the user-specified frequencies within the bass will be affected. This technique is a more transparent way of dealing with the same issue, as it means your bass won’t totally disappear every time your kick drum hits.

Other uses for side-chain compression:

– Try side-chaining your snare to your overheads: This is a technique which I regularly  reach for when I’m going for a primarily sample based snare sound. By doing this you can effectively duck the original snare sound out of the overheads every time your sample is triggered.

Try side-chaining your vocal FX to your vocal: This will help to keep your vocal upfront in the mix and basically automate your reverb and delay tails to become more prominent during the gaps in between words and at the ends of sections.


3) Give your effects a diet plan:

Effects Diet Plan

Filtering an FX send at 600HZ and 5KHZ

Free up some valuable frequency real-estate in your projects.

Rolling off excess highs and lows on your effect sends is a great way to gain some extra space and clarity in an already dense mix.

A lot of the time these frequencies aren’t really all that necessary when it comes to adding a sense of depth to an instrument or vocal, and only really contribute to introducing extra mud and clutter to your overall sound.

How to combat this issue?

– Try applying a high-pass (low-cut) filter at anywhere between 250-600Hz to get rid of unnecessary low-end rumble and a low-pass (high-cut) filter at anywhere between 8-3kHz to get rid of the high-end splatter effect on your FX sends.

– Experiment with reducing some of mid-range boxiness between 500-800Hz on your drum reverbs in order to help the reverbs sink into the mix in a more natural way.

– Another thing you can try is to dip out some of the presence range between 2-4kHz on your vocal FX. This can give your vocals more space to cut through your mix and prevent them from fighting your effect tails for dominance.

Note – Make sure you’re not using these techniques just for the sake of it, as within a sparse mix you can get away with keeping more of these frequencies intact to fill out the extra space.

4) Mix through your master chain:

Mastering Chain

An example of some typical mix bus processing

Start your mix with the end result in mind.

If you’re planning to add a bunch of saturation and compression onto your entire mix then it’s probably a better idea to mix through this processing from the beginning instead of leaving it to the end. The main reason for this is because this kind of processing can change the tonal balance and dynamics of your mix, as well as undoing some of the work you’ve done on your individual channels.

Why work this way?

Slapping on a bunch of extra processing after you’ve already spent ages trying to get everything nicely balanced doesn’t make much sense, and pretty much defeats the purpose of balancing instruments in the first place! Try setting up your master buss processing at the beginning of the mix so that this processing is aiding your progression by getting you to the end-result faster.

Here are a few examples of the added benefits to mixing through your master-buss processing from the start:

NOTE – You don’t want to be hitting any of this processing TOO hard during the mixing stage. You can always make this processing more drastic at the end to enhance the overall effect.

Tape + Console Emulation:

– Smooth, natural sounding high frequency roll-0f and extra fatness in the low-end depending on type of console, tape type and tape speed used.

– Pleasant harmonic enhancement which makes your individual tracks sound thicker + more alive from the beginning.

– Rounded and less “peaky” sounding transients which are less fatigue-inducing to listen to.

Buss compression: (2-4 dB reduction MAX)

– Extra mix glue which will make your individual tracks sound more cohesive with each other.

– Enhanced transient punch from the get-go.

– Added harmonic saturation which will fatten and smooth out the mix. (if the compressor is analog hardware modeled)

Limiter +/or Clipping: (Minimal gain reduction during mixing, only on errant peaks)

– Will give you a better idea of what your mix is going to sound like when it’s mastered, helping you to pass better judgement on things such as drum levels.

– Will prevent your mix from continuously triggering your peak indicator.

Conclusion:

If you haven’t tried this workflow before then I’d highly recommend you give it a go. You’ll find that your mixes come together quicker and sound closer to a finished product earlier on in the process.

5) Saturation/distortion can slice through a mix:

SaturationDistortion Vocals

Soundtoys Decapitator – An excellent distortion plugin

Having trouble getting your vocals to cut through that wall of distorted guitars?

Try adding/blending in some tasteful saturation (or heavy distortion!) to get certain instruments nice and in your face. You can use pretty much anything to get this distortion as long as it sounds good. Guitar amps, FX pedals, saturation units, you name it!

A great method of using this trick is to blend the saturation/distortion in under your dry tracks by using a the mix knob on the plugin or by using the distortion as an FX send in parallel. By doing this you can process the distorted signal separately from your dry tracks, and also preserve more of the transient detail and intelligibility of the dry tracks.

Here are a few places to try adding saturation and distortion:

Your lead vocals: Try blending in some fairly heavy distortion underneath your dry vocal channel in parallel to give it that extra bit of bite and presence.

Your drum shell mics: Saturation/distortion does a magical thing to the sustain and thickness when applied to a snare track, or any drum track for that matter!

Your bass DI track: Try duplicating your bass channel so that you have one clean “low-end” channel and one heavily distorted “grit” channel. Filter these channels differently so that the clean channel consists of only the low-end information and the grit channel consists of only the high-mid/treble information. This is a great way of maintaining clarity in your low-end while also helping your bass to cut through a dense mix.

Note – Remember, all things in moderation!

6) Add and Juggle extra elements to maintain interest:

EzDrummer Percussion

EZDrummer 2 includes great sounding, easy to use percussion loops

Do you have any percussion in your track? Why not give it a go?

I bet you’d be surprised if I told you that by adding a simple tambourine or shaker into certain sections of a track you can really accentuate the groove and pulse while also enhancing the sense of progression throughout the duration of the song.

Note – When I say percussion I’m not necessarily just talking about tambourines or shakers. I’m mainly talking about anything that can give a bit of extra movement and excitement to the feel of the track.

After reading what I’ve just written you’re probably thinking something along the lines of: “Yeah, I get it… but this definitely doesn’t apply for heavy metal and hard rock…” or “Percussion is lame, no way it’s making it’s way on to my records…

Well… tell that to these guys:

Killswitch Engage – My Last Serenade + Hate by Design: 16th note Tambourines throughout the choruses.

Metallica – Sad But True + Wherever I May Roam: 16th note Shakers going for almost the entire duration of each song.

Alice in Chains – Man in The Box: Tambourine accenting the downbeat on the snare during the chorus.

Avatar – Torn Apart: 16th Note Tambourine in the Instrumental sections after each chorus. (Check out this band if you haven’t heard of them before, this song has one of the coolest music videos I’ve ever seen).

Nickelback – Dark Horse: Shakers and Tambourines throughout almost every song on the album.

Note – Think what you want about Nickelback, but there’s no denying that the production quality and mixing on their material is absolutely top-notch, which I’m willing to bet plays a huge role in the success of their albums.

ALSO: Producer Mutt Lange REALLY knows what he’s doing when it comes to arrangement, instrumentation and making a hit record (just check out his discography and you’ll know what I mean).

Conclusion:

Now don’t get me wrong… I’m not saying that you should go and add percussion to EVERY song you record, or even have it that loud in the mix when you do for that matter. I’m simply letting you know that it can be exactly what your track needs to gain a bit of a necessary lift in certain sections.

Just give it a go!

7) Listen to your mix through the public’s ears:

The Public's Ears

Your average listener’s monitoring rig

Your listeners don’t have $1000+ monitoring systems…

Lets face it, probably around %90 of the people who are going to listen to your mixes are going to be listening through less-than-stellar monitoring in less-than-optimal listening environments.

Some of these Include:

-Mobile phones.

-Terrible car hi-fi systems.

-Overhyped “fashion statement” headphones (hint, hint).

-Cheap earbuds.

-Shops and malls, usually through tiny speaker systems.

Realistically it’s near-impossible to mix a song which is going to translate well when played back on ALL systems without doing multiple mix versions to accommodate them. BUT… there is still definite value in testing your music out on different speakers in order to try and get it to a happy medium of balance and consistency  for every listener, no matter how they choose to listen.

Application:

Try listening to your mix through some laptop speakers and a car stereo system. The biggest issues that will usually stick out when you try this are your mid-range and your low-end (or lack thereof…).

Here are some things to look out for/try out on your next mix:

– If your low-end isn’t audible through a pair of regular laptop speakers then maybe it’s time to try out some harmonic enhancement plugins like Waves MaxBass or R-Bass. These types of plugins can help the bass content in your mixes to become audible through smaller speakers which don’t go as low as a full range speaker system.

– Home stereo systems can sometimes have a rather scooped sounding mid-range. You might want to combat this by being careful with how much mid-range you’re removing while mixing.

8) Difference is the key to width:

The Key To Width

Double tracked rhythm guitars

If your left and right signals are too similar, it’s not REALLY in stereo…

I had to learn this lesson the hard way… When I first started mixing I used to edit my double tracked rhythm guitars to the point that they were basically identical to each other. I thought that by doing this, I could achieve a super-tight and punchy guitar section. The truth is I’d pretty much missed the mark completely…

How come?

One of the main reasons for double tracking guitar parts in the first place is to get them out of the centre of the stereo field. By making your left and right too similar via editing you are basically making them more mono.

How to maintain stereo width?

– Your best bet to achieve tight, punchy and wide double-tracked guitars is to record the takes really well in the first place.

Instead of having a “comp and edit hundreds of mediocre takes into a perfect take” mentality, try and get the guitarist to track the doubles as tightly as possible (although sometimes you simply don’t have any other option but to polish the living life out of a turd in order to get anywhere close to the guitar tracks you need). If done right, this will result in tight, punchy and natural sounding doubles with just enough difference to maintain a good level of left-right separation and overall width.

– Another way to increase the stereo separation between the two sides is to use a slightly different recording setup for each double. Try using a different amp/cab combination for each guitar track in order to introduce further separation between the two sides (the classic “dual rectifier + 5150” combo comes to mind).

Note – Make sure that the individual tones compliment each other in a pleasing way, otherwise you’re just gonna make it sound weird.

9) Automation before compression:

Automation Before Compression

Pre-FX volume automation on a vocal track

Ease the load on your compressors!

There’s a reason top dogs in the mixing game like CLA and Andy Wallace are always talking about the importance of volume automation. It’s because it’s one of the most effective ways to craft yourself a loud and punchy sounding mix without having to use stupid amounts of compression to get everything upfront and in your face.

Sure, compression is pretty much a necessary evil at this point when it comes to getting something extremely dynamic like a vocal pinned on top of the music at all times… but by using some good old-fashioned volume automation beforehand, you can reduce the amount of work the compressor is having to do, and in return introduce less compression-caused issues such as pumping and distortion.

How to apply this concept?

This approach can be applied to pretty much any instrument with a fairly dynamic nature. Here are a few of tips on using volume automation before you reach for a compressor:

– Try automating your pre-fx vocal level section-by-section (or word-by-word in some cases) so that it’s more consistent throughout the song before it hits your first compressor. This will ease the load on the compressor and prevent it from jumping all over the place, resulting in fewer noticeable artifacts.

– Make sure you’re not ruining the flow and realism of the vocals by over-flattening the performance. Hopefully this goes without saying, but don’t go and start automating all of the transients at the start of each word and try to make them the same level as the decays, as this is a sure-fire way of making your vocal sound like garbage.

– You can also use pre-fx volume automation to reduce the sibilance in vocal tracks by reducing the level of the harsh “s,t,ch,th” sounds. These sounds will usually appear like dense blobs within your waveform and are quite easy to spot and automate.

10) Have you been EQ’ing in solo?

EQ-ing in Solo

Tunnel Vision – Eqing in solo/out of context

WARNING: EXTREMELY FAR FETCHED METAPHOR INCOMING!

EQ’ing individual instruments in solo, to later on just throw them all together at the last minute and hope for the best, is like cooking each individual ingredient of a cake separately and then blending all of the ingredients together and hoping for it to form a solid result.

Terrible metaphors aside though: How any single element of your mix sounds while it’s being listened to in solo is unimportant! (unless it’s the only thing playing)

The only people who are ever going to hear those instruments on their own are yourself and the band you’re recording with. According to that statement, surely the measure of how good any particular instrument in the mix sounds should be based on how it sounds in the context of the mix, when it’s fighting against dozens of other elements for the same space.

Now you might be thinking: {Insert famous engineer name here} spends a lot of time EQ’ing in solo in their demo videos…

That’s a pretty accurate observation, but it’s important to remember that those guys have completed hundreds, if not thousands of mixes, and trained their ears to the point that they know exactly what a solo’d instrument should sound like in order to compete within a full mix.

This doesn’t mean soloing is wrong, as it’s still an amazing tool for focusing in on issues within the individual tracks without getting distracted by all of the other sounds in your mix.

Conclusion:

It’s important to remember that we call this process “mixing” for a reason… I can personally vouch for the fact that your mixing ability and final products will improve drastically if you stop focusing on the individual and start focusing on the whole.

Final Words:

I hope that this article has given you some new ideas to try out during your next project.

Be sure to let me know in the comment section below if any of this information has helped you out, or if you have any further questions regarding anything I’ve talked about here.

Stay tuned for part 2 in the not-so-distant future!


Thomas Brett is a producer, mixing engineer and songwriter at Brett Brothers recording studio in the UK. Check out the Brett Brothers studio website for more information and articles on all things mixing www.brettbrothersstudio.com

Having trouble understanding De-essers? Check out Thomas Brett’s URM Blog, Death To Sibilance!

Nail The MixNail The Mix is our online mixing school that gives you REAL multi-tracks from REAL bands, plus a mixing class from the producer who recorded it. Past guests include Periphery, Chelsea Grin, Machine Head and State Champs. Join now for instant access!


Sick of Bands Coming to Record Unprepared? We’ve got your solution.

SICK OF BANDS COMING TO RECORD UNPREPARED? WE’VE GOT YOUR SOLUTION.
– By Joey Sturgis

Nothing makes a session suck worse than when you’re planning on producing great material with a band that’s just not ready to record in any way, shape or form. They book enough time for a 10 song album, but arrive with 1 song and 5 riffs written… and they can barely play those 5 riffs!

There are plenty of reasons for this disconnect:

  • Inexperience
  • Lack of practice
  • Too many distractions
  • Laziness
  • Lack of discipline
  • The list goes on and on…

Band members run into enough stress in their careers between label demands and touring, or day jobs and family life. Many see the studio as a getaway from the day-to-day.

So what can you do as an engineer/producer to keep the session moving in the right direction?

[clickfunnels_clickpop exit=”true” id=”5j5usoiqwzl4doja” subdomain=”unstoppablerecordingmachine”]mailing-list-button[/clickfunnels_clickpop]

Be Malleable in Your Process

You need to be flexible with your workflow above all else. No two bands are the same. It stands to reason that no two recording sessions will be the same either. Even if a band fits a certain style, you’re going to take different approaches in tracking that coax the best performance out of the musician.

Here are a few of my favorite ways to switch things up:

Record Vocals on Day 1

Too often vocals are saved for last. When a vocalist walks into the vocal booth after weeks of tracking other instruments, it can be overwhelming. You might be throwing your vocalist’s performance under the bus by not including him sooner.

Whether or not you choose to keep the Day 1 vocals at the end of tracking is up to you. These vocals aren’t necessarily made for the final mix. They’re captured for the sake of inspiration.

Your singer will feel more included in the overall process by being included from the get-go. The rest of the band will have, at minimum, a reference vocal to help them dial in the groove of a song. Hard drive space is cheap. Capture everything and you might be pleasantly surprised when those Day 1 vocals were exactly what your mix needs.

No Demos? Make Them

You’re going to make me say it twice: Hard drive space is cheap.

If the band doesn’t have a demo or rough track when they’re walking into the studio, make one. It can be a microphone or two in a room with the band. It doesn’t have to sound amazing, and the performance doesn’t have to be perfect.

The point is to capture a “rough draft” of what the song should sound like. Without one, you don’t have anything to fall back on when the bassist suddenly forgets his transition leading into the bridge. Throughout recording, things can change. Parts get added and cut to make the song work. The demo provides a starting point, a reference for where the song originated.

Speaking of changing parts

Record The Drums Last

If the band hasn’t finalized a song down to the last note, you’ve got little to lose by trying this approach. The benefit to recording drums last is that the band has a chance to iron out any in-studio changes beforehand.

Feel free to start off with a scratch drum track when trying this approach. Some musicians just can’t find the groove with a click track but can do wonders with a basic drum pattern. Have the drummer leave space for the others to find their sound.

Then, once everyone’s happy with their parts, have the drummer play through. They’ll benefit from having full instrumentation in their headphones, and they’ll be able to confidently play fills/complex sections with less fluctuation between takes because of it.

Best Practices for Tracking an Unprepared Band

Maybe you’re not ready to mess with your workflow to try out the techniques we’ve talked about so far. Don’t worry, every single engineer (and band) can take advantage of these last two helpful techniques:

Record with a DI Whenever Possible

We preach this approach whenever possible, but it’s because it works! Live amps are noisy, inconsistent, and often compressed/overdriven to the point where editing in your DAW after tracking can be a monumental nightmare.

Don’t rely on a band’s gear when it comes to the quality of your session. A band just starting out may not have the best equipment to begin with. Couple that with the limitations mentioned above, and you’ll quickly see how the guitarist’s tone issues become your issues.

Instead, invest in a good DI so that you can track the clean signal of guitars & basses. Having that DI signal provides you with a quick way to punch in and out without having to worry about cutting off the sustain and room tone of a miced up amplifier.

You can run your amp alongside the DI, or reamp later. You could also use an amp simulator if the guitarist is cool with trying out some new sounds (heads up, they usually are – we’re all dirty gear sluts at heart). The point is to have that clean signal as the least common denominator, giving you a fallback to use later if the performance was good but the sound needs adjusting.

[clickfunnels_clickpop exit=”true” id=”5j5usoiqwzl4doja” subdomain=”unstoppablerecordingmachine”]mailing-list-button[/clickfunnels_clickpop]

Practice Between Sessions

This rule is the absolute easiest way to get an unprepared band up to snuff without having to overhaul your workflow.

Give your bands homework. Be crystal clear with them – this is your job. You take it seriously. Their job is to know their part. Make sure they feel a sense of pride in what they’re doing and they’ll practice when you tell them to. Better yet, they’ll want to do it.

This step is just as much about psychology as it is about the need for rehearsal. By having band members take ownership of their part, they become the biggest advocate for its success. The more you get into the habit of having this conversation with clients, the easier it becomes to have.

At it’s most basic level, you need to ask the question: “Do you feel confident enough in your playing on this song that no one else could play your part better?” If there are any doubts, the seed has been planted and you can bet they’ll find time to practice.

Time to Get Prepared

Feel ready to give some of these a try? Excellent.

Remember, even the most unprepared band can be turned into a successful session if you find the obstacle they’re facing and remove it. Once you find a transparent and honest way to communicate with your artists, creativity will soar (taking your end product’s quality with it).

Have a story to share where you were able (or unable) to turn an unprepared band’s session around? Add it to the comments section below!


For more awesome tips on becoming a better producer, head on over to the URM Academy blog and subscribe to our podcast or [clickfunnels_clickpop exit=”true” id=”5j5usoiqwzl4doja” subdomain=”unstoppablerecordingmachine”]join our mailing list[/clickfunnels_clickpop].

Nail The MixNail The Mix is our online mixing school that gives you REAL multi-tracks from REAL bands, plus a mixing class from the producer who recorded it. Past guests include Periphery, Chelsea Grin, Machine Head and State Champs. Join now for instant access!

How To Stop Kidding Yourself And Eliminate Self-Delusion

How To Stop Kidding Yourself And Eliminate Self-Delusion | By Joel Wanasek

To be successful at anything you’ve got to eliminate self-delusion.

… and it’s one of the hardest things you’ll ever do, because self-delusion is a very natural part of the human condition. 

However just because it’s natural, doesn’t mean it’s good.

Self-delusion is a cancer of the mind and must be stamped out before you can achieve the clarity of vision needed to turn yourself into an achievement machine.

  • Jealousy
  • Anger
  • Contempt
  • Excuses

Those are all poisons you can choose to feed the cancer of self-delusion.

For instance, when you see someone that’s more successful than you do you immediately try to tear them down, or do you analyze why they’re successful and apply it for yourself?

Which path do you think will bring you closer to your goals?

And let’s be real for a second, we all have goals.

  • Want to make a living recording bands?
  • Become an A list mixer?
  • Or maybe you just want to record your own music better.
Let me tell you a little story…

One of the biggest delusions I’ve ever had is the belief that getting really good at guitar and developing super sick chops would be enough to sustain my career.

I completely disregarded market timing.

In the 1980’s guitar shredding paid massive dividends, but in the early 2000s? Not so much.

Even though we were all great players, my band paid no attention to image, market trends, market timing, and song writing. We just played hard and thought it would lead us to victory.

Wrong!

It only took me 8 years to finally figure this out, and change my life’s path.

8 FREAKING YEARS!

Take that in for a second…

In my heart I knew I was lying to myself, but blind hope and self-delusion shaped my action, and kept me going in the wrong direction for a long time.

Before I could experience any of the success I have today, I had to fail.

And in order to fail, I had to admit to myself that I had failed.

Let’s apply this to audio now:  

The first delusion we need to break is thinking this path will be easy. We need to realize that this stuff is hard work. And to get good, you need to put in the time. Too many young kids I meet just want the fast track or the preset to everything.

There is no fast track or easy mode in audio!

Let me repeat it so it sinks into your head.

THERE IS NO FAST TRACK OR EASY MODE IN AUDIO!

Another common delusion is the “how good am I actually” question. Ego always tells us that we are better than we are. It’s easy to make a massive amount of progress and think that you are starting to become hot stuff.

Let me share a secret with you…

I know a lot of very famous producers. Not a single one of them on the A or B list thinks that they’re amazing. They don’t take shortcuts or pump up their own egos. They’re all trying to get better, every day.

The only way to be truly great at something is to commit to being great and then be strict enough in your discipline to actually follow through.

Every. Single. Day.

A final, and very common delusion people have, is that the only way to make serious money in this business is to work with signed bands.

Budgets from unsigned bands alone have helped me purchase over 100k worth of gear while paying my living expenses, insurance, food bills, and supporting my children.

You can actually make out really well not working with signed bands.

Labels have politics, money and inter-office ego battles. These things often clash and sometimes can result in weird situations where you don’t get paid for long periods of time.

Nearly every producer I know that works on signed bands has had at least 1 dispute with a label over money.

While working with signed artists is cool for your cred, it’s a lot easier to get paid recording unsigned acts because they show up, give you money, and go home.

Now it’s your turn to take control of your audio career.

Answer the following questions:
  1. What self delusions do you have? Trust your gut feeling, you know what they are. Admit them to yourself.
  2. What are you going to do right NOW to change that mindset?
  3. What is holding you back from achieving massive success in your career and life?
  4. Do you look at successful people and feel resentment? Ask yourself why? As the great Chase Jarvis says, “don’t hate, congratulate!”

For more awesome tips on becoming a better producer, head on over to the URM Academy blog and subscribe to our podcast.

Nail The MixNail The Mix is our online mixing school that gives you REAL multi-tracks from REAL bands, plus a mixing class from the producer who recorded it. Past guests include Periphery, Chelsea Grin, Machine Head and State Champs. Join now for instant access!

Making Sure You’re Getting Your Inspiration Nourished Properly

Making Sure You’re Getting Your Inspiration Nourished Properly – By Jesse Cannon

While I recognize I am about to talk about nutrition to a bunch of energy drink swilling, Taco­Bell ingesting people whose idea of exercise is cranking a snare drum to tune it, understanding how to nurture your mind to make great music is crucial to making great records.

There’s a famous saying that gets tossed around a lot that you’re the product of the five people you hang out with the most. In finance they say you’re as rich as the five people you talk to the most. Well, this also goes for musical influence. The five things you listen to the most will largely shape what you create. With years of music listening this can be diminished down to what you listened to over the course of your life. However, for beginners, this is especially crucial since you don’t have years of accumulating influence, standards, and a palette to draw from.

After establishing that inspiration is research, we need to recognize that you should be conscious of the inspiration you’re taking in as if it were a diet. When I’m trying to get inspired for a record, I try to consider my inspiration diet. I then nurture myself for what I’ll need to make sure I’m inspired for a project.

Here are considerations I often take in when trying to make sure I’m going to be on the best diet to be inspired on a project:

Favorites Vs. Fresh­ 

It can be easy to get lost in your favorite records. Getting to know them as best you can is some of the most important listening you can do to figure out what you love about them. Plus it feels great to listen to them! But you also need to be taking in new records to gain new and fresh ideas. Even if these records aren’t music made in recent years, you need to continue to get inspired by new source material. The inverse can also be true. You can be too focused on new records versus exploring your favorites and figuring out what makes them tick. If I give a concentrated listen to many of my favorite records even decades later, I can still find new details from them to get inspired by, but there’s nothing like fresh new ideas to get you inspired.

The Greats Vs. The Local Trash ­

Everyone has a favorite local band that’s doing amazing music that the world may never hear. There are also the other ten bands in your local scene who aren’t that special and far too often, musicians put too much time into listening to them. I’ve seen many musicians get lost in listening to their friend’s music that’s poorly done versions of great bands. This drives their standards down. It will make them think subpar ideas are great, instead of getting used to the high standards they need to achieve the greatness of the greats. 

Bells & Whistles Vs. Solid Songs ­

On some records, an artist can be filled with inspiration for song structures and hooks, but when it comes to how to do some crazy soundscapes they may be coming up blank. I’ll often go on an inspiration diet depending on what a band needs for this. If a band needs help coming up with soundscapes, I may end up listening to Mars Volta, Brian Eno, Clinic, The Talking Heads and Chrome to get ideas of what we could do. But if the band has a mind for those bells and whistles, I may try to get into the mind of their favorite songwriters and make sure we stay focused on solid songs. Consider where you feel deficient inspiration wise and consciously take in inspiration that’ll help nurture what you need on a project.

Inspiration opens our brains to the possibility of what can be done in music. The more we are reminded of this possibility the greater connections we can make to do great things in music. Making sure you get the right inspiration is far more important than another hour spent, no matter what your job in music is.


Jesse Cannon is a Brooklyn based record producer, mixer and mastering engineer. He is co-founder of Noise Creators a service that connects musicians to the best producers in music today. He is the author of Get More Fans: The DIY Guide To The New Music Business and the upcoming Processing Creativity.

Click here and listen to Jesse’s guest URM Podcast episode where we discuss strategies upcoming audio engineers can use to promote themselves, and lots of juicy mastering tips.

Click here to read Jesse’s previous URM blog entry, “Band Practice Is Toxic To Your Creativity.”

Nail The MixNail The Mix is our online mixing school that gives you REAL multi-tracks from REAL bands, plus a mixing class from the producer who recorded it. Past guests include Periphery, Chelsea Grin, Machine Head and State Champs. Join now for instant access!

Death To Sibilance: A Simple Guide To De-essing Vocals

Death To Sibilance: A Simple Guide To De-essing Vocals – By Thomas Brett

Over-sibilance is a problem with most recorded vocal tracks. Sibilance is the common name for some of the harsh sounds in the human voice such as “s,t,ch,th”. If not dealt with correctly, these sounds will cut through a mix in a very painful way. In other words, they make your mixes hard to listen to. 

“De-Essing” is the process of reducing the level of these sibilant sounds in order to make the vocal sound more pleasant. I’m going to share some of my favorite de-essing tricks which can be used both during the mixing, and recording stages. 

Tackling Sibilance in the Recording Stage:

The age old recording cliche says “get it right at the source.” I can’t argue with that. One of the best ways to reduce sibilance in your vocal tracks is to capture less sibilance in the first place.

vocal-mic-techniqe                                              
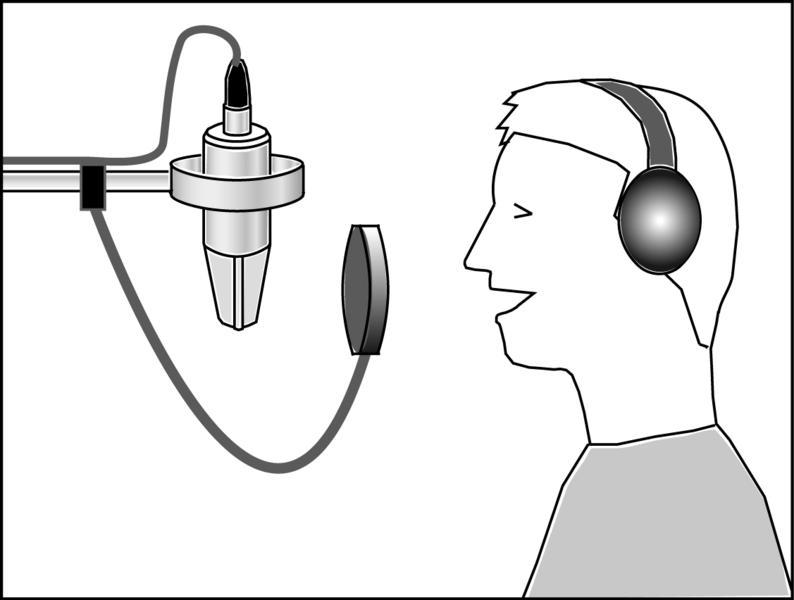
Vocalist singing around two fists (8 inches) away from a condenser microphone.

Don’t place the microphone too close to the singer’s mouth:

On condensers, try to keep the distance between the singer’s mouth and the capsule of the microphone at around 8 inches. Anything closer than this and the sibilance and plosive (bursts of air from P,B sounds) sounds in the vocal will be exaggerated.  

The vocalist will often need to be closer than 8 inches on dynamic microphones like an SM7B. In cases like these try a combination of the methods outlined below.                                                                                                                                            

(BONUS TIP: A good way to make sure the singer stays at the correct distance from the microphone is to tell them to sing at around two fists away. One fist between the mic and the pop filter, and one fist between the singer and the pop filter.)                                                                                                                                                        

Angle the microphone:

High frequency sounds are very directional. By angling the microphone so that it’s not in a direct line with the singer’s mouth you can reduce the amount of sibilance hitting the microphone directly. Plus, there’s the added benefit of reducing plosives (bursts of air from P,B sounds).

45 degree mic angleMicrophone aimed at the singers mouth at a 45 degree angle while the singer aims toward the pop filter.

Try the Pencil Trick:

This is a rather unconventional trick that I hadn’t heard about until Eyal Levi mentioned it while discussing this article. After doing some research and trying it myself, I must admit that it works surprisingly well! While this trick is primarily aimed at stopping plosives, it can sometimes help reduce sibilance as well. 

This technique uses a pencil to block/reduce the amount of air hitting the diaphragm of the microphone, and in return reduce the high-end harshness in the sibilance.

pencil trick
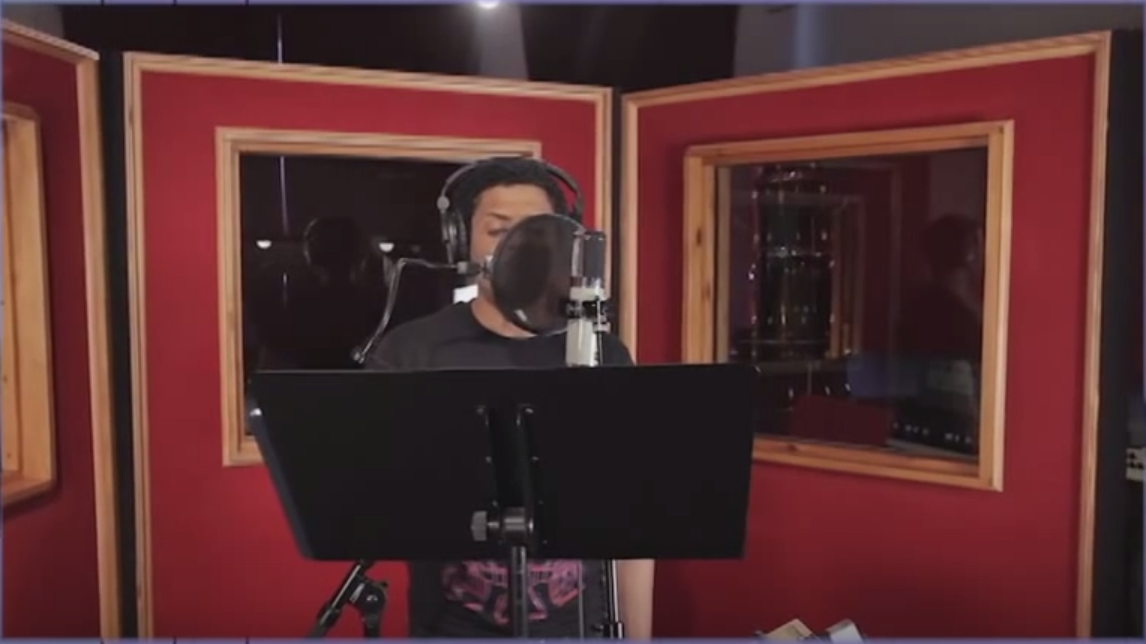
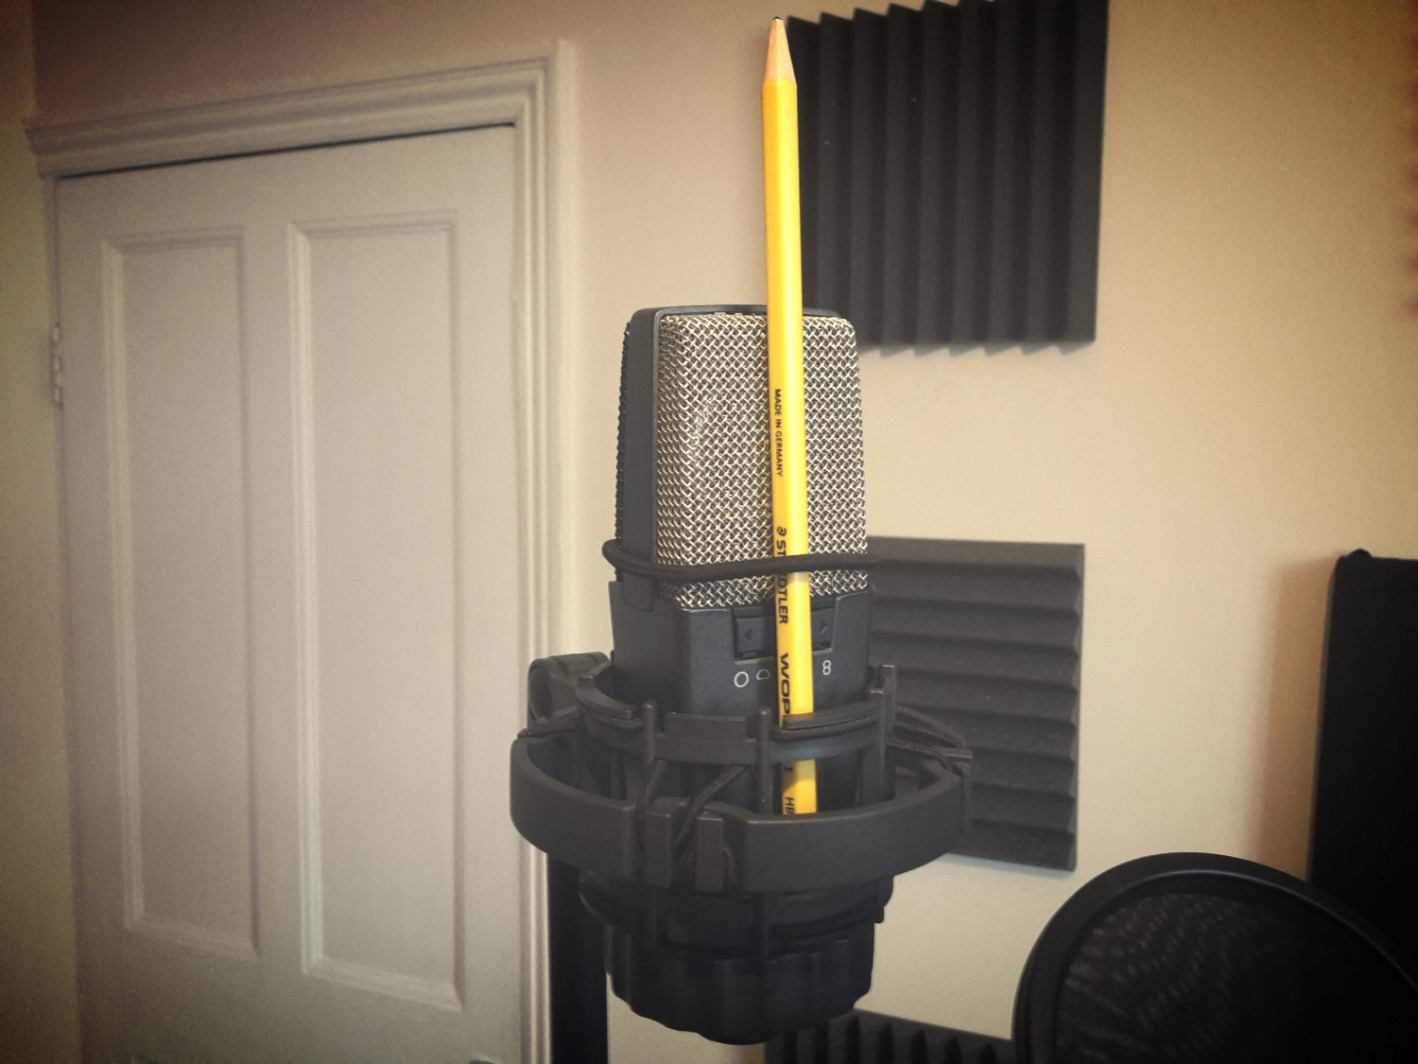
The Pencil Trick on an AKG c414

How to do the Pencil Trick:
  1. Find yourself a regular wooden pencil and a rubber band (a hair-band will also do the trick).
  2. Attach the pencil to the grill of the microphone so that it’s facing straight down over the center of the membrane.
  3. Experiment using this technique with and without a pop-filter. Depending on the severity of the sibilance,  if you’re not careful, you might end up over-dulling the vocal in certain cases.
Tackling Sibilance in the Mixing Stage:

Don’t worry If a vocal hasn’t been recorded properly, or if the vocalist just happens to be extremely sibilant. Handling sibilance in a mix is relatively easy. 

De-Esser Plugins:

The easiest and most popular method to De-Ess a vocal would be to use a De-Esser plugin.

Here’s a list of my favorite De-Esser plugins available on the market today:

  • Fabfilter Pro-DS – My personal favorite. Offers the best customization and the most options.
  • Waves R De-Esser
  • Plugin Alliance SPL De-esser
What is a De-Esser?

A De-Esser is basically a compressor which is side-chained to the high-mid frequencies. When set correctly, a De-esser will only act upon the harsh and sibilant sounds within a vocal. Most De-Essers give you the ability to fine-tune which frequencies are being affected. By using these parameters you can determine where the problem areas are, and how the plugin reacts to them.

De-Essers usually offer two separate ways of reducing sibilance:

1 – Split-Band De-Essing:

A Split-Band De-Esser is a multi-band compressor which has been optimized for sibilant sounds. This setting will only affect the high frequencies of the sibilance (which the user can determine). 

Split Band De-EsserSPL De-Esser in Split-Band Mode

By using this setting you can effectively “dull” the sibilance, and in return cause less irritation to the listener’s ears.

2 – Wide-Band De-Essing:

Unlike Split-Band De-Essing, a wide-band De-esser will compress (turn down) the whole vocal track whenever a sibilant sound crosses the threshold parameter.

Wide Band De-EsserWaves R De-Esser in Wide-Band mode.

I personally prefer using De-Essers in the wide-band setting, as the esses are left intact frequency-wise and only reduced in volume instead.

How to use a De-Esser:
  1. Instantiate a De-Esser plugin as an insert on your vocal channel. The most common places to insert a De-Esser are usually at the very end, or beginning of your signal chain (or both).
  2. Loop a section of the vocal which has a lot of sibilance. 
  3. Choose either wide-band or split-band mode depending on what’s available. Both of these settings work well, I personally prefer using the wide-band mode. It sounds more natural to me.
  4. Set the side-chain frequency of the De-Esser at somewhere between 5kHz to 10kHz. Some De-Essers only give you the option to center the side-chain around a certain frequency area. Others give you multiple frequency sliders in order to set the range between two frequencies.
  5. Set the range of the De-Esser. The range control determines the maximum amount of reduction which will be applied to the sibilance. I usually find that somewhere between 5 to 10 dB of reduction works well. Please note – this is very dependent on the amount of sibilance in any particular vocal track.
  6. Set the threshold parameter so that you are getting the desired amount of reduction.
Manual Volume Automation De-Essing:

De-Essing vocals manually is much more time-consuming compared to using a plugin. However, this method allows for much more control and fine-tuning on a per sibilant basis:

Manual Ess AutomationReducing the volume of a single sibilant using automation.

When viewed in an editor, sibilant sounds within the waveform/vocal will appear like very dense blobs (due to mainly being made up of high frequency information). For this reason it’s very easy to quickly identify the sibilant sounds within a vocal.

Once you’ve spotted the sibilance, the next step is to add a volume envelope to each one and reduce them in volume by anywhere from 5-10dB.

This is basically the same as using a wide-band De-Esser, but with the added control of adjusting the volume for each sibilant separately. Although doing this by-hand is super accurate, the biggest downside is the fact that it takes much longer than just using a plugin.

Split Track De-Essing:

This method of De-Essing is not for the faint-hearted. It comprises of manually cutting each individual sibilant sound out of the vocal track one by one and moving them on to a second channel.

split track de-essSplitting the sibilance on to a separate track and reducing the volume with the channel fader.

This process is the most tedious and labor intensive method of doing the job, but in return gives you full control over the amount of sibilance in your vocal, as well as the option to process the sibilance differently.

In Conclusion:

Using any of these techniques can lead to great results. It’s important to remember that there isn’t really a “correct” way to de-ess a vocal. I find that choosing which method to use really depends on your workflow, and how long you’re willing to spend on the de-essing process.

Try out these techniques in your own projects and make sure to experiment with using multiple techniques on a single vocal. Remember that splitting a process between multiple stages instead of relying on a single plugin or technique can sometimes be the key to more natural sounding results.


Thomas Brett is a producer, mixing engineer and songwriter at Brett Brothers recording studio in the UK. Check out the Brett Brothers studio website for more information and articles on all things mixing www.brettbrothersstudio.com

Nail The MixNail The Mix is our online mixing school that gives you REAL multi-tracks from REAL bands, plus a mixing class from the producer who recorded it. Past guests include Periphery, Chelsea Grin, Machine Head and State Champs. Join now for instant access!