Synths can be tough to mix in metal, and are often f***ed up by inexperienced mixers– especially when there are several layers of them competing with an already dense metal mix, like in “S.H.O.T.” by Chelsea Grin.
Synths can be tough to mix, and are often f***ed up by inexperienced mixers– especially when there are several layers of them competing with an already dense mix, like in “S.H.O.T.” by Chelsea Grin (something like 10 layers of strings competing with a blazing solo). With a ton of information across pretty much the entire frequency spectrum, it’s easy for the synths to drown out the rest of the mix without the right EQ moves. And yet at the same time, you need to be careful not to EQ the life out of either the synths or the guitars. It’s a tough balance that’s one of the arrangements most commonly butchered by metal mixers (both novices and many pros).
In this clip from his Nail The Mix session, Eyal Levi shows you how to do it the right way, balancing several layers of synth orchestration and a choir with a Jason Richardson guitar solo.
Nail The Mix is our online mixing school that gives you REAL multi-tracks from REAL bands, plus a mixing class from the producer who recorded it. Past guests include Periphery, Gojira, Machine Head and State Champs. Join now for instant access!
Quad-tracked guitars are a great way to get that massive, thick sound, but they do have their challenges.
In this clip from NAIL THE MIX, Joel Wanasek works with quad-tracked guitars in a Machine Head session, using some smart EQ moves and a little limiting to balance them against the bass and drums while retaining the thickness and depth of the guitars (the mild phasing that you’re hearing is an inherent part of quad-tracked guitars).
In this clip from NAIL THE MIX, Joel Wanasek works with quad-tracked guitars in a Machine Head session, using some smart EQ moves and a little limiting to balance them against the bass and drums while retaining the thickness and depth of the guitars.
Nail The Mix is our online mixing school that gives you REAL multi-tracks from REAL bands, plus a mixing class from the producer who recorded it. Past guests include Periphery, Chelsea Grin, Gojira, Papa Roach, and State Champs. Join now for instant access!
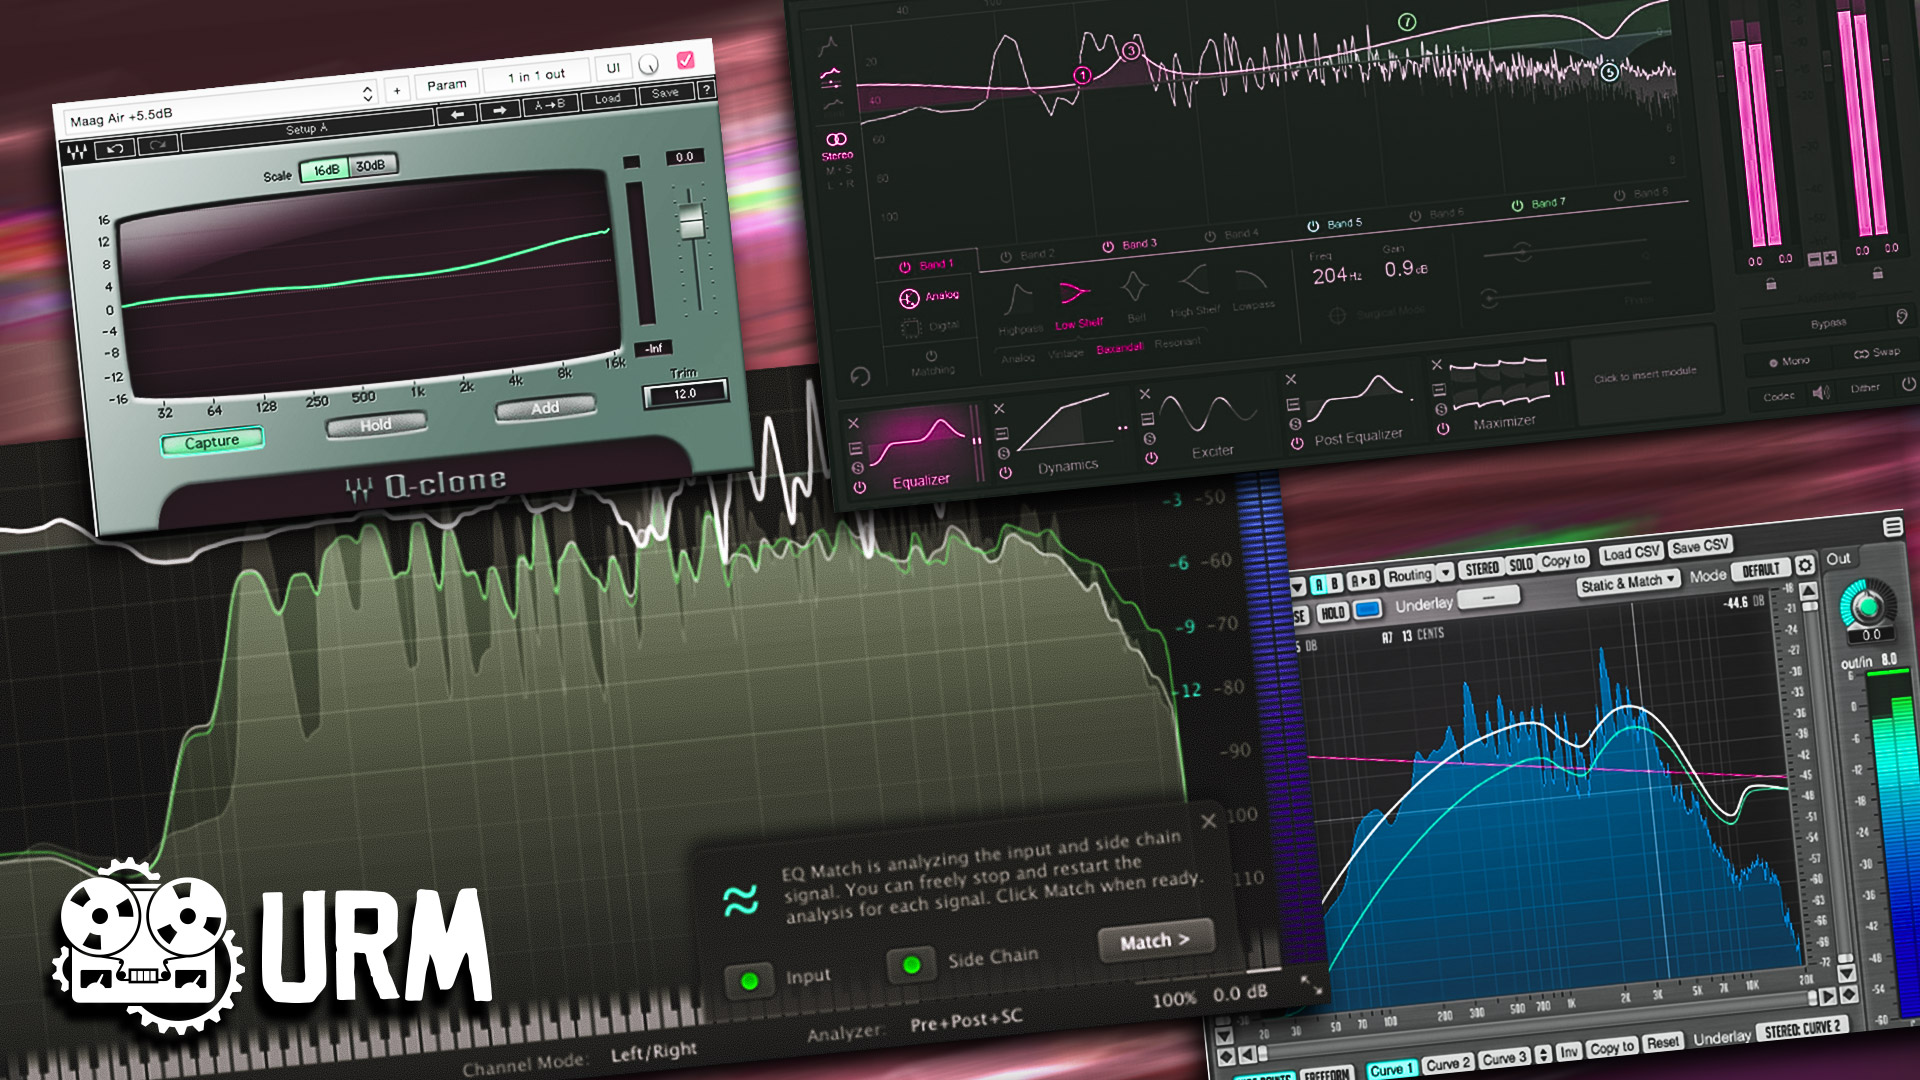
Analysis As a Learning Tool (Part 2) | By Thomas Brett |
As audio engineers we’re always looking to improve our craft and take our mixes to the next level. Two of the key methods to speeding up this learning process are:
Understanding the subtleties of the gear we’re using.
AND
Knowing how to perform accurate analysis and comparisons.
Here are some of the primary tools which you can use in order to analyze and compare sounds or gear, while possibly gaining further insight into the techniques of the pros in the process:
EQ-Matching:
EQ-matching is an awesome feature which comes built-in to quite a few different EQ and mastering plugins these days. I often find myself using this tool as a means of testing certain things out, or simply confirming any frequency related suspicions I might have.
How Does EQ-Matching Work?
An EQ-match basically takes two signals you feed into it, compares their overall frequency information, and provides a corrective EQ curve which can be used to better match their tonal characteristics.
Although EQ-matching can’t achieve %100 replication due to the thousands of factors which go into capturing a specific source, it can really help towards getting you in the same ballpark as the sound you’re after.
Here are a few example situations where EQ-Matching might come in handy:
Comparing Your Mixes to Your Reference Mixes: This is a cool method of pinpointing possible weaknesses within your track and smoothing them out. Check out David Glenn’s Pro Audio Files video for a great show and tell on this subject.
Comparing Drum Samples: EQ matching is a great means of comparing your raw drum samples to processed drum samples. This can be an excellent learning tool which can help you figure out which areas your sounds might be lacking in.
Fixing Tonal Imbalances Between Stereo Overheads: It’s not uncommon to encounter various tonal discrepancies between individual overhead mics – Check out Matthew Weiss’ Pro Audio Files video on this exact topic for an excellent demonstration on how to address these issues using EQ-matching.
I’m sure there are a bunch more similar situations and uses which could be added to this list, but I think you get the point…
Here’s A Practical Example of EQ-Matching In Everyday Mixing Practice:
I was recently working on a project where the acoustic guitar and vocals were tracked in a different country by the singer/guitarist of the band. We had some contact before he started the tracking process, so I was able to give him advice on microphone placement for each instrument beforehand. Overall, he managed to do a decent job with the recording.
HOWEVER
The vocal and acoustic guitar raws I received at the time of mixing came to me as stereo files, which I naturally assumed was just down to incorrect rendering settings. I began EQ’ing away at the vocals without really thinking twice about the fact they were on a stereo track. After a few minutes of tweaking, I realised that they were actually sounding quite “phasey” and weird…
Here is the process I used to determine/confirm the source of the culprit:
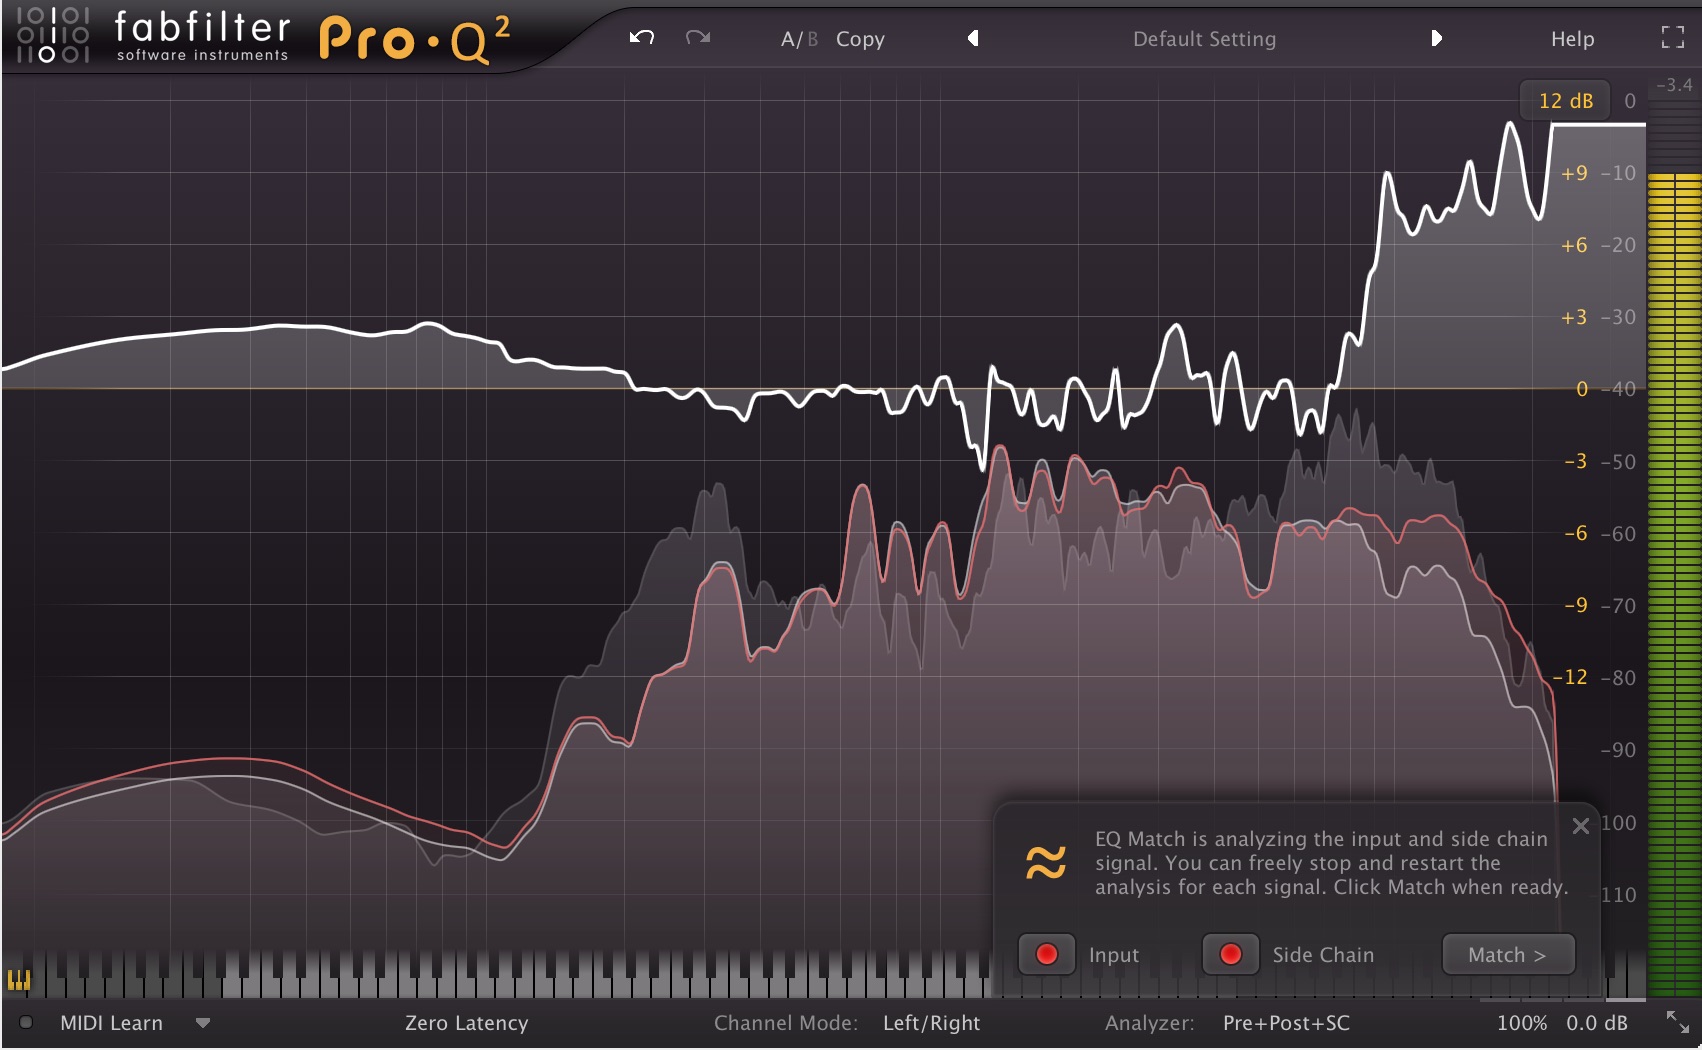
I started out by splitting the stereo vocal track into two individual mono tracks using Reaper’s “explode channels” function.
My second step was to perform an EQ-match between the two channels using Fabfilter Pro-Q2, in order to determine the tonal differences between them.
As you can see below, the results of the EQ-match indicated that there was huge discrepancy in the amount of high and low-end information between the two channels.
Notice how the mid-range between 200Hz – 7kHz is pretty consistent between the two channels, but how the content below and above this range is much more prevalent in one of them.
By using this information we can tell that the vocals have actually been recorded in stereo, but that one of the capsules of the microphone was probably facing off-axis from the recorded sound source. (Due to the reduced proximity effect and lack of high-end clarity)
Long Story Short…
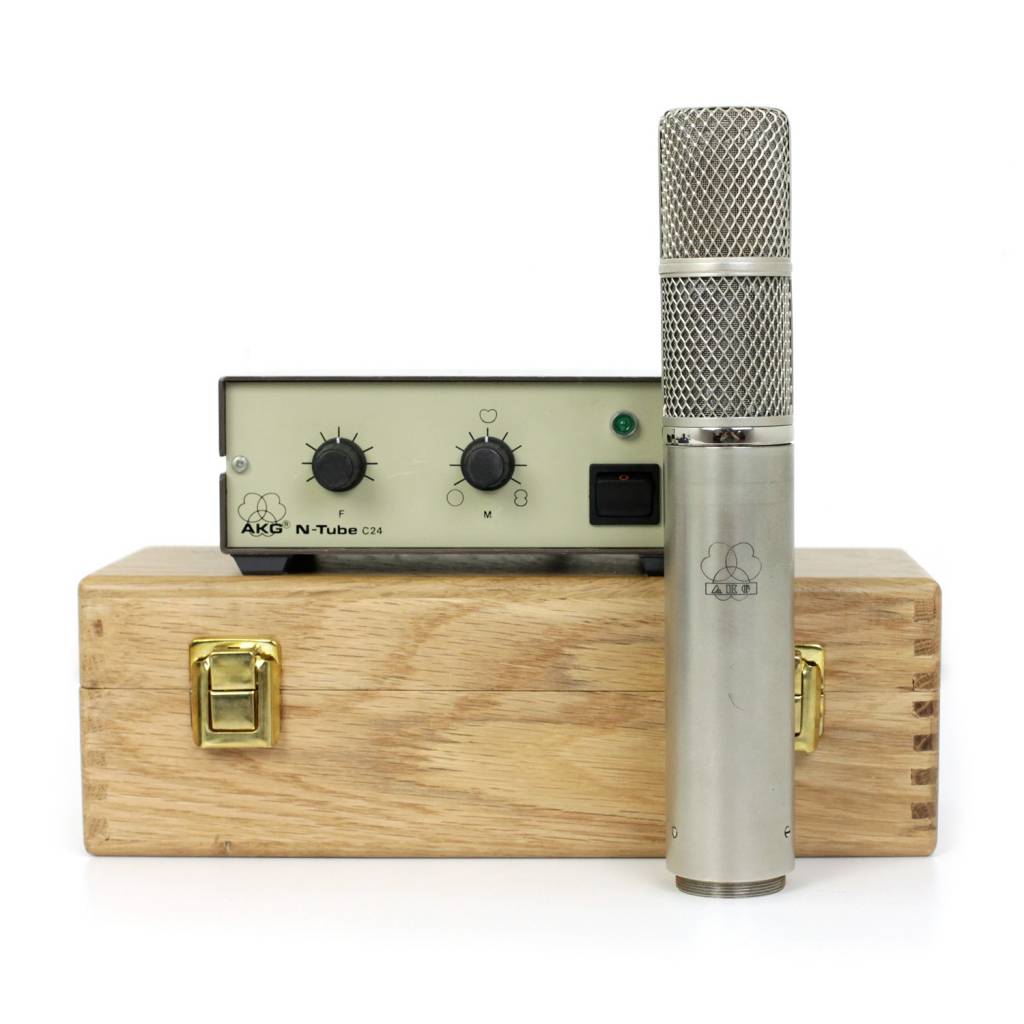
It turns out that the microphone which was used while tracking was an expensive AKG C24 stereo mic (Kind of like a stereo C12, but slightly different in sound), which he had borrowed from a friend. The problem is, due to his lack of recording knowledge (which I don’t blame him for) he had actually used both of the capsules in stereo while recording his vocals and acoustic guitar.
Overall, none of this was really a big issue… as I simply ended up using the recordings from the brighter, on-axis C24 capsule for the project and got rid of the extra channel captured by the second capsule.
Could I have instantly recognized that this was the problem from the get-go?
Sure… but my main purpose in telling you this story is to point out how EQ-matching was an extremely useful tool in confirming my suspicions quickly and accurately in order to aid my decision making mindset.
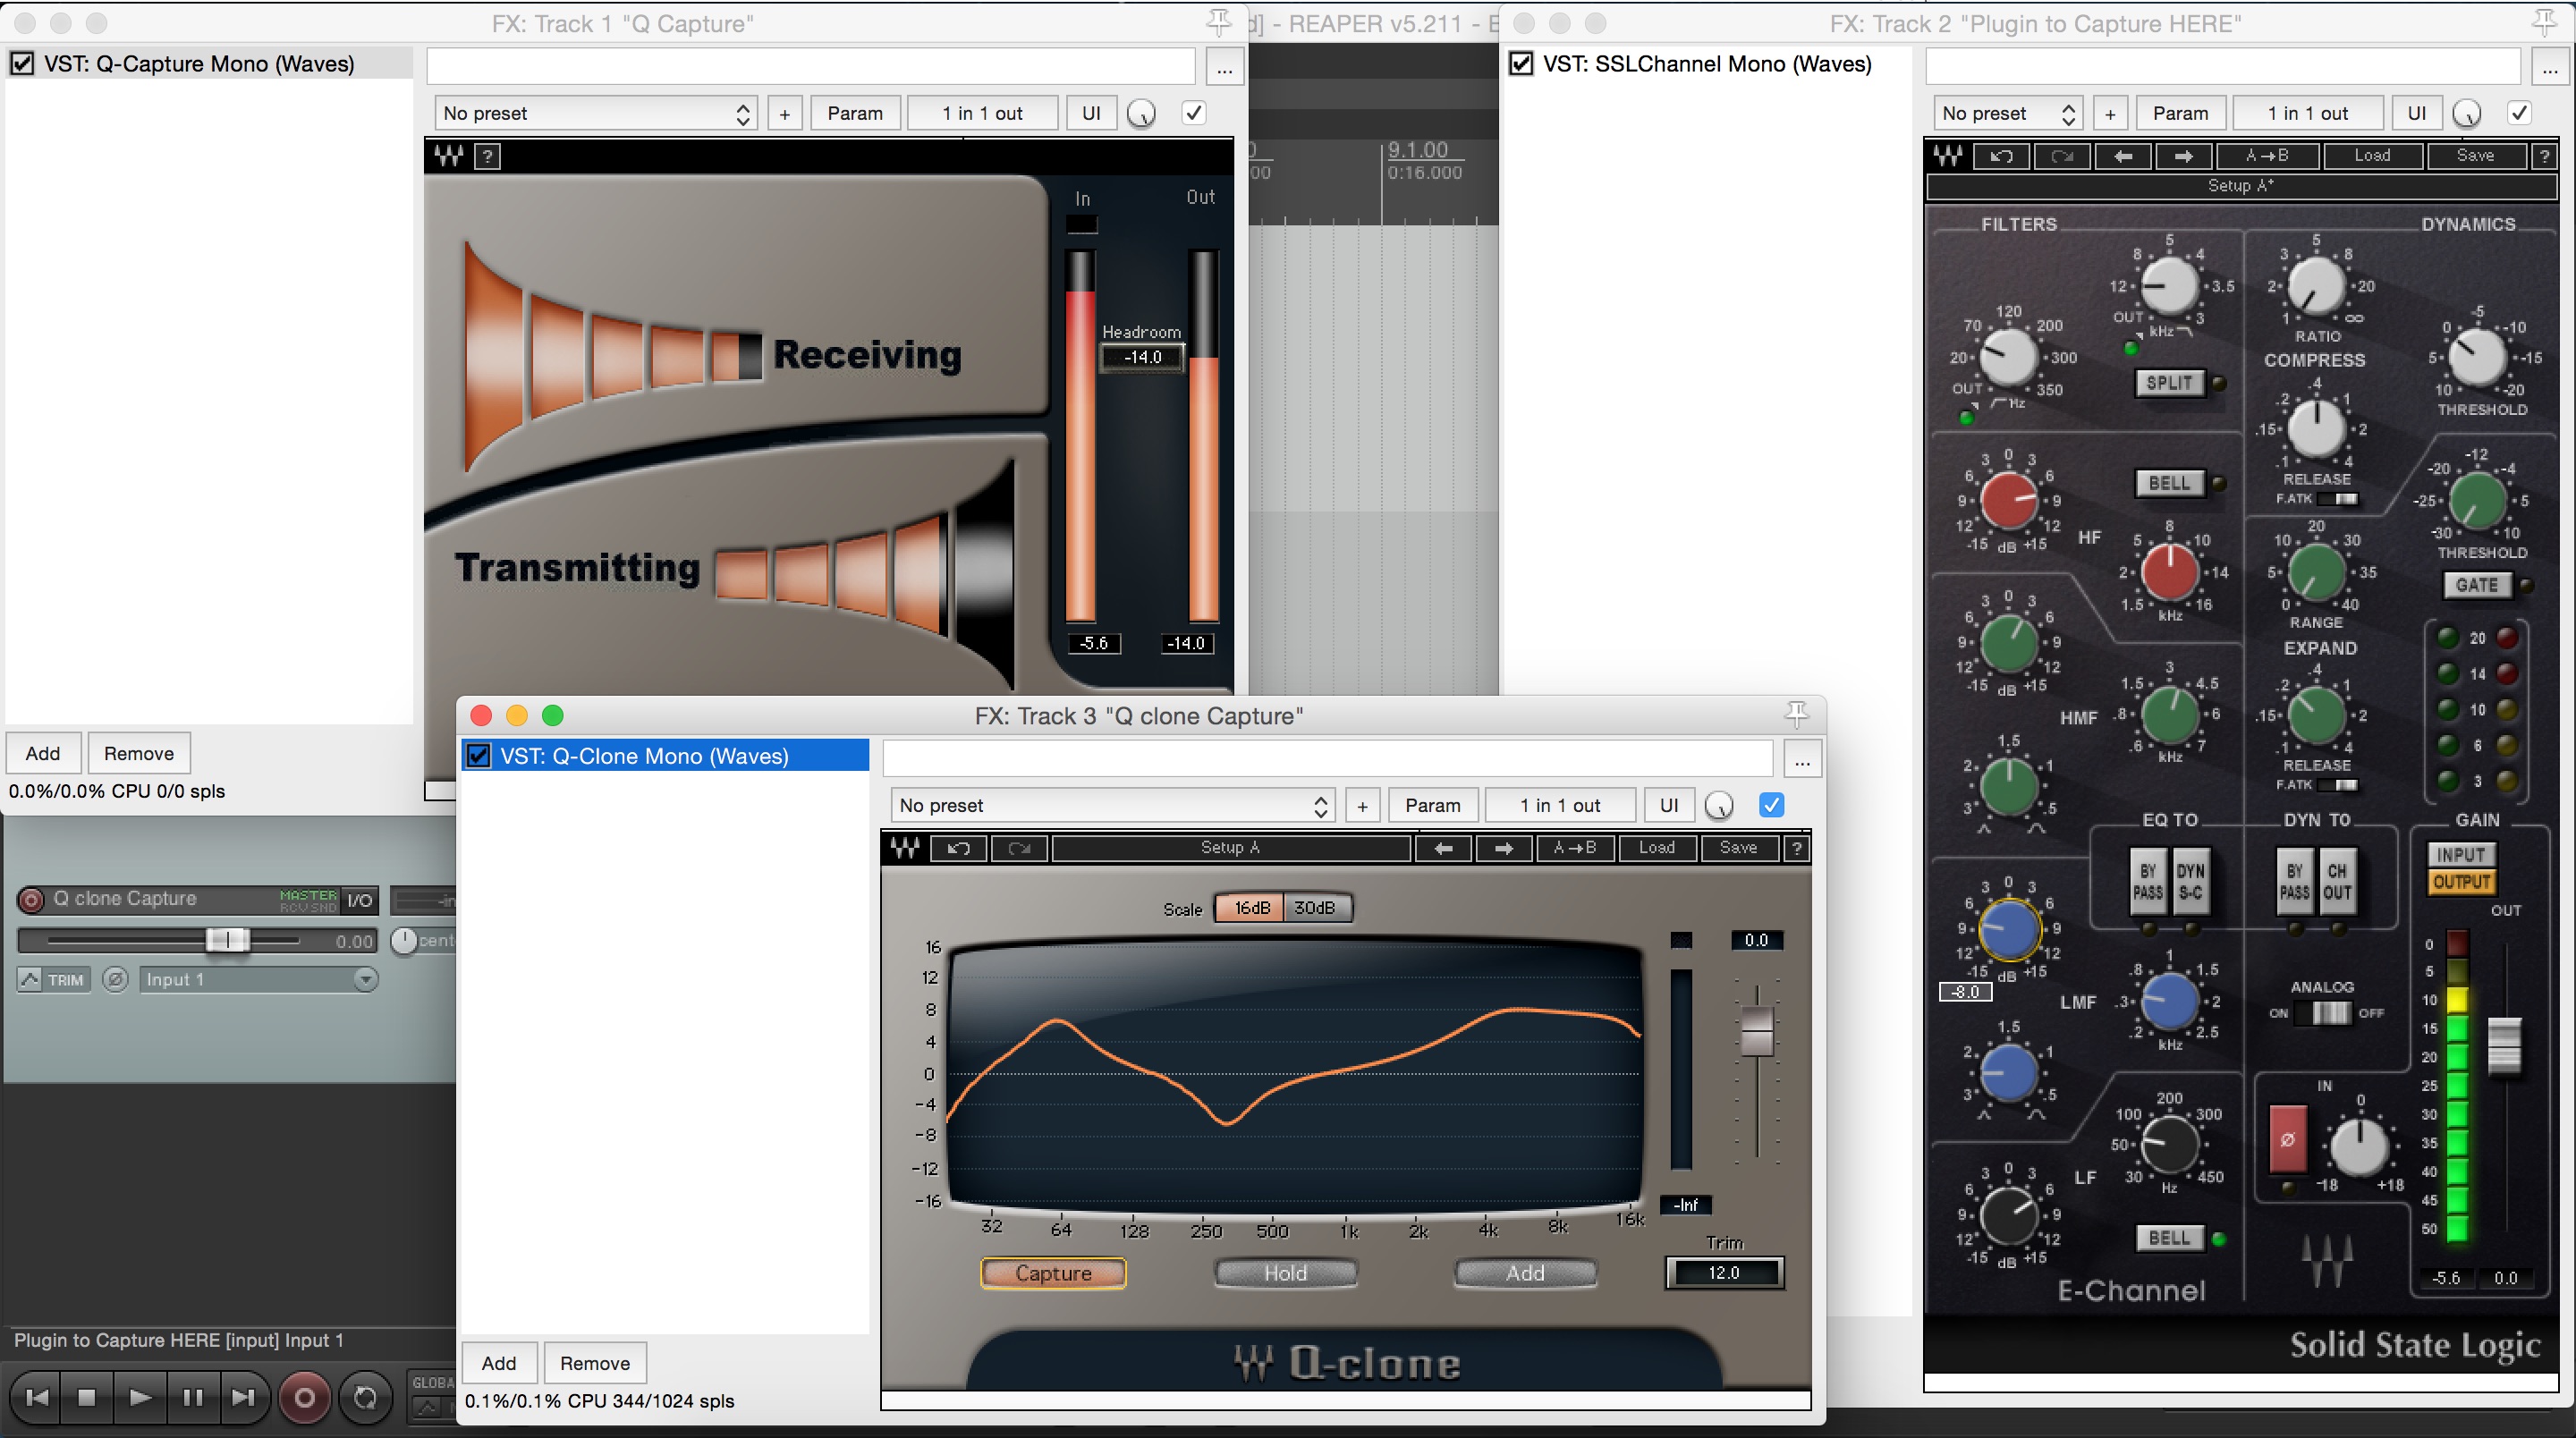
Waves Q-Clone:
This is a fairly unique and interesting plugin which I use on a daily basis for various audio tests and analytical purposes. It isn’t an EQ-matching plugin or spectral analyser as such, but rather a sine-sweep generating convolution plugin which creates real-time impulse responses of the gear it’s being fed through.
Why Is This Useful?
Q-Clone was originally designed as a means of accurately capturing and reproducing the filter curves of expensive analog gear and giving engineers the option to use these curves across multiple tracks simultaneously. This was probably a great selling point when the plugin was initially released, but with the advent of excellent analog-modeled digital EQ’s being so widespread nowadays, this purpose seems a bit obsolete…
Obsolete? Then Why Are You Telling Us About It?
Despite the fact that Q-Clone may have outlived its’ original purpose, another extremely valuable use for this plugin is as a measurement device:
NOTE:I won’t attempt to explain how to set up and operate Q-Clone in this Blog, as it’s fairly complicated and will vary greatly depending on the DAW you’re using. The plugin manual is probably the first place you should look if you’re having any trouble getting it up and running, but I’m sure there are also some great in-depth tutorials available online.
Here are a few example Analytical uses for Waves Q-Clone:
1 – To Learn More About The EQ Curves of Various Analog-Modeled Processors:
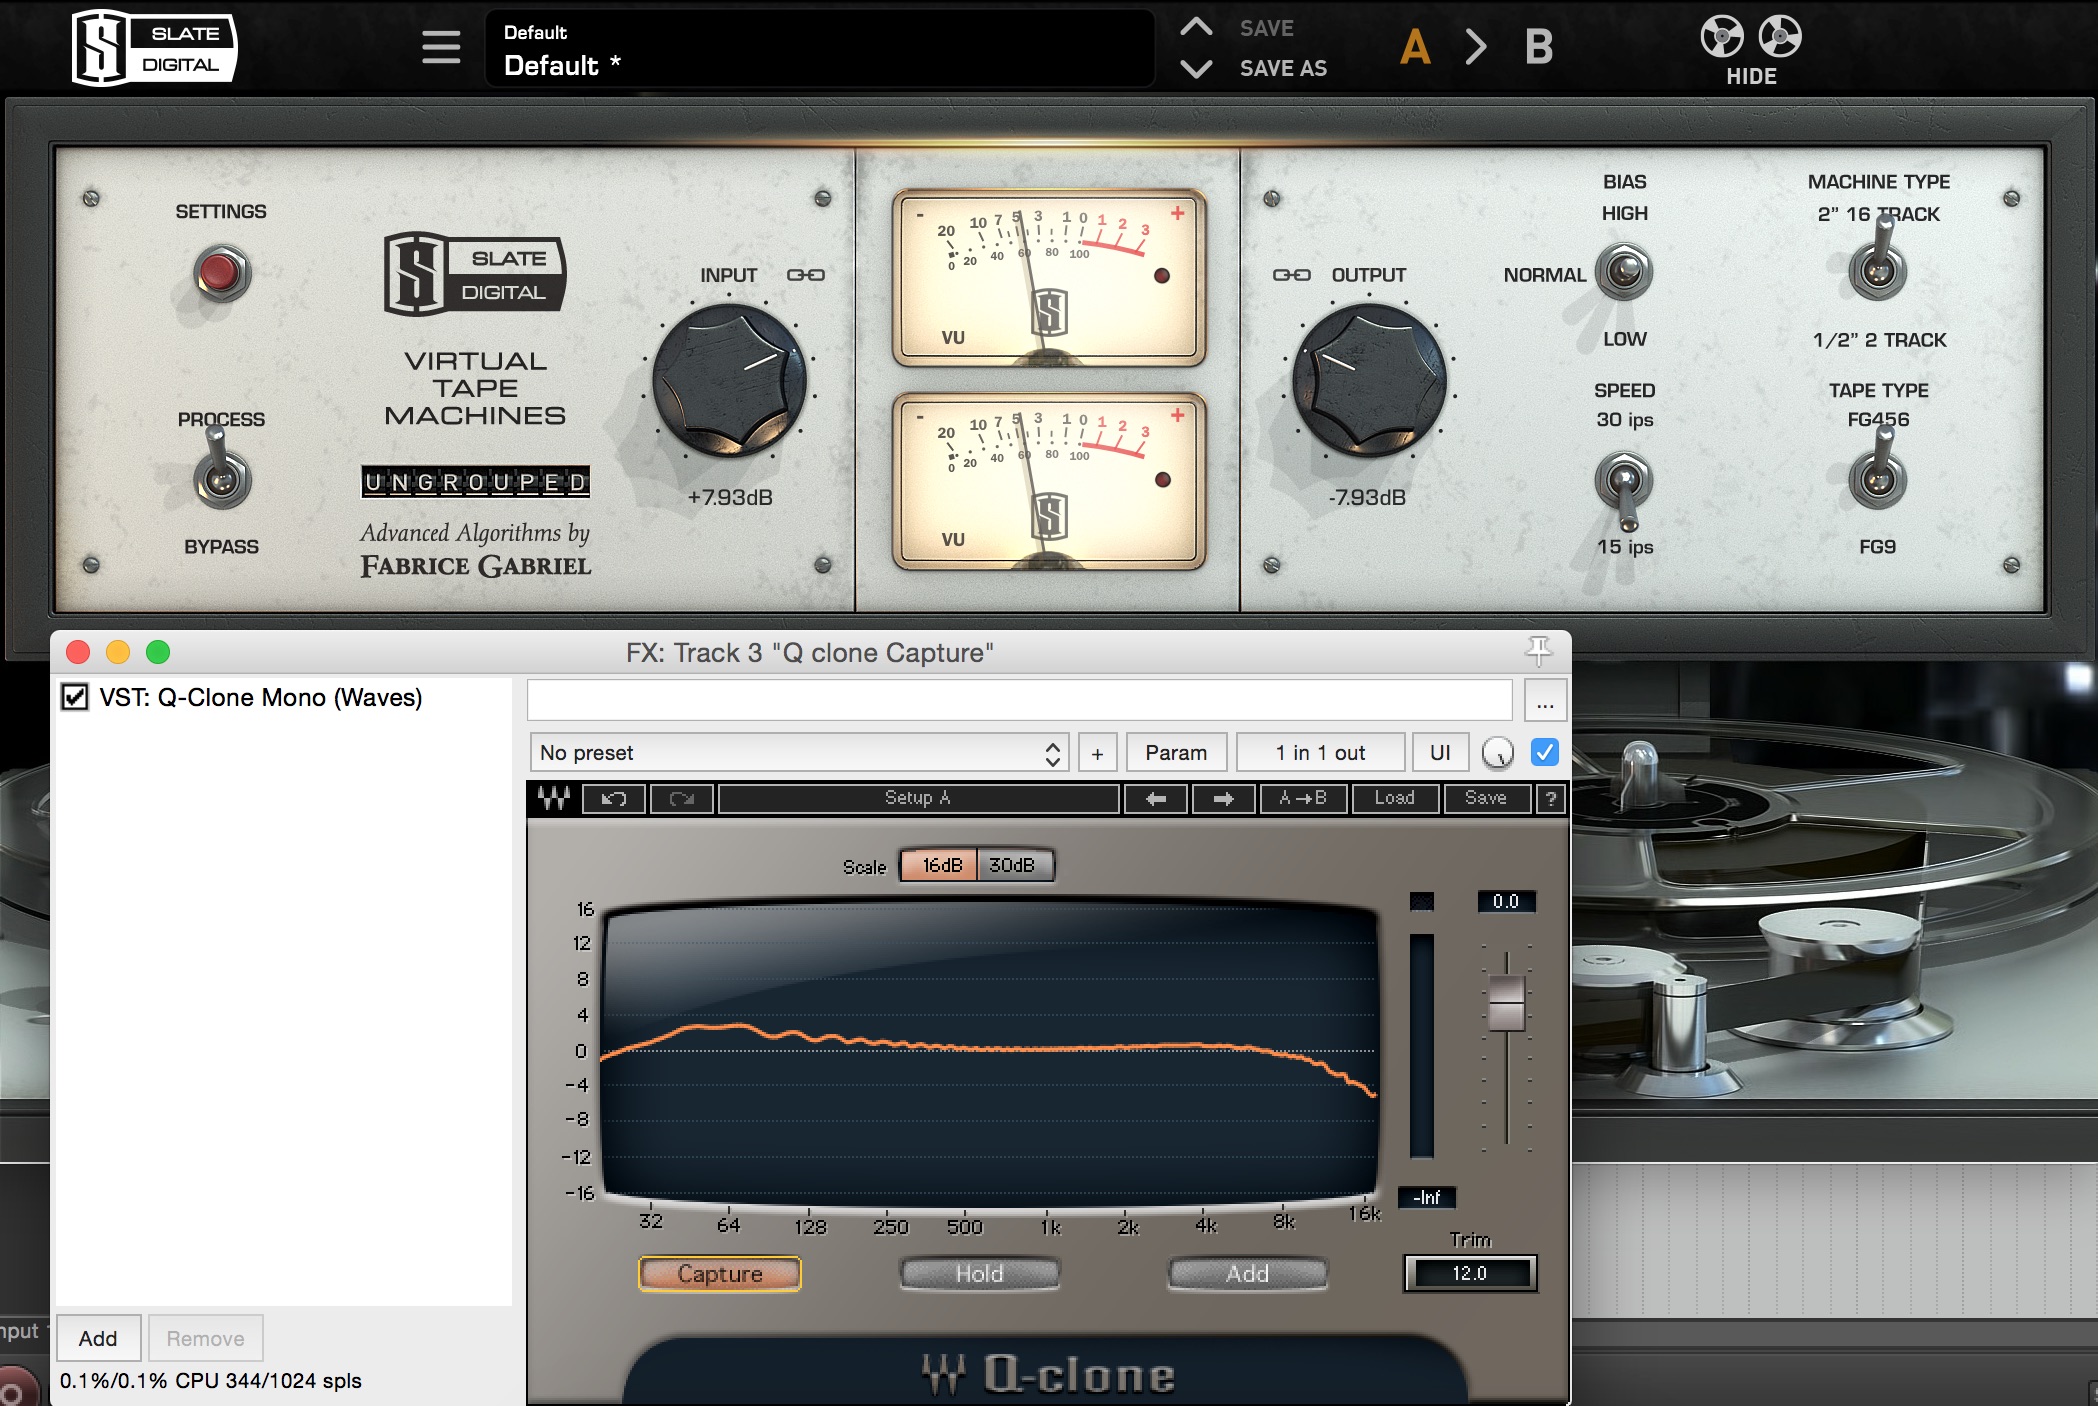
Slate VTM 15 IPS 456 16-Track Frequency Curve Analysis:
Note: By using Waves Q-Clone I am able to go through the various tape-type and tape-speed settings available in VTM and gain a better understanding of how these settings are affecting my audio. Notice how the “vintage sounding” 15IPS 456 tape introduces a fair amount of low-end boost while also rolling off some of the high end.
Further examples of Waves Q-Clone in Action:
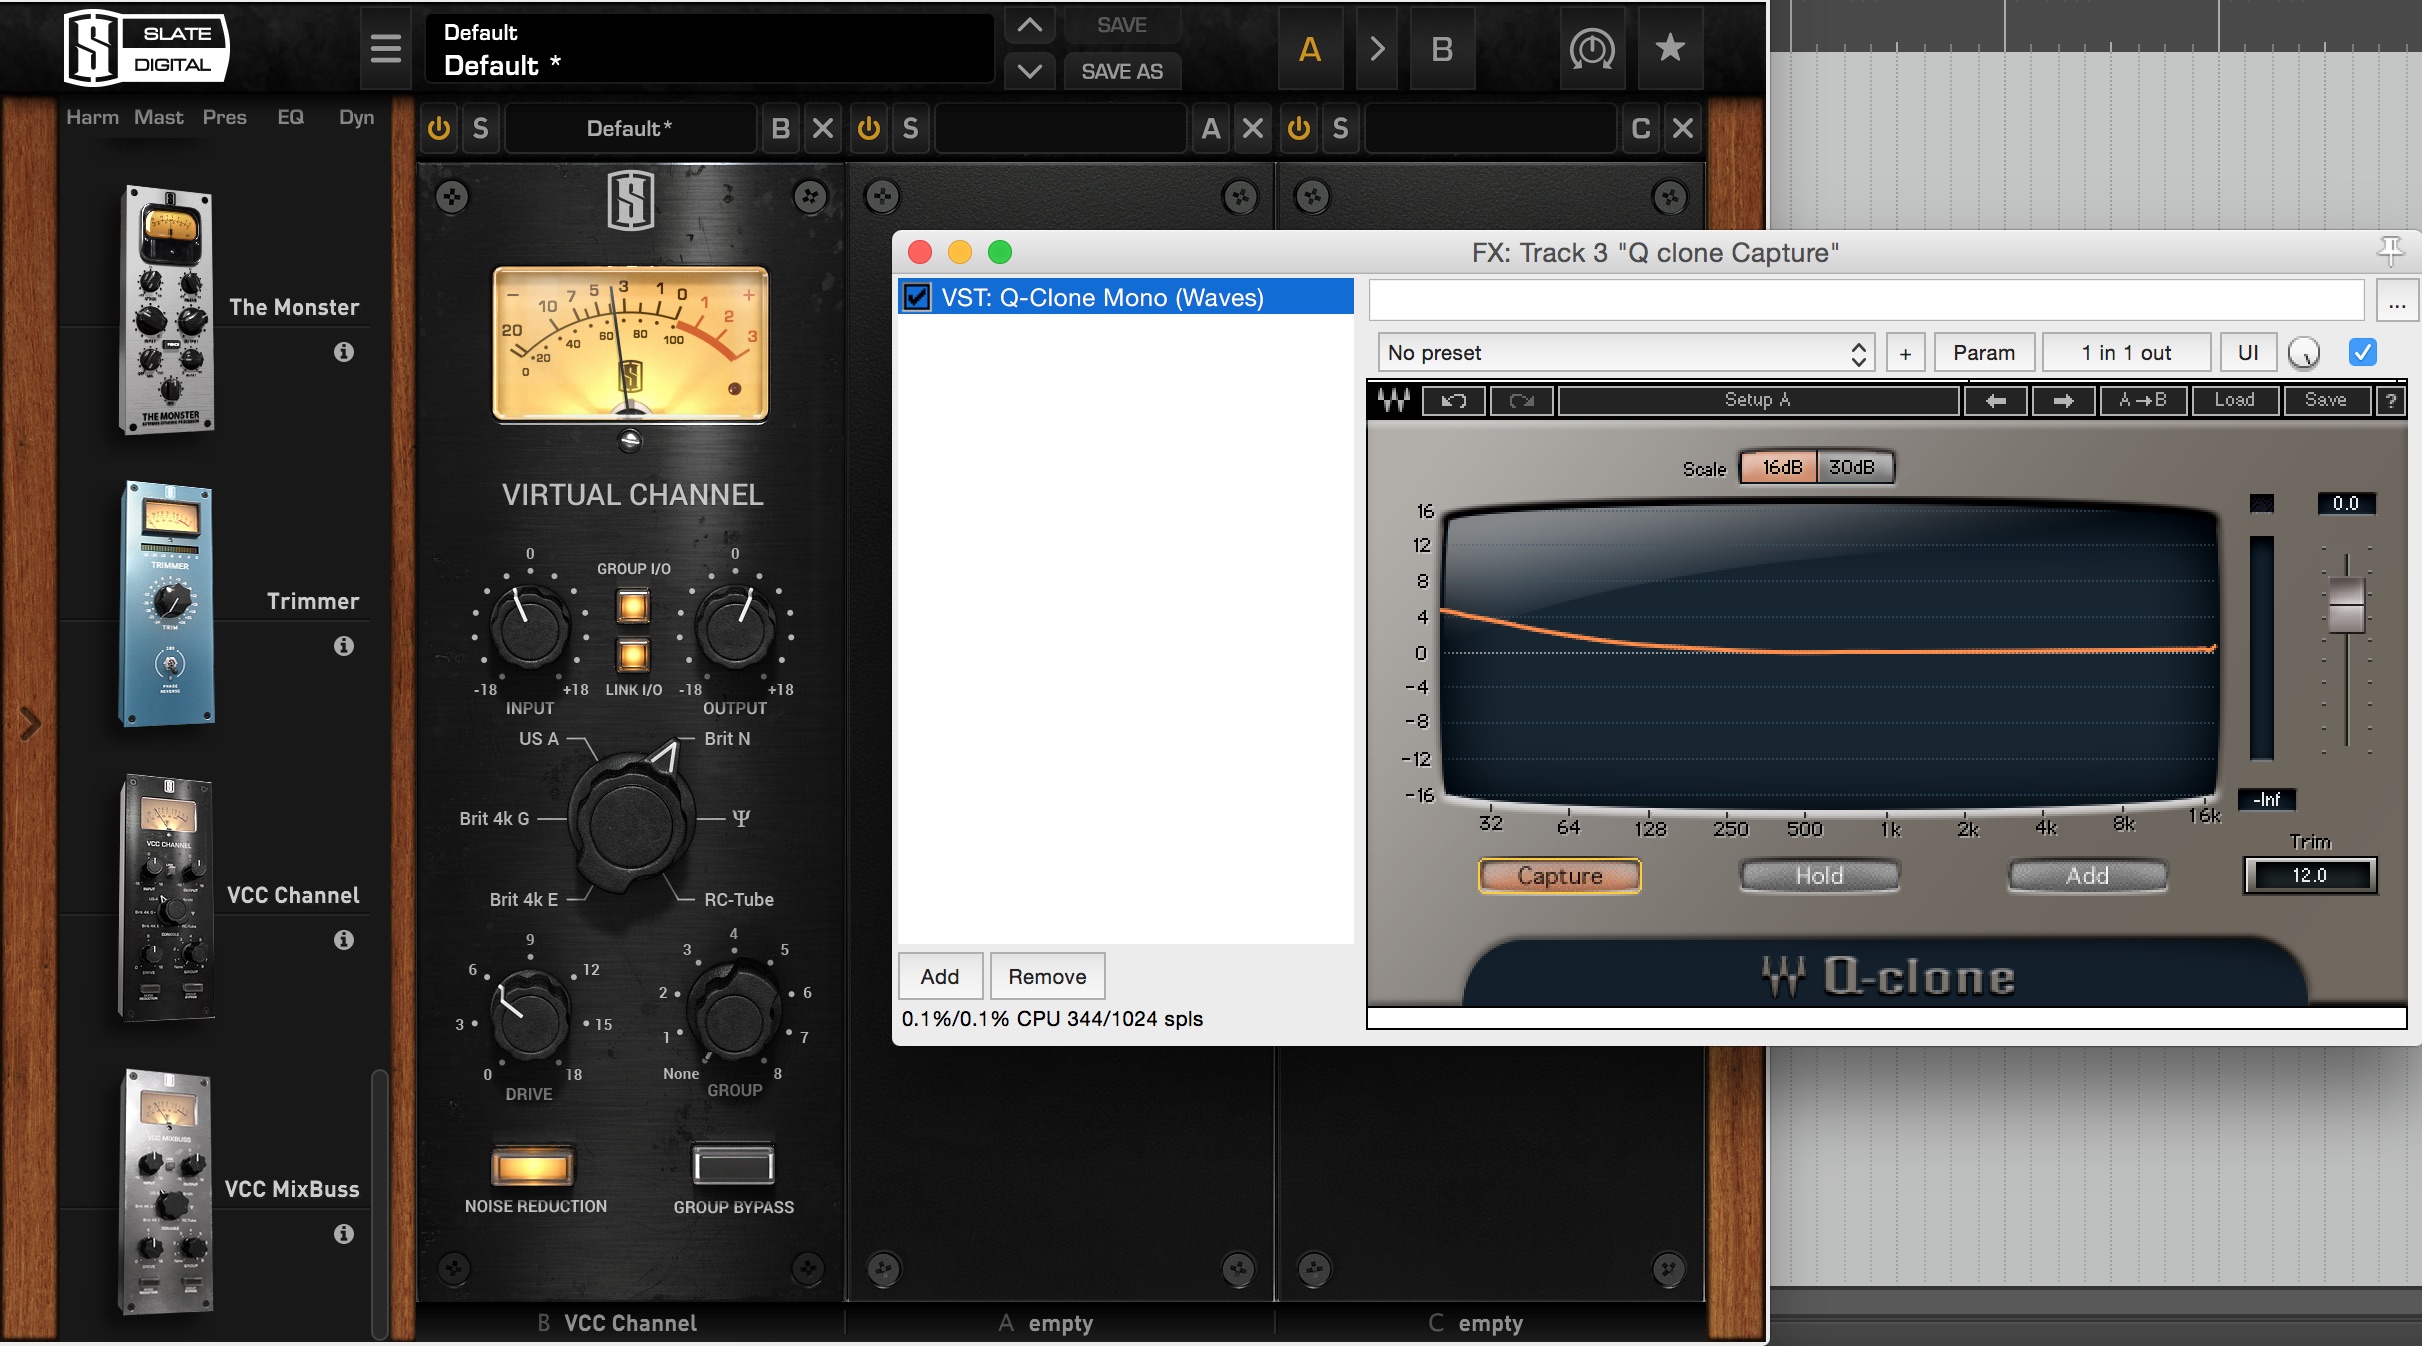
Slate VCC Neve Console Analysis:
Note: On the Neve console setting, Slate VCC introduces a subtle low-end shelf which is part of the reason behind it’s classic “fat” neve sound.
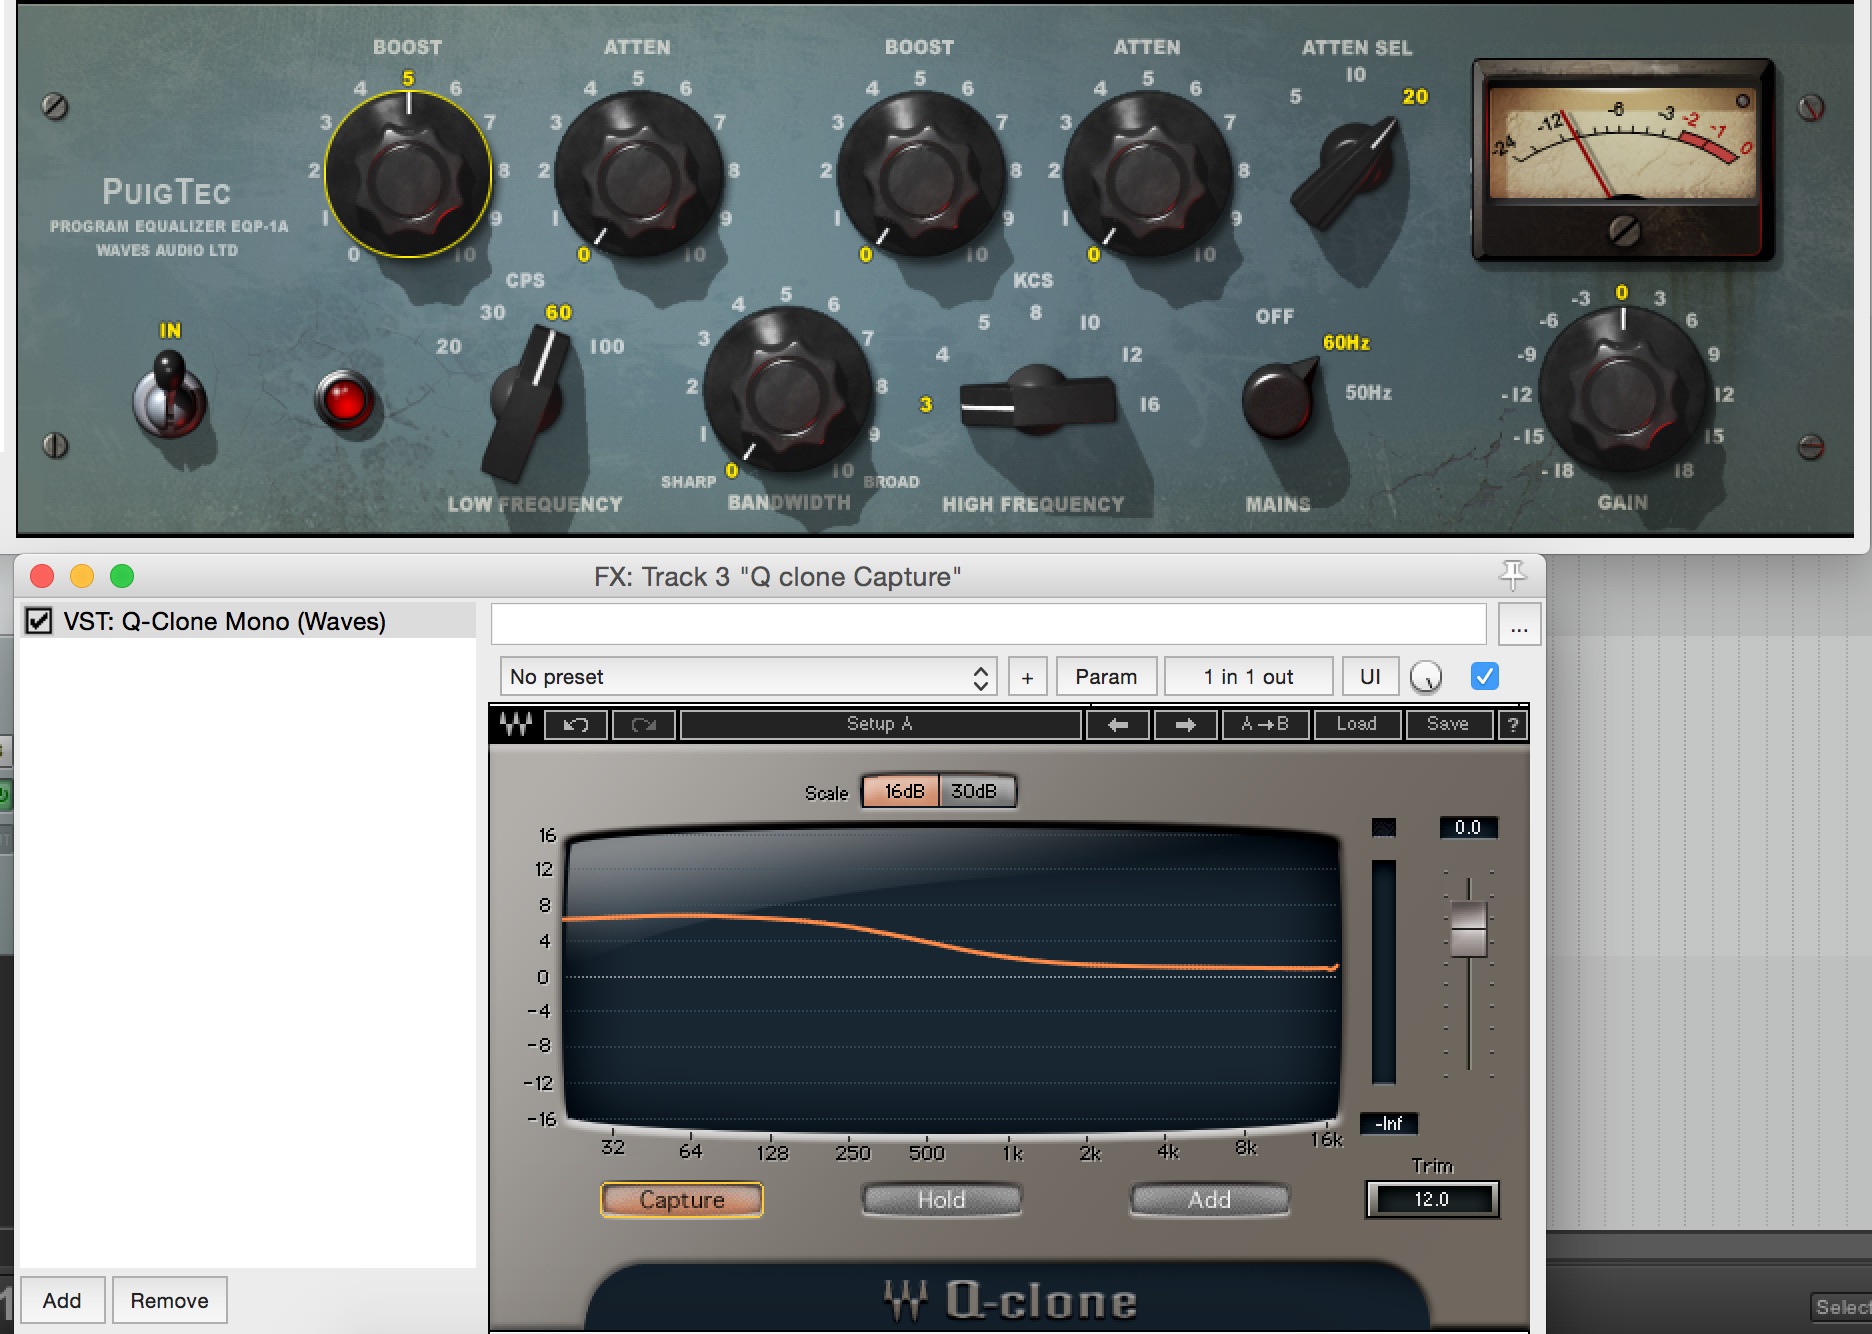
Waves PuigTec EQ Analysis:
Note: Despite being set to 60Hz, the Puigtec’s low-shelf extends all the way up to 1kHz.
2 – To Discover The Secrets Behind Various “Magic Preset” Plugins:
NOTE: Before you start making fun of me: No, I wouldn’t usually use the plugins below while mixing… (Although, there’s no problem in doing so if you find a setting that sounds great!) These are simply for educational purposes!
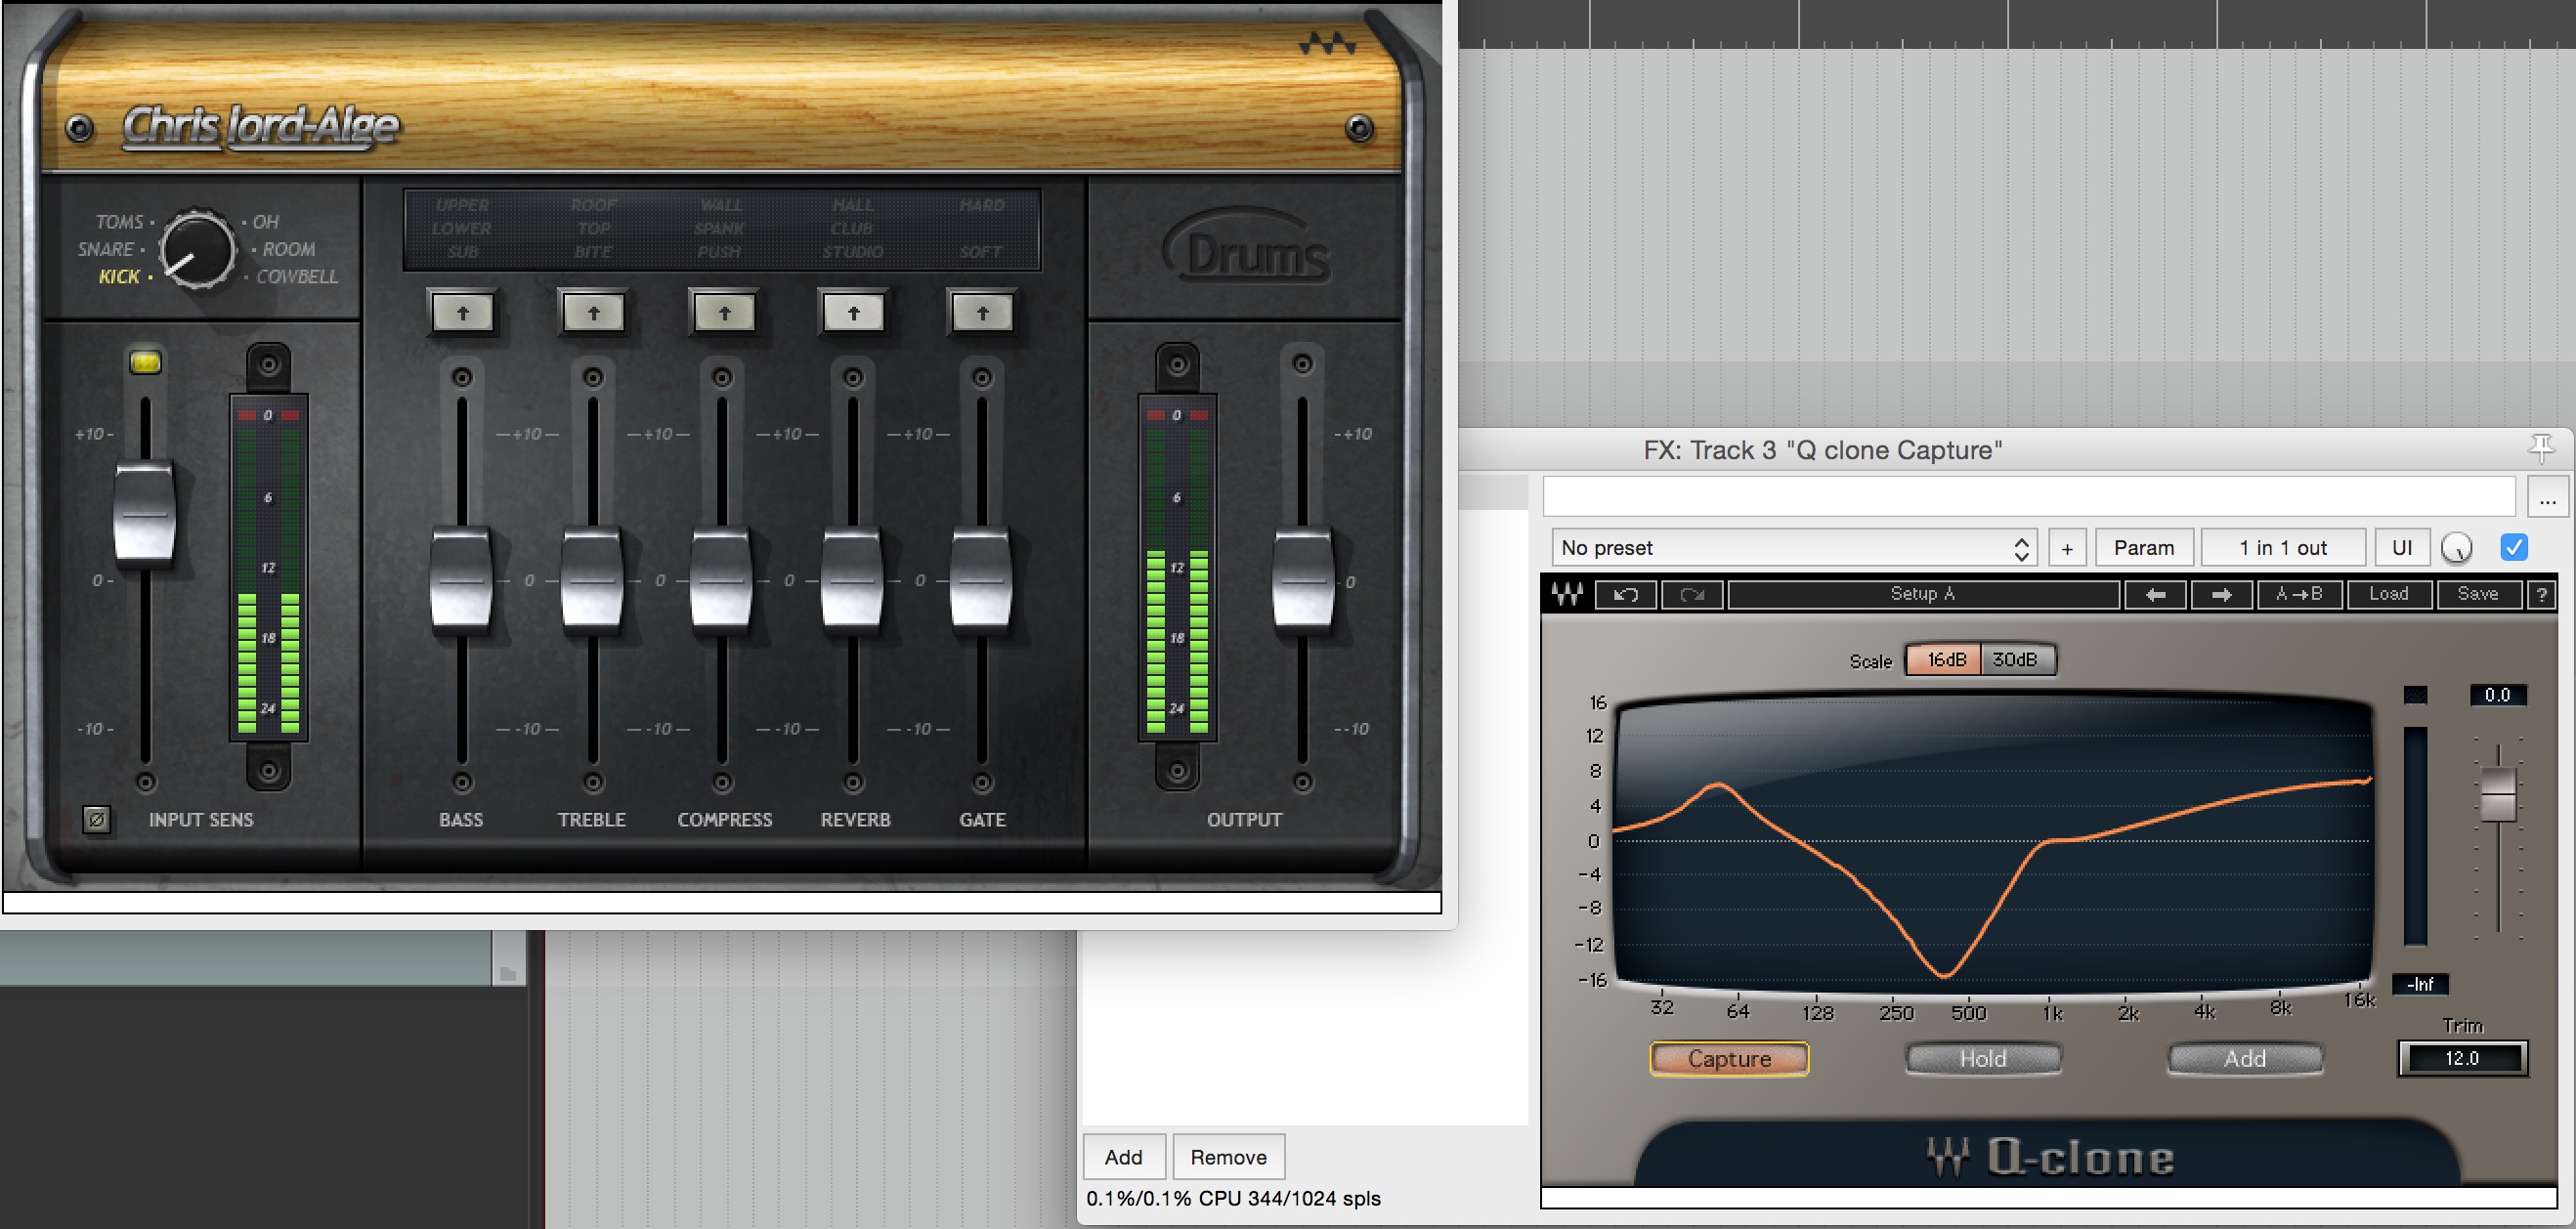
Waves CLA Drums “Kick” Analysis:
Note: CLA clearly isn’t shy of scooping 15dB of mid-range on a kick drum…
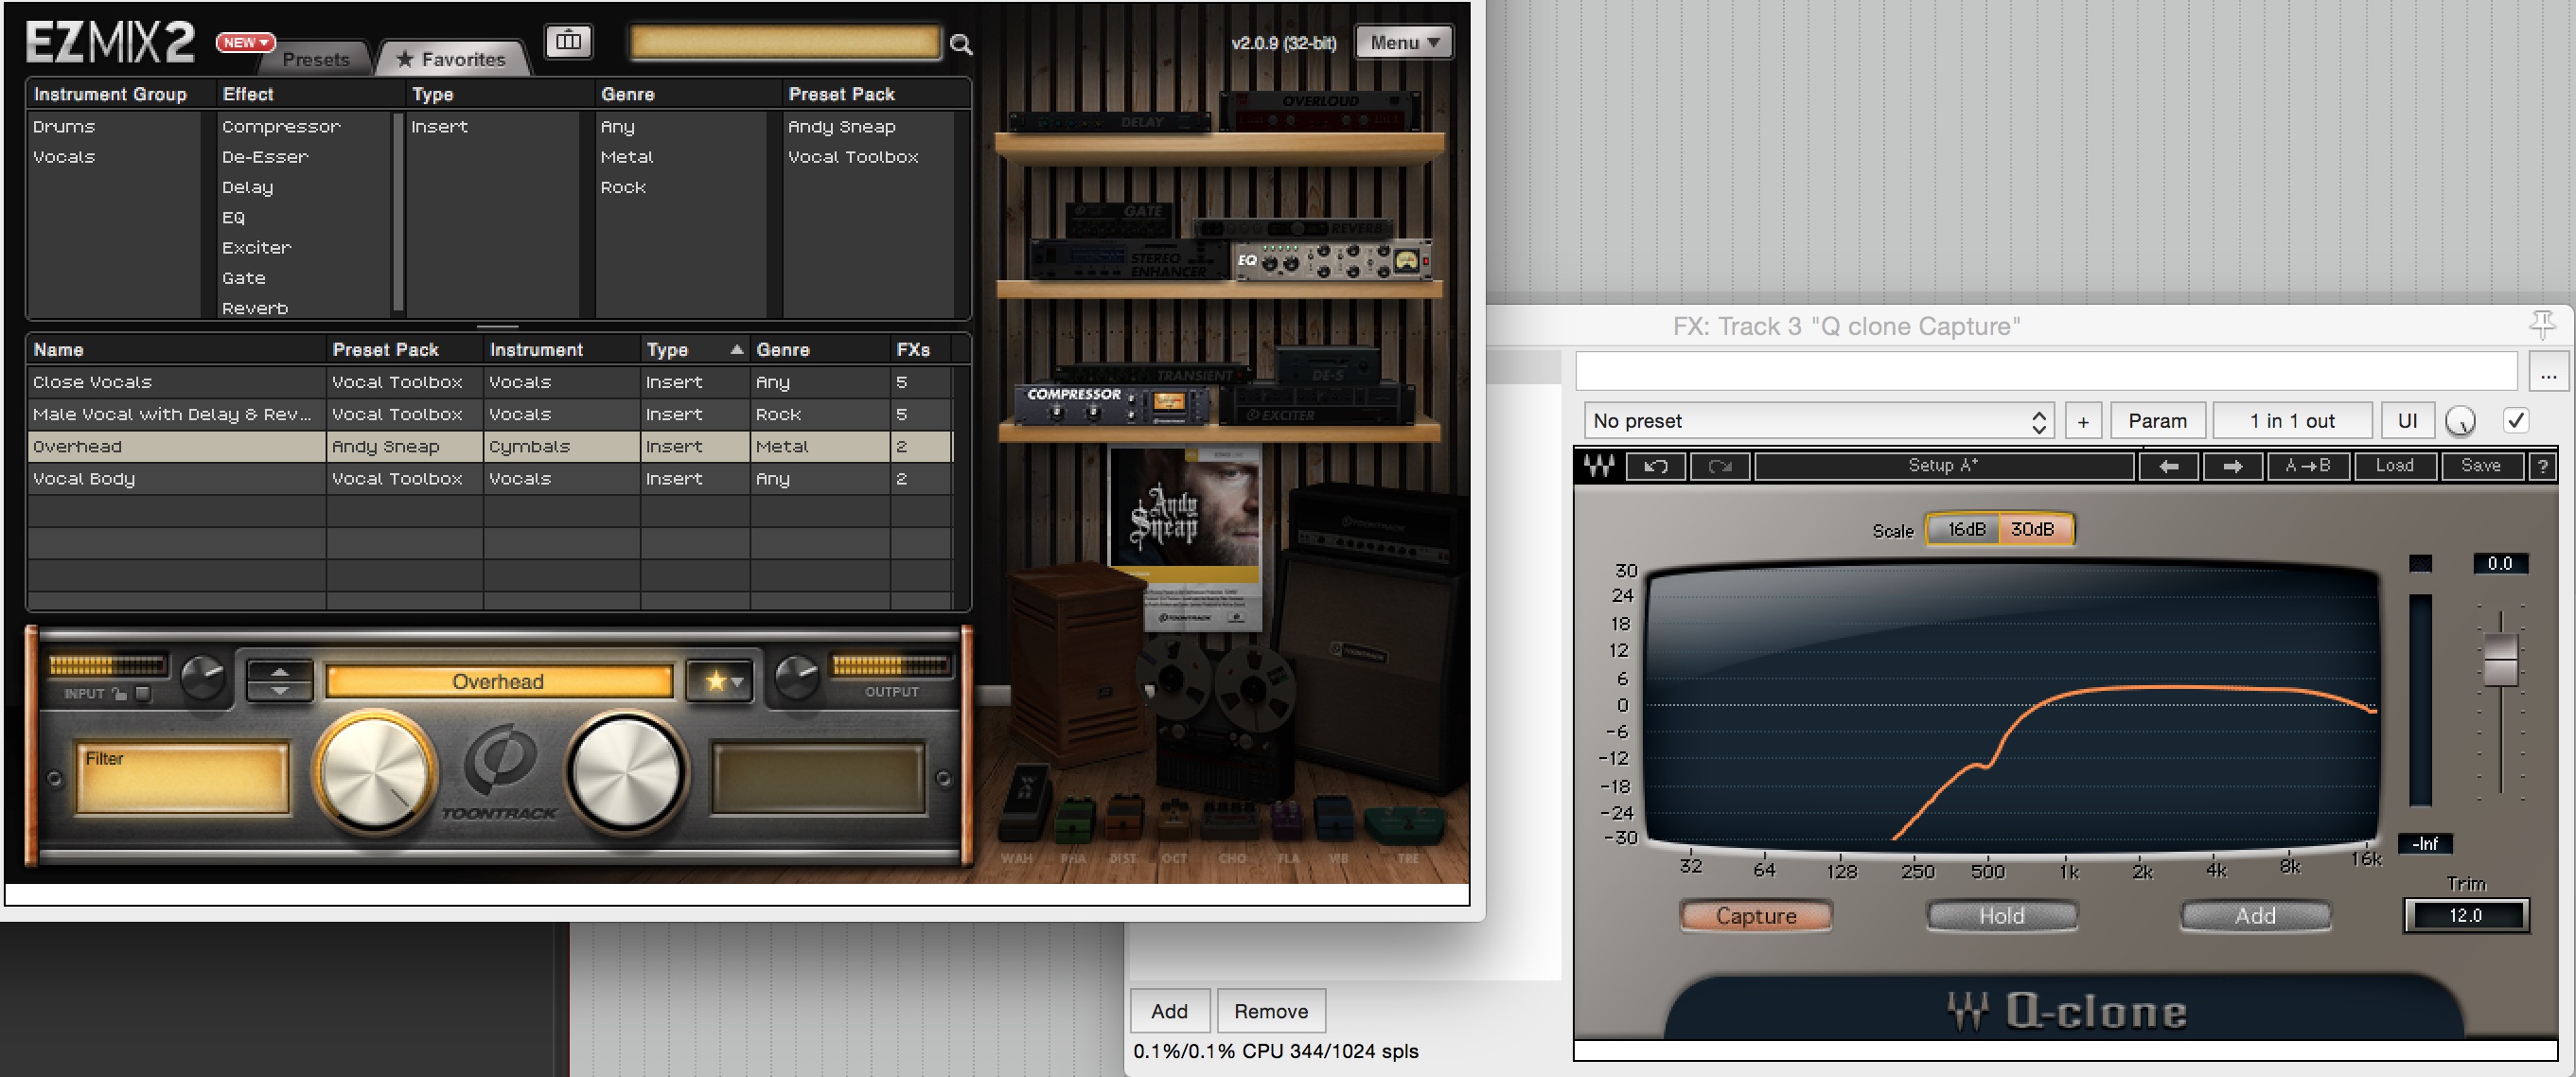
Toontrack EZmix – Andy Sneap “Overhead” Preset Analysis:
Note: A confirmation of the classic Andy Sneap “filter the overheads up to 500Hz” setting.
3 – To Analyse The Frequency Responses of Various Analog Gear:
In this case, I’m not talking exclusively about EQ’s. You can use Waves Q-Clone as tool for analysing and learning more about the frequency responses for pretty much any of the following pieces of gear:
DI Boxes
Audio Interfaces
Outboard Preamps
Headphone Amplifiers
FX Pedals
Etc…
Conclusion:
The simple fact about the music production business is that THERE IS NO SUBSTITUTE FOR HARD WORK. Analysis and comparison both play a huge part in the growth of an audio engineer, so unless you’re willing to put in the hours learning your gear and honing your craft, you can’t expect to turn out like Joey Sturgis, Eyal Levi or Joel Wanasek…
FINAL WORDS:
This concludes Part 2 of my “Analysis As a Learning Tool” series of Blogs. I hope that this article has given you some new ideas to try out in your next project. Be sure to comment below if any of this information has helped you out, or if you have any questions.
Stay tuned for more production/mixing related articles in the not-so-distant future!
Thomas Brett is a producer, mixing engineer and songwriter at Brett Brothers recording studio in the UK. Check out the Brett Brothers studio website for more information and articles on all things mixing www.brettbrothersstudio.com
Nail The Mix is our online mixing school that gives you REAL multi-tracks from REAL bands, plus a mixing class from the producer who recorded it. Past guests include Periphery, Chelsea Grin, Machine Head and State Champs. Join now for instant access!
5 New Year’s Resolutions For The Studio | By Thomas Brett |
Mixing is for life, not just for Christmas
As another year draws to a close, the time has come for the annual tradition of setting unrealistic goals that usually end up going unfulfilled.
Don’t get me wrong… It’s great to dream big, but equally important to make sure you can actually achieve your goals in the time frame given!
HERE’S A QUICK LIST OF REALISTIC AUDIO TARGETS TO STRIVE FOR IN 2017
1 – Learn A New Skill
Gain a new skill to open up doors of opportunity and make your services more appealing to potential clients
Nobody likes a one-trick pony, but there’s good news: One of the great things about working in audio is that it’s nearly-impossible to know everything there is to know!
Here are some valuable studio skills which will take you a long way towards becoming a jack-of-all-trades:
Discover the world of synthesis: Using preset synth patches is fine, but what if you could build the exact sound you’ve been hearing in your head?!? It’s a wide and wonderful world of opportunities. Who knows, you might end up being pretty good at it…
Always worked with drum samples or amp sims?: Why not learn how to mic up a real kit and record a real amp/cab? Or… (on the other side of the coin)Learn about drum replacement, amp simulation, and Impulse Responses. Both of these approaches have their pros and cons, so know how to nail them both!
Learn some basic orchestral arrangement skills: Being able to provide additional instrumentation such as string sections and percussion is an extremely valuable asset in the studio. There are hundreds of excellent, reasonably priced sample libraries on offer from companies such as Spitfire, Voice of Gaia, and Native Instruments (and exactly zero reasons not to give them a go!)
NOTE: These are just a handful of obvious examples. Just make sure that whatever you go for, you stick with it long enough to overcome the learning curve.
2 – Expand Your Target Audience / Client Base
If you play it safe in life, you’ve decided that you don’t want to grow anymore
It’s easy to get pigeonholed into a specific type of music in this business. Being able to switch between genres and cater to a wide range of potential customers is key to expanding your skillset and maintaining a steady, reliable income.
Try out these ideas to give your musical palate a good cleansing:
Write some music in a genre you haven’t worked in before: This is an excellent way of adding some new licks or rhythmic skills to your vocabulary. The awesome thing is that these new tricks are often transferable, and can result in innovation when applied to different contexts.
Study the greats: Learn the characteristic sonic traits that help define specific sounds and study the engineers who are “top-dog” in their respective genres. Trying out the different techniques on offer from this process is a great way of spicing up some otherwise bland mixes.
3 – Get Your Name Out There!
How are people going choose you if they don’t even know you exist?!?
Feel like your business is going nowhere fast? Might be time to step up your marketing game with some shiny new upgrades.
Here are a few practical marketing steps you can take towards getting more work in 2017:
Brand yourself: Think up a simple, clever logo that will catch the eye of potential customers. You don’t necessarily have to create the logo yourself, just make sure it’s memorable and relevant to what you’re all about.
Use social media: Create a concise and professional looking Facebook page. It helps paint a clear picture of the service quality you provide, and is a great way to spark an interest in people. It’s not a terribly difficult thing to create, but trust me when I say it’s better to do it early on in order to start building up a following for your studio.
Build a website: Although it may not be the best way of gaining new customers, having a professional looking website with clear examples of your work and images of your studio goes a long way towards giving yourself some credibility (make sure to check out Wix.com for an excellent DIY website building solution that won’t break the bank!)
NOTE: A “dumb” and simple-to-use website is worth a lot more to a potential customer than a flashy and complex one. If I can’t find examples of your work within 10 seconds, I most likely won’t be bothered with your website.
4 – Stop Procrastinating
Because of the nature of the job, we often like to really take our time trying to perfect the most tedious and miniscule things in order to satisfy our “engineer ego”
Striving for excellence is great, but if the pursuit of perfection is causing you to spend way too long trying to finish things then it’s time to take a step back and reevaluate… The simple truth is, the biggest impacts we can make on a mix often only take up a tiny fraction of the overall time spent.
Here are a few changes you can make towards getting more work finished from now on:
Commit to decisions early on: Giving yourself too many options and leaving all of the tough decision making for “future you” is a sure-fire way to slow-down your productions. Check out last week’s URM Blog by Dave Whalen for some excellent advice on decision making.
Simplify the process: Try and streamline your recording and mixing process down to the bare necessities and cut out anything that’s hindering your progress. Learn to limit yourself and focus on the bigger picture.
Question: Do you really need a chain of 15 plugins to mix a cowbell?NO! A single channel strip will do just fine…
5 – CONCLUSION: Learn From 2016
It’s fairly common to look back on previous years and phase out all of the positive things until you only see the mistakes you’ve made. The ironic truth is that mistakes should actually be the single biggest motivator of all!
How so?
If you’ve made a particular mistake that led to problems or someone being disappointed you’ll do whatever it takes to avoid repeating that same mistake.
Having a “learn from your mistakes” attitude is key to a successful career in audio!
Some final questions to think about:
I’ll leave you with a few simple questions about the past year. The answers to these should help decide what your primary audio goals for 2017 should be:
What worked well?
What didn’t work?
What am I good at?
What do I need to improve upon?
HAPPY NEW YEAR!
FINAL WORDS:
This concludes “5 New Year’s Resolutions For The Studio”. I hope that this article has given you some new ideas to try out during your next project. Be sure to comment below if any of this information has helped you out, or if you have any questions.
Stay tuned for “Analysis As A Learning Tool – Part 2” and more production/mixing related articles in the not-so-distant future!
Thomas Brett is a producer, mixing engineer and songwriter at Brett Brothers recording studio in the UK. Check out the Brett Brothers studio website for more information and articles on all things mixing www.brettbrothersstudio.com
Nail The Mix is our online mixing school that gives you REAL multi-tracks from REAL bands, plus a mixing class from the producer who recorded it. Past guests include Periphery, Chelsea Grin, Machine Head and State Champs. Join now for instant access!
It’s Digital, You Can Change It Later… | By Dave Whalen |
Perhaps the most common misconception in the modern, digital world of recording is the idea that you should record everything as pristinely and clean as possible.The reason is simple: it allows you to make critical decisions later in the process.Sure this may allow you to focus on other critical aspect such as performance, but the idea of leaving every other decision until later on can be detrimental to the recording process.
For a long time, I actually subscribed to this theory of recording. Especially as a beginner, the idea that I could tinker around endlessly with the sounds of my recorded takes was extremely enticing.
That’s exactly what I did.
I messed with everything and when I had it perfect, I would mess with it some more.After all, that tambourine part needed to be punchy and vibey and shimmery (or did it?), even though I had absolutely no idea how I would get it there.
In fact, I had so much latitude with how I made creative decisions, hardly any decisions ever got made. No songs ever got completed!In fact, it was probably a good year before my copy of Cubasis VST (which came with my Soundblaster Audigy soundcard) ever saw the end of a song.
And that’s the root of the problem – too many options.Options can actually be the enemy of getting things done, especially if you’re only vaguely familiar with options you have. For instance, if you have 20 different options for EQ, some digital and some modeled, and you’re not intimately familiar with the character or capabilities of any of them, you’re extremely likely to get stuck in a cycle often described as “analysis paralysis,” where you spend too much time analyzing what you’re doing and nothing actually gets done.
Let not your heart be troubled though, there is a solution:
(Take the leap)
Commit early
Make a decision early on and lock yourself into it. Commit to it, and move onto the next decision. This is especially important when deciding on tones. You should always try and capture a high-quality DI’s on your guitars and bass, but dial in a great guitar tone and capture that as well. Try and commit to using it as the final tone. ONLY use the DI as a last resort in case you really screwed it up.
Drum tones are another area where it’s good to commit. If you have a way of dialing in your EQ and some mild compression on the way in, do it. Get those drum sounds as close as you can to what you think the final product will be. You’ll always be able to make small tweaks later to blend the instruments.
Another area where it’s easy to run into trouble is when you’re composing extra synth or string parts for your production. You want to write the part, dial in the settings on the synth or whatever instrument you’re using, print it, and delete the original.
The same thing goes for special effects.
Say you want some sort of delay throw for a vocal track; play with your delay, distortion, reverb and other toys until you hear what you want to hear. When you get it, print it and delete the original track. Repeat this method for all of your vocal effects.
It’s also beneficial to take a similar track with your mixing tools. Personally, 90% of the time I limit myself to 3-4 EQ’s. I know exactly how they sound and how they affect the source material, on every mix. I also limit myself to 2-3 different types of compressors. This enables me to be extremely familiar with how each of these tools behaves under various circumstances. It also gives me the experience to be able to say to myself, “These tools won’t do what I want them to, I’m going to experiment with something new.” This in turn enables me to gradually assimilate other tools into my workflow, allowing me to expand my knowledge of different tools without being overwhelmed by them.
At first, locking yourself into these types of decisions can be a scary proposition. Especially if you’re inexperienced, you may be intimidated at the idea that you don’t know what will sound good as a final product. There’s no doubt, making judgment calls like these requires some experience, as well as confidence in what you’re doing and what you’re hearing. Fortunately, there are a few tactics you can use to get around this until you develop your tastes and style:
Do what you think sounds good
It is entirely possible that you can dial every instrument in your song to perfection individually and it sounds like crap when it’s all put together, but it’s not likely. Remember, every great mix is the result of a thousand small moves which were done well, and most of those moves were on individual instruments. A bass that sounds killer in solo will probably sound great in the mix too.
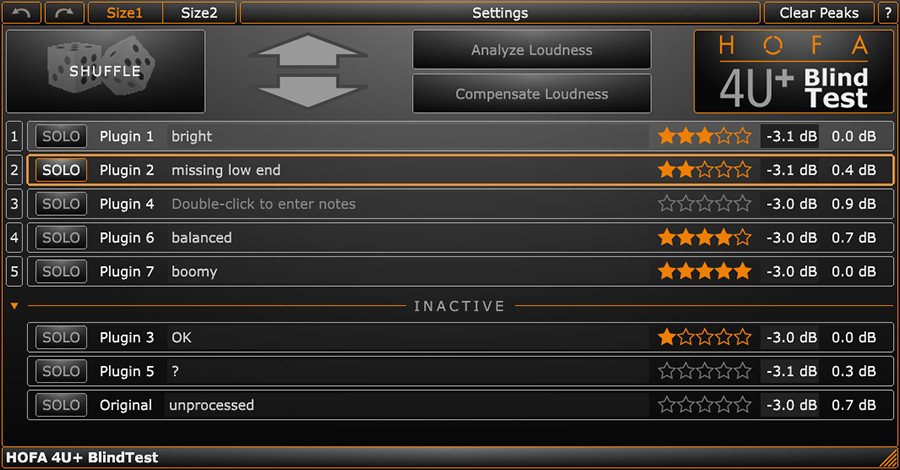
(HOFA BlindTest lets you do a blind test of different plugins on your tracks)
Do multiple versions of tracks
If you’re having trouble deciding on a sound or are unsure if the end result will fit your mix, do multiple versions of the same track. Use five different chains on your kick or snare or vocal. You’ll probably find that not only does each iteration become less important, but there will be less pressure to get the perfect sound.
Realize there is no “right way” to get a sound
There are a lot of myths surrounding the proper way to get a sound on any given instrument.I call shenanigans! Sure there are tried-and-true methods that will work eighty percent of the time, but twenty percent of the time it won’t work! When you find yourself in that spot, just remember there are no set rules on how to get there.It’s like Chris Lord Alge once said, “Just do it, no one’s going to die.”
Pretend there is no “next stage” in the process
Imagine your DAW malfunctioned and suddenly, you could only use faders and panning to make your mix.Record all of your instruments as if recording is the last stage in the process. When you throw your faders up, it should sound like a mixed song – almost done.When you’re in the mixing phase, pretend there is no mastering process to fix the mix problems.It should sound like a great mix before it ever goes to mastering.
Finish the damn song
This is perhaps the most important part of the puzzle.Creative people don’t become masters of their craft by obsessing over a single piece of work. They get better gradually, over a large body of work.As you finish more songs you will become more comfortable with the process. You’ll begin to realize there are no right or wrong sounds, only what’s appropriate for the context of the song.
So next time you’re tempted to rush through the process of recording so you can get onto fixing everything, don’t. There should be nothing to fix in the first place. Remember, you’re not doing this so that you can be finished with it; you’re making art, and art takes time, dedication, and attention to detail. Get it right from the very beginning.
Dave Whalen is a producer and mix engineer currently based in western Ohio.
You can find some of his work and other production/mixing tips on his website – The Mix Shed.
Nail The Mix is our online mixing school that gives you REAL multi-tracks from REAL bands, plus a mixing class from the producer who recorded it. Past guests include Periphery, Chelsea Grin, Machine Head and State Champs. Join now for instant access!

 Nail The Mix is our online mixing school that gives you REAL multi-tracks from REAL bands, plus a mixing class from the producer who recorded it. Past guests include Periphery, Gojira, Machine Head and State Champs. Join now for instant access!