Eyal Levi, Author at Unstoppable Recording Machine - Page 11 of 33

Death To Sibilance: A Simple Guide To De-essing Vocals

Death To Sibilance: A Simple Guide To De-essing Vocals

Over-sibilance is a problem with most recorded vocal tracks. Sibilance is the common name for some of the harsh sounds in the human voice such as “s,t,ch,th”. If not dealt with correctly, these sounds will cut through a mix in a very painful way. In other words, they make your mixes hard to listen to. 

“De-Essing” is the process of reducing the level of these sibilant sounds in order to make the vocal sound more pleasant. I’m going to share some of my favorite de-essing tricks which can be used both during the mixing, and recording stages. 

Tackling Sibilance in the Recording Stage:

The age old recording cliche says “get it right at the source.” I can’t argue with that. One of the best ways to reduce sibilance in your vocal tracks is to capture less sibilance in the first place.
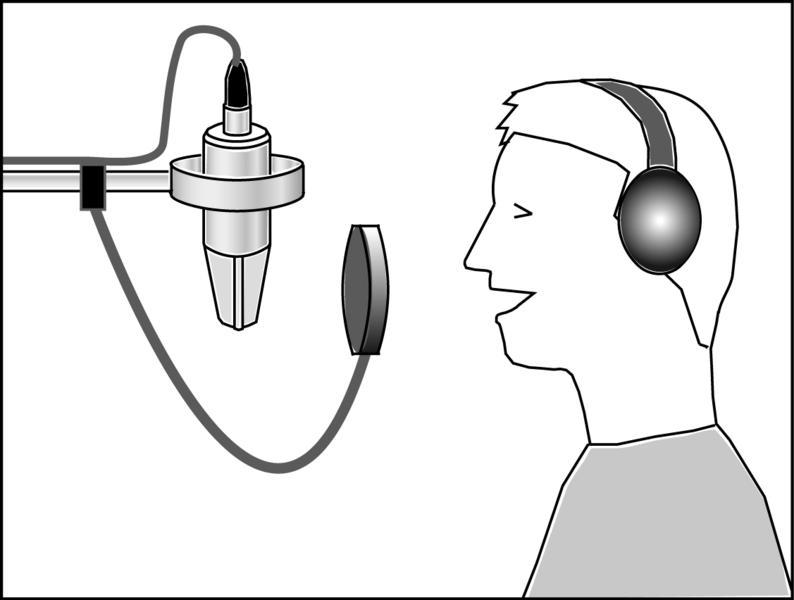
vocal-mic-techniqe                                              Vocalist singing around two fists (8 inches) away from a condenser microphone.

Don’t place the microphone too close to the singer’s mouth:

On condensers, try to keep the distance between the singer’s mouth and the capsule of the microphone at around 8 inches. Anything closer than this and the sibilance and plosive (bursts of air from P,B sounds) sounds in the vocal will be exaggerated.  

The vocalist will often need to be closer than 8 inches on dynamic microphones like an SM7B. In cases like these try a combination of the methods outlined below.                                                                                                                                            

(BONUS TIP: A good way to make sure the singer stays at the correct distance from the microphone is to tell them to sing at around two fists away. One fist between the mic and the pop filter, and one fist between the singer and the pop filter.)                                                                                                                                                        

Angle the microphone:

High frequency sounds are very directional. By angling the microphone so that it’s not in a direct line with the singer’s mouth you can reduce the amount of sibilance hitting the microphone directly. Plus, there’s the added benefit of reducing plosives (bursts of air from P,B sounds).
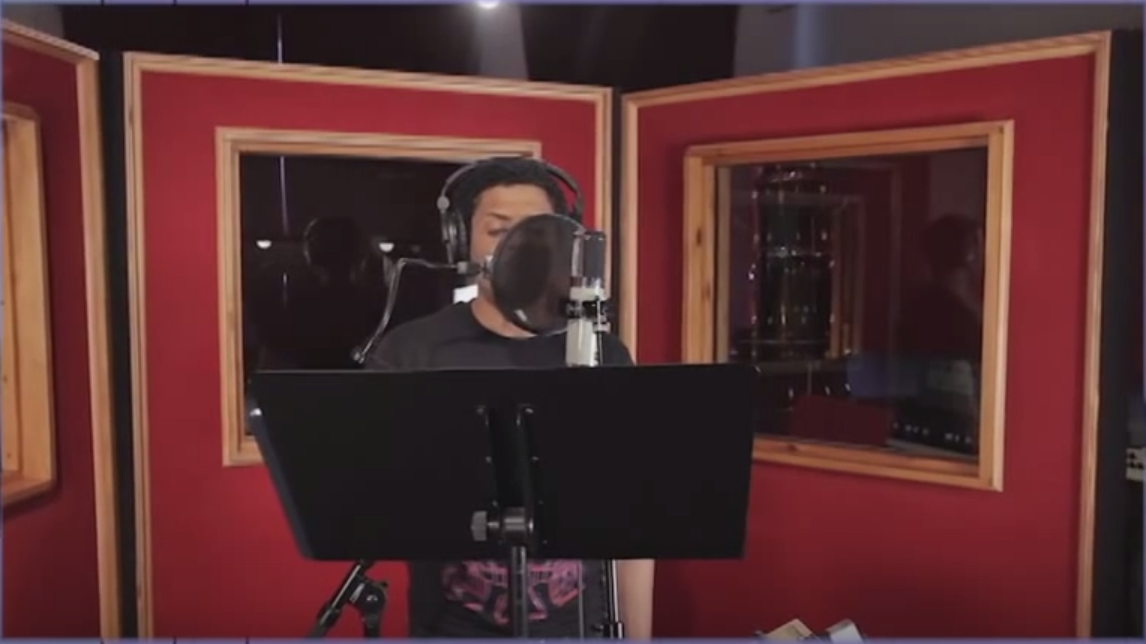
45 degree mic angleMicrophone aimed at the singers mouth at a 45 degree angle while the singer aims toward the pop filter.

Try the Pencil Trick:

This is a rather unconventional trick that I hadn’t heard about until Eyal Levi mentioned it while discussing this article. After doing some research and trying it myself, I must admit that it works surprisingly well! While this trick is primarily aimed at stopping plosives, it can sometimes help reduce sibilance as well. 

This technique uses a pencil to block/reduce the amount of air hitting the diaphragm of the microphone, and in return reduce the high-end harshness in the sibilance.
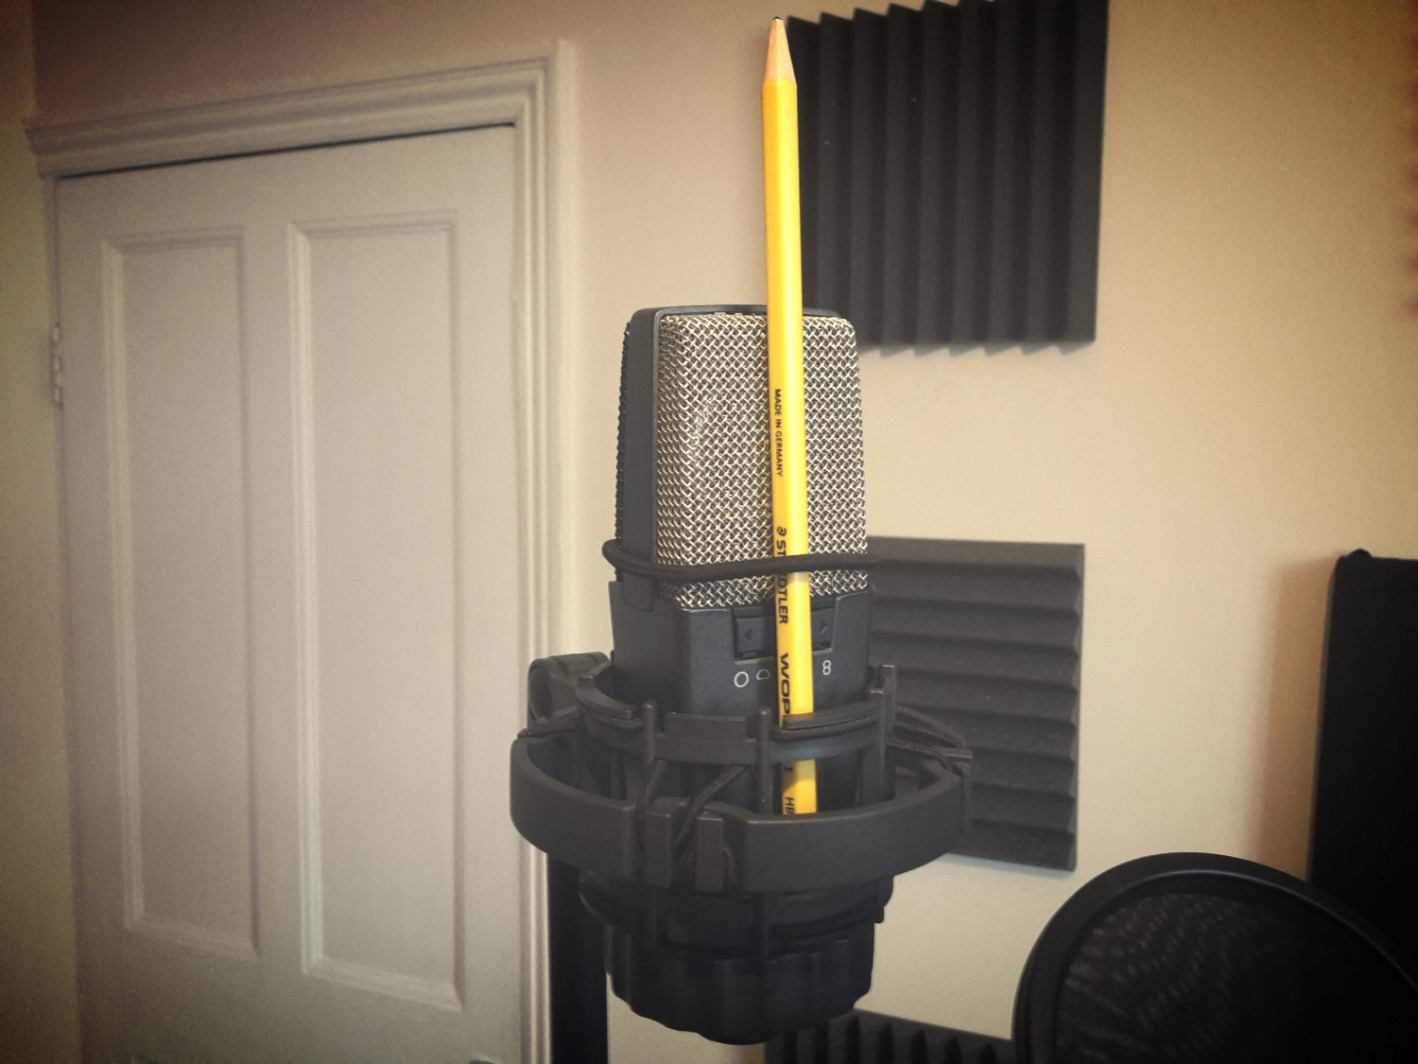
pencil trickThe Pencil Trick on an AKG c414

How to do the Pencil Trick:
  1. Find yourself a regular wooden pencil and a rubber band (a hair-band will also do the trick).
  2. Attach the pencil to the grill of the microphone so that it’s facing straight down over the center of the membrane.
  3. Experiment using this technique with and without a pop-filter. Depending on the severity of the sibilance,  if you’re not careful, you might end up over-dulling the vocal in certain cases.
Tackling Sibilance in the Mixing Stage:

Don’t worry If a vocal hasn’t been recorded properly, or if the vocalist just happens to be extremely sibilant. Handling sibilance in a mix is relatively easy. 

De-Esser Plugins:

The easiest and most popular method to De-Ess a vocal would be to use a De-Esser plugin.

Here’s a list of my favorite De-Esser plugins available on the market today:

  • Fabfilter Pro-DS – My personal favorite. Offers the best customization and the most options.
  • Waves R De-Esser
  • Plugin Alliance SPL De-esser
What is a De-Esser?

A De-Esser is basically a compressor which is side-chained to the high-mid frequencies. When set correctly, a De-esser will only act upon the harsh and sibilant sounds within a vocal. Most De-Essers give you the ability to fine-tune which frequencies are being affected. By using these parameters you can determine where the problem areas are, and how the plugin reacts to them.

De-Essers usually offer two separate ways of reducing sibilance:

1 – Split-Band De-Essing:

A Split-Band De-Esser is a multi-band compressor which has been optimized for sibilant sounds. This setting will only affect the high frequencies of the sibilance (which the user can determine). 
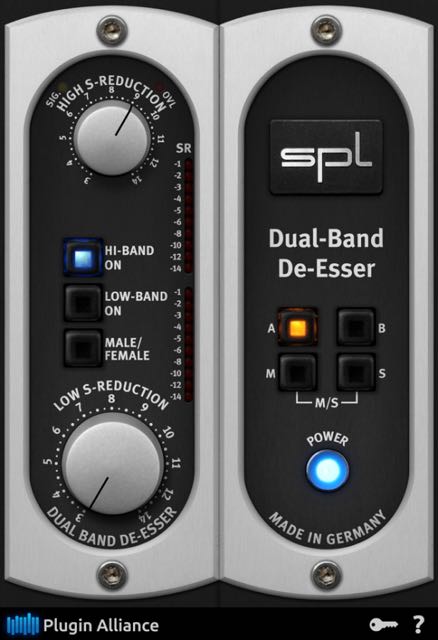
Split Band De-EsserSPL De-Esser in Split-Band Mode

By using this setting you can effectively “dull” the sibilance, and in return cause less irritation to the listener’s ears.

2 – Wide-Band De-Essing:

Unlike Split-Band De-Essing, a wide-band De-esser will compress (turn down) the whole vocal track whenever a sibilant sound crosses the threshold parameter.
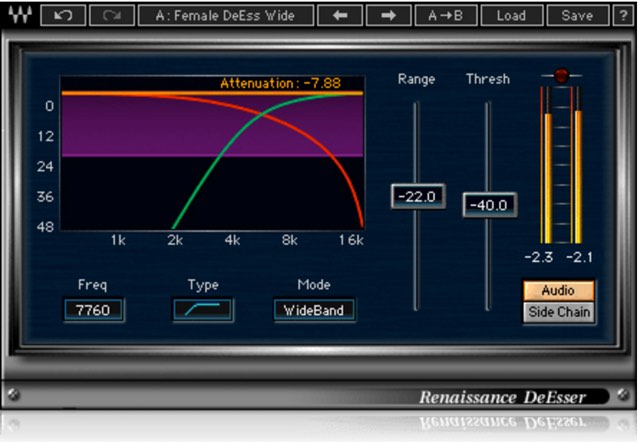
Wide Band De-EsserWaves R De-Esser in Wide-Band mode.

I personally prefer using De-Essers in the wide-band setting, as the esses are left intact frequency-wise and only reduced in volume instead.

How to use a De-Esser:
  1. Instantiate a De-Esser plugin as an insert on your vocal channel. The most common places to insert a De-Esser are usually at the very end, or beginning of your signal chain (or both).
  2. Loop a section of the vocal which has a lot of sibilance. 
  3. Choose either wide-band or split-band mode depending on what’s available. Both of these settings work well, I personally prefer using the wide-band mode. It sounds more natural to me.
  4. Set the side-chain frequency of the De-Esser at somewhere between 5kHz to 10kHz. Some De-Essers only give you the option to center the side-chain around a certain frequency area. Others give you multiple frequency sliders in order to set the range between two frequencies.
  5. Set the range of the De-Esser. The range control determines the maximum amount of reduction which will be applied to the sibilance. I usually find that somewhere between 5 to 10 dB of reduction works well. Please note – this is very dependent on the amount of sibilance in any particular vocal track.
  6. Set the threshold parameter so that you are getting the desired amount of reduction.
Manual Volume Automation De-Essing:

De-Essing vocals manually is much more time-consuming compared to using a plugin. However, this method allows for much more control and fine-tuning on a per sibilant basis:
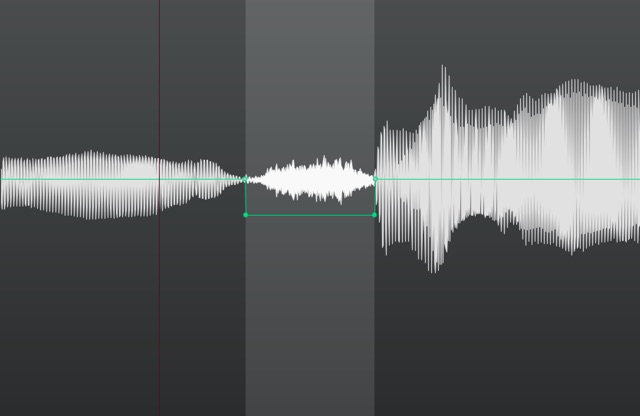
Manual Ess AutomationReducing the volume of a single sibilant using automation.

When viewed in an editor, sibilant sounds within the waveform/vocal will appear like very dense blobs (due to mainly being made up of high frequency information). For this reason it’s very easy to quickly identify the sibilant sounds within a vocal.

Once you’ve spotted the sibilance, the next step is to add a volume envelope to each one and reduce them in volume by anywhere from 5-10dB.

This is basically the same as using a wide-band De-Esser, but with the added control of adjusting the volume for each sibilant separately. Although doing this by-hand is super accurate, the biggest downside is the fact that it takes much longer than just using a plugin.

Split Track De-Essing:

This method of De-Essing is not for the faint-hearted. It comprises of manually cutting each individual sibilant sound out of the vocal track one by one and moving them on to a second channel.
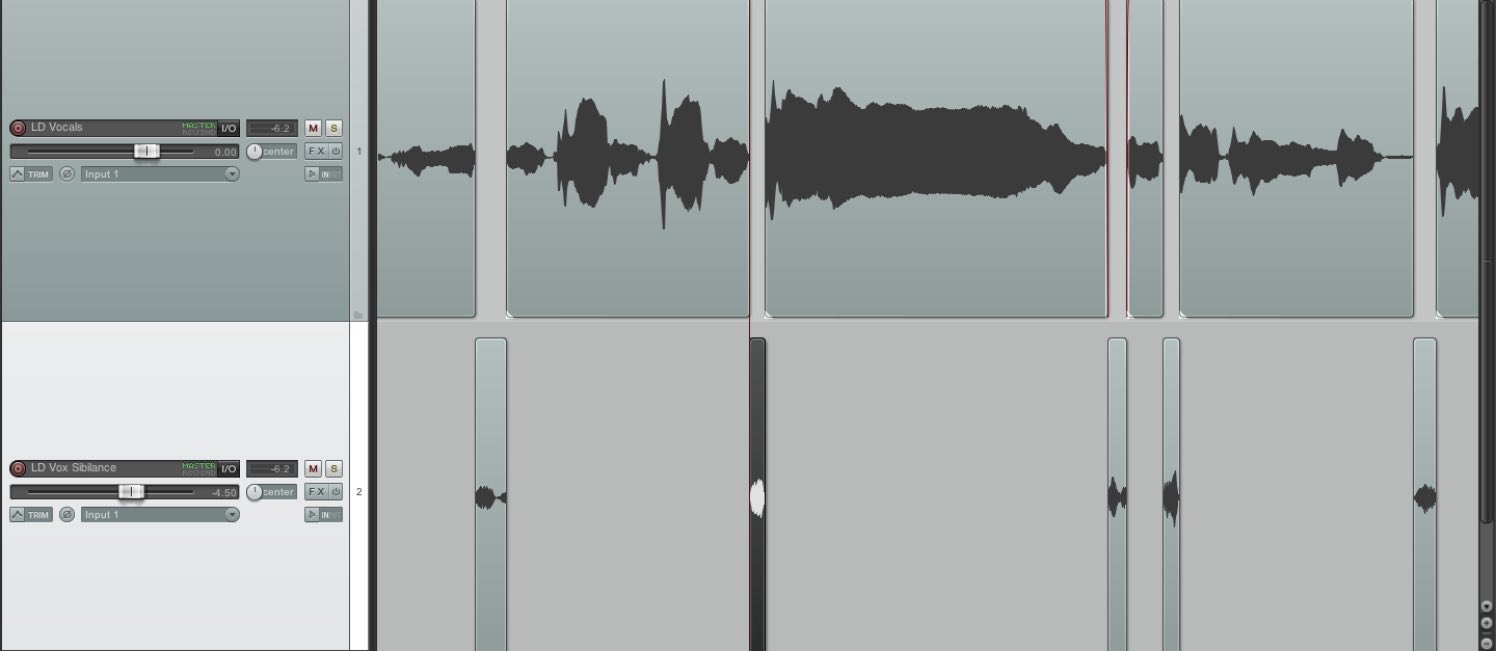
split track de-essSplitting the sibilance on to a separate track and reducing the volume with the channel fader.

This process is the most tedious and labor intensive method of doing the job, but in return gives you full control over the amount of sibilance in your vocal, as well as the option to process the sibilance differently.

In Conclusion:

Using any of these techniques can lead to great results. It’s important to remember that there isn’t really a “correct” way to de-ess a vocal. I find that choosing which method to use really depends on your workflow, and how long you’re willing to spend on the de-essing process.

Try out these techniques in your own projects and make sure to experiment with using multiple techniques on a single vocal. Remember that splitting a process between multiple stages instead of relying on a single plugin or technique can sometimes be the key to more natural sounding results.



Nail The MixNail The Mix is our online mixing school that gives you REAL multi-tracks from REAL bands, plus a mixing class from the producer who recorded it. Past guests include Periphery, Chelsea Grin, Machine Head and State Champs. Join now for instant access!


JOHNNY MINARDI: What labels look for, creating content with no shame, the key to longevity

Johnny Minardi is the VP of A&R at Elektra Music Group, which includes powerhouse labels like Fueled by Ramen, Elektra, and Roadrunner. Beyond his label duties, he’s also involved with the Good Future Club apparel brand and runs Self-Titled Management, a company dedicated to managing top-tier producers including Will Putney, Steve Evetts, and Nolly.

In This Episode

Johnny Minardi drops in for a real-talk session about navigating the music industry’s wild twists and turns. He kicks things off with stories about his intense travel schedule, overcoming a long-held fear of flying, and the simple health hacks (like packing your own food) that make life on the road sustainable. The conversation then shifts to how the pandemic has served as a massive “reset button,” offering a unique opportunity to build healthier habits and get creative. Johnny shares the inside story of how All Time Low had to completely pivot their album rollout just two weeks into lockdown, highlighting the insane work ethic required to pull it off. He breaks down why artists need to have “no shame” in the digital age, creating constant content and finding their voice online. This is a super insightful look into the mindset of a top A&R exec, covering everything from what labels actually look for beyond the data to why the future of the industry belongs to those who can evolve.

Timestamps

  • [3:48] The insane travel schedule of an A&R executive
  • [7:39] How a fear of flying held Johnny back early in his career
  • [10:17] Overcoming anxiety and fear to get back on a plane
  • [16:44] Why you should probably never eat airplane food
  • [21:53] Using the pandemic as a chance to reset your life and habits
  • [28:56] The story of All Time Low releasing an album two weeks into the pandemic
  • [30:53] Throwing out the marketing plan and starting from scratch
  • [33:17] Why what artists do now will determine their success when the world reopens
  • [36:46] Creative ways artists are maximizing digital outreach (Nothing, Nowhere., Machine Gun Kelly)
  • [40:47] The importance of having “no shame” when creating content online
  • [45:04] Why you shouldn’t worry about repeating topics someone else has covered
  • [48:16] A key rule to live by on tour: “Nobody cares”
  • [56:43] Johnny’s personal research project: reverse-engineering the careers of legendary A&R reps
  • [1:03:17] The key to longevity in the music industry: evolution
  • [1:06:24] Has the pop-punk/emo scene plateaued?
  • [1:12:04] Do you need huge numbers to get signed by a major label?
  • [1:17:15] Why the common complaints about Spotify payouts are misguided
  • [1:22:42] Is the era of the “enigma” rock star over?

BEN WEINMAN: The Dillinger Escape Plan, creating your own market, and managing Kimbra

Ben Weinman is the trailblazing guitarist and founding member of The Dillinger Escape Plan, a band that spent 20 years defining and redefining the genre of mathcore. He’s also the founder of the independent label Party Smasher Inc., a member of the supergroup Giraffe Tongue Orchestra alongside Brent Hinds of Mastodon, and currently plays guitar for the legendary Suicidal Tendencies. On top of his own musical projects, Ben manages the acclaimed pop artist Kimbra and runs an animal sanctuary.

In This Episode

Ben Weinman drops by to chat about the philosophy behind his long and uncompromising career. He dives deep into his two-decade creative partnership with producer Steve Evetts, explaining why having a consistent team member was the anchor that allowed The Dillinger Escape Plan to constantly evolve. Ben gets into the “take what you got and get to work” mentality that defined the band’s early days, sharing stories about borrowing amps and learning the business side of things on the fly while opening for Mr. Bungle. He discusses the difference between a “fireworks” career that burns out fast and building a sustainable, long-tail career by creating your own niche instead of chasing trends. Ben also shares some incredible wisdom on knowing when to walk away from a project that isn’t working, how he diversifies his income streams through management and Patreon, and why it’s so important for the music community to support its own, especially in tough times.

Products Mentioned

Timestamps

  • [3:37] Why consistency with producer Steve Evetts was crucial for an evolving band
  • [6:22] Balancing technical perfection with an organic, human feel in the studio
  • [6:59] Steve Evetts’ philosophy: Replaying a part until it’s perfect vs. copy-pasting
  • [9:00] Alan Douches’ sage advice: “Pick your tool and get to work”
  • [12:18] The insane story of opening for Mr. Bungle with only three working audio channels
  • [16:21] Ben’s role in the band was always about networking and building the aesthetic
  • [19:53] Comparing old-school touring with the modern YouTube musician model
  • [22:19] The “fireworks vs. slow burn” theory of building a long-term career
  • [29:15] Knowing when to quit: The eight-year struggle to launch Giraffe Tongue Orchestra
  • [35:03] The lessons learned from a failed beard oil company
  • [38:00] How Dillinger created its own market by ignoring the nu-metal scene
  • [44:30] Establishing a “do whatever you want” precedent gives you artistic freedom
  • [48:32] Writing music he couldn’t actually play and using the studio to level up his skills
  • [53:26] Why being an international band was the key to making a living
  • [58:38] Using Patreon as a fan club and creative incentive
  • [1:03:57] The ethics of asking artists to play for charity during a pandemic
  • [1:10:31] Why road crews are the ones hit hardest by the lack of touring
  • [1:31:19] What a metalhead can learn from managing a pop artist like Kimbra
  • [1:35:14] The time he accidentally hit a fan in the head with a guitar
  • [1:38:50] What it was like working with Mike Patton on the “Irony Is a Dead Scene” EP

How To Rescue Your Lame Mix With These Mastering Tricks

How To Rescue Your Lame Mix With These Mastering Tricks – By Mike Kalajian


Compressors are a mystery…

I’m not ashamed to admit that using them effectively can be tricky. With so many possible combinations of Attack, Release, Ratio, Knee, etc, how can you ever be sure you’ve dialed in the settings that are just right for your song?

Throw in the fact that at the mastering stage every jump of the gain reduction meter affects everything in the song, and you’ve really got your work cut out for you!

Fortunately, if you break down dynamic range adjustments into a few different categories, clearly outlining the types of issues they are meant to address, the mystery of mastering compression begins to come into focus.

In this article we’ll talk about some of the more tricky common mix issues a mastering engineer deals with, and how to use specific dynamics processing to efficiently solve them. For each example i’ll include before and after mixes, as well as a preset file for the plugin i’m using.

I encourage you to load the files and settings up in your daw and get a feel for how they’re reacting to the music. For practicality purposes i’ll only be using plugins for these examples (even though I might actually use hardware in some cases) and all the plugins used have free trials and support cross platform preset files.

The most important thing to understand is that these techniques should only be used when a mix has an issue that calls for that particular process. Just because you have a tool in your arsenal doesn’t mean you’re going to use it on every or even most jobs, but in the right situation it can really save a mix.


Attached you’ll find a short “song” I wrote, recorded, and mixed specifically for this blog (be nice – i’m a mastering guy, not a producer) My friend Ryan O’leary of Fit For A King was kind enough to come by and record a few vocal parts to the song, because If it were me singing … let’s just say it would be painful.
Here’s the original unmastered mix:

[smart_track_player url=”https://s3.amazonaws.com/urmpublicpodcast/blog/mike+k+mastering+dynamics/Main+Mix+1.mp3″ title=”Main Mix Unmastered” artist=”Mike Kalajian” download=”false” social=”false” ]

Although I think it could be improved with a little “glue” across the entire mix, which we’ll eventually cover, from a mastering standpoint there’s not a whole lot wrong with it.

Over the course of this article i’ll provide alternate versions of this mix, each with a specific issue that we can address.

Please note – All files are 44.1khz 24-bit and are totally unmastered.

You can download them as WAVs here – or listen on with mp3 versions.

FIRST STOP: THE DE-ESSER

The obvious use for these guys is knocking down the harsh top end in a vocal track during the mix stage, but they can also be very useful in mastering. In this context it’s best to think of a de-esser as more of a “frequency specific compressor” meaning that the compression is being applied to only a certain frequency range, and the detector circuit of that compressor is being fed by a certain (but not always the same) frequency range.

My personal favorite example of this is DMG Audio’s “Essence.” In addition to the parameters mentioned above, Essence will allow you to equalize the side chain as it feeds into the compressor circuit. Using a sharp narrow eq boost on a problem frequency can really help you zero in on the problem and nothing else.

You can download a free trial of Essence from dmgaudio – I have no affiliation with them whatsoever, but it is the only plugin of it’s kind that I use. Like most of the dmg plugins it’s teeters on the verge of being too feature rich, but with mastering we sometimes need to get very very tweaky.

ISSUE #1 TAMING A SIBILANT VOCAL
In this first example we have a mix with a sibilant lead vocal:

[smart_track_player url=”https://s3.amazonaws.com/urmpublicpodcast/blog/mike+k+mastering+dynamics/Harsh+Vocal+(before)+1.mp3″ title=”Harsh Vocal Before Processing” artist=”Mike Kalajian” download=”false” social=”false” ]

I find this happens most often when you get a “dark” sounding mix. Using some eq to open up the mix can reveal sibilance in a lead vocal that the mix engineer may not have noticed.

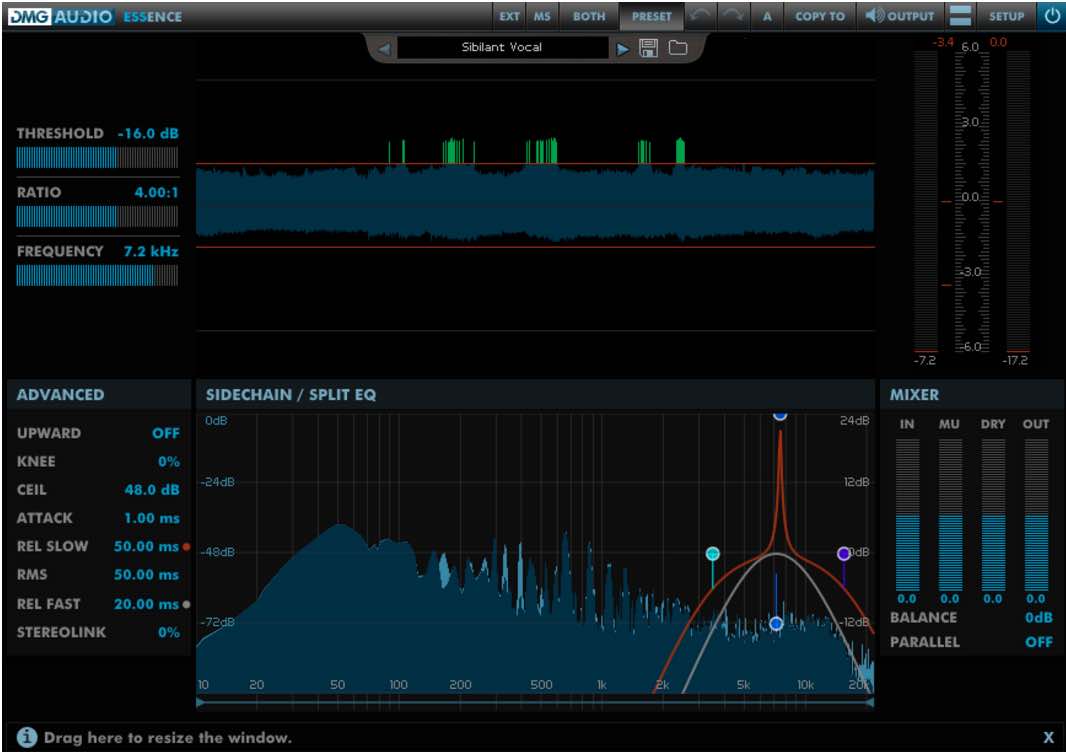
To solve this, i’ll typically set up the de-esser with a very fast attack, fast – medium release and hard knee shape. I’ve used the sidechain eq to zero in on the most offensive sibilant frequency range (7500 hz in this case) and added a very hard narrow eq boost at that range in the side chain signal.

Now i’m able to drop the threshold to a point where compression ONLY occurs when the offending sibilance is present – important because I know that i’m not messing up the other elements in the mix.

Typically, i’ll loop a section with a few harsh syllables and play with the threshold, ratio, and also the frequency range being affected by the compression, until I find something that smooths the vocal out in the most transparent way possible.

Wait .. what exactly is the knee?

You can think of the knee as “ratio smoothing” so that even if you have a ratio of 3:1 the actual ratio is less than 3:1 if a signal only slightly exceeds the threshold – the ratio then gradually increases until it hits 3:1 at a designated point above the threshold (depending on the softness of the knee). In my experience using a hard knee for surgical frequency specific mastering tasks allows you to compress what you want, and little else.

Here is the same mix with processing applied:

[smart_track_player url=”https://s3.amazonaws.com/urmpublicpodcast/blog/mike+k+mastering+dynamics/Harsh+Vocal+(after)+1.mp3″ title=”Harsh Vocal After Processing” artist=”Mike Kalajian” download=”false” social=”false” ]

… and here is the preset file for Essence.

You can hear how the harsh top end sibilance is tamed in the mix, but the other elements haven’t been dulled. The ratio can be pulled up or down to change the total amount of de-essing taking place.

Essence

The orange line represents the side chain eq and filtering, while the grey represents the frequency range the compressor is acting upon. It’s also important to note that i’ve got essence in Mid / Side mode and i’m only performing this process on the mid channel.

FIXING AN OBNOXIOUS LEAD GUITAR
In this example we’ve got a mix with a lead guitar that pokes out in a really annoying way:

[smart_track_player url=”https://s3.amazonaws.com/urmpublicpodcast/blog/mike+k+mastering+dynamics/Annoying+Lead+(before)+1.mp3″ title=”Annoying Lead Guitar Before Processing” artist=”Mike Kalajian” download=”false” social=”false” ]

We can hear the heavy build up around 2k that really makes it tough to listen to. This happens a lot because many 2 way studio monitors have crossover points in the 2-5k range which can cause a “no man’s land” of frequency response. A mix engineer *could* be forgiven for pouring on these frequencies in order to separate a lead guitar from the rest of the music.

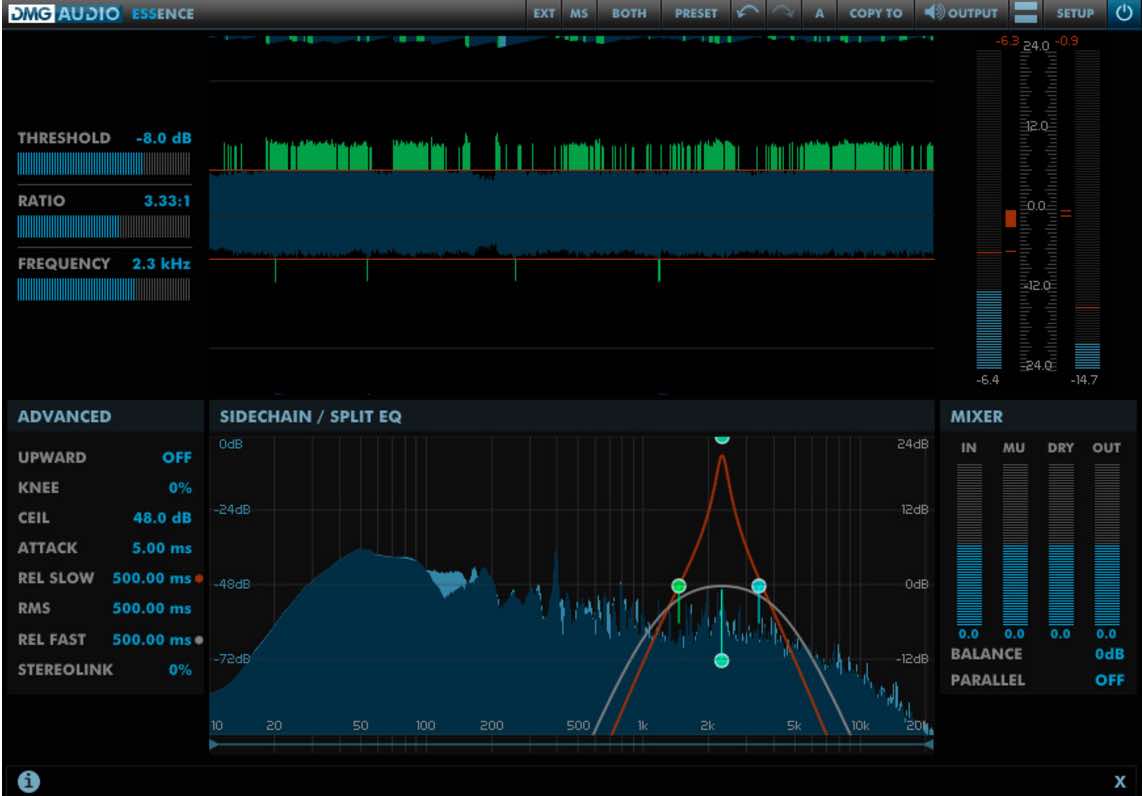
Again we’re going to create a large boost in the sidechain signal (right clicking on the frequency handles allows you to solo the sidechain EQ) and sweep around a bit to find where this lead guitar really rings and sounds annoying. For this i’m going to slow down the attack a touch, but more significantly the release will be slowed quite a bit.

The offending guitar part here has a MUCH longer sustain compared to the sibilant vocal, and a short release riding across a long period of gain reduction will cause the mix to sound blown out.

Like in the vocal example, we’re looking for a setting in which the compressor only reacts to the signal we want to affect.

In a perfect world, as soon as the lead is over and the song transitions into the verse, we would not see any gain reduction. Eq’ing is an alternate option here, but the compression will basically act as an EQ only when the lead guitar passes through that most offensive frequency range.

Here’s the same mix with processing applied:

[smart_track_player url=”https://s3.amazonaws.com/urmpublicpodcast/blog/mike+k+mastering+dynamics/Annoying+Lead+(after)+1.mp3″ title=”Annoying Lead Guitar After Processing” artist=”Mike Kalajian” download=”false” social=”false” ]

…and here’s the preset file for essence.

If you compare to the unprocessed mix you can hear that the lead has been pushed back down into the track a bit and and doesn’t sound like as much it’s coming through a megaphone.

Essence 2

The reality of this set up is not so perfect, and we’re getting some compression in the chorus where the vocal hits notes that fill the same frequency space as our annoying intro lead guitar. One solution here is to put the intro section of the song on it’s own track and only apply this process there.

 BEEFING UP A WIMPY SNARE DRUM
In this example the mix is pretty well balanced, but the snare drum just seems thin. It lacks the low mid punch to help it cut through the guitars and really establish the groove of the song:

[smart_track_player url=”https://s3.amazonaws.com/urmpublicpodcast/blog/mike+k+mastering+dynamics/Thin+Snare+(before)+1.mp3″ title=”Thin Snare Before Processing” artist=”Mike Kalajian” download=”false” social=”false” ]

Again, we could probably just EQ some of that back in, but we’d also be boosting some 200hz-ish stuff on the guitars / bass / vocals which could get a little ugly. We can easily use essence to add some of that punch back in by flipping it into a frequency dependent expander by turning on “upward” mode.

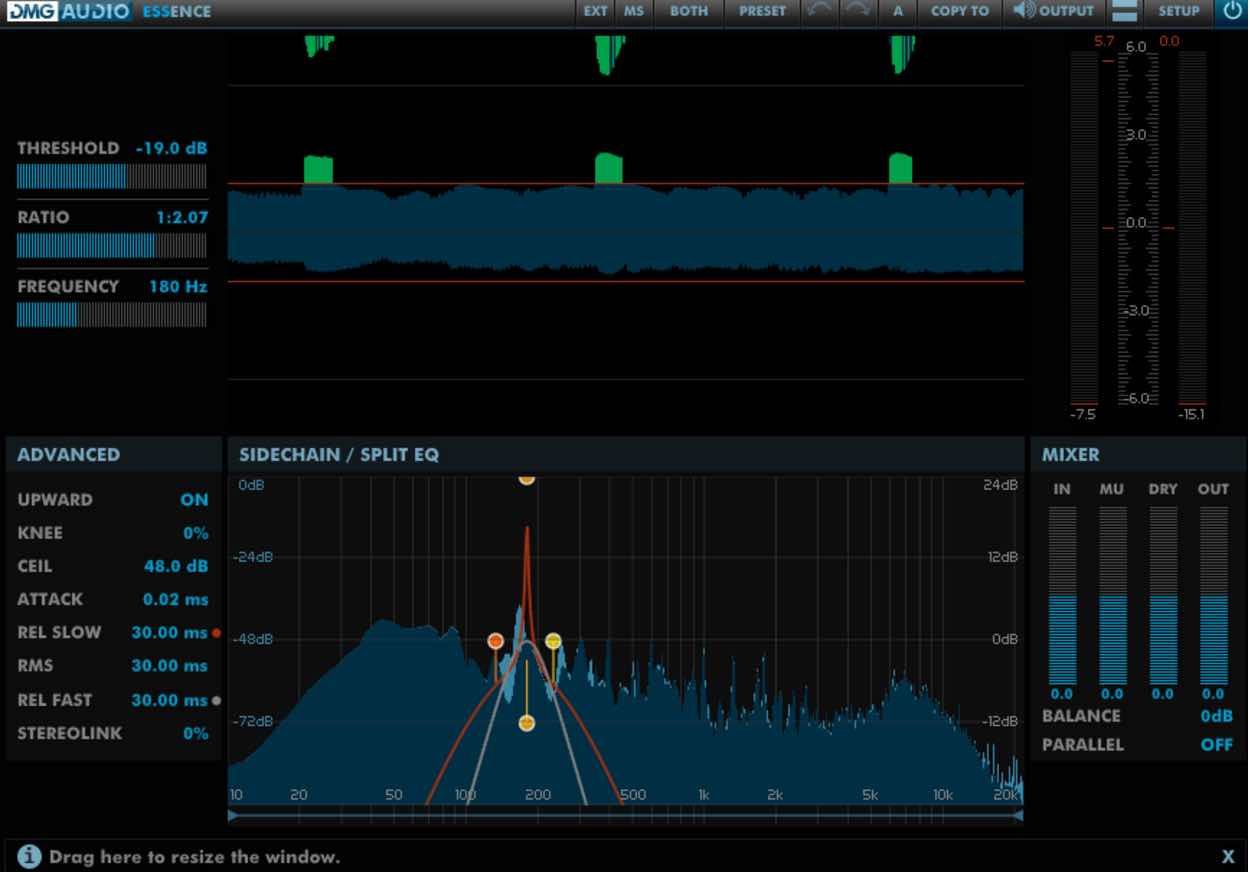
Like the first example i’m in the mid only portion of side mode, using a very narrow side chain eq to focus in on the main resonant frequency of the snare, which in this case is 180hz. Since we’re expanding here we can think of the attack and release almost like the attack and sustain of a transient enhancer.

I’m going to set the attack to the fastest possible setting, I want the expander to push the designated frequencies up immediately when it detects a snare hit. The release time is going to determine how long that 180hz band gets pushed when triggered. To me 30ms feels like it’s covering the length of the snare sample and not too much afterwards.

Once i’ve got the threshold dialed to that it’s only triggering when the snare is hit, it’s just a matter of using the ratio to determine how much push is applied.

Essence 3

Overdo this and you’ve got a dubstep snare.

Here’s the mix with processing applied:

[smart_track_player url=”https://s3.amazonaws.com/urmpublicpodcast/blog/mike+k+mastering+dynamics/Thin+Snare+(after).mp3″ title=”Thin Snare After Processing” artist=”Mike Kalajian” download=”false” social=”false” ]

…and here’s the preset for essence.  

The processed file has a nice added low end punch in the snare drum that really helps it jump out of the mix and establish the rhythmic feel of the song.

That about wraps it for now!

These are just a few examples of how you can carefully use dynamics processing to shape very specific mix elements. Next time we’ll talk about multiband compression and how we can very carefully use it to adjust the relative levels of elements in a stereo mix and add overall enhancements without destroying the mix (which is SO easy to do with multiband compression).


Mike Kalajian is the owner / chief engineer at Rogue Planet Mastering in New York. He’s worked with artists like, Saosin, The Dear Hunter, Giraffe Tongue Orchestra, Gates, Moving Mountains, and Against the Current. 

Nail The MixNail The Mix is our online mixing school that gives you REAL multi-tracks from REAL bands, plus a mixing class from the producer who recorded it. Past guests include Periphery, Chelsea Grin, Machine Head and State Champs. Join now for instant access!

 

XIAOAN LI: Surviving the Music Industry, Networking Without Anxiety, and Composing for Games

Xiaoan Li is a versatile composer whose work spans across video games, film, and other media. He has composed for major IPs like Futurama and King Kong, and through his game audio team, he has contributed to massive titles including Call of Duty, Skyrim, and Borderlands for companies like Ubisoft, Sega, and Tencent.

In This Episode

Composer Xiaoan Li dives into the realities of making a living in the modern music industry, and it’s not all about just being good at your craft. He breaks down the crucial difference between being a niche “outlier” versus a “generalized specialist” and argues why having a wide range of skills is a powerful survival tactic in a game of attrition. Xiaoan shares some seriously actionable advice on networking, explaining how to beat social anxiety by focusing on others and building the long-term relationships that actually lead to work. He also gets into the nitty-gritty of navigating difficult personalities, from shady clients to covert narcissists. For those curious about game audio, he demystifies the technical side, touching on non-linear music, middleware, and his own practical approach to programming incredibly realistic drums. This is a must-listen for any producer looking to sharpen their business sense and expand their professional toolkit.

Products Mentioned

Timestamps

  • [0:02:28] Being a “generalized specialist” vs. a “freak” outlier
  • [0:05:26] Why you have to “play ball” when working on commercial projects
  • [0:07:51] The music industry as a game of survival and attrition
  • [0:09:17] Why the best gigs come from long-term relationships
  • [0:10:21] A contract is only as good as your ability to enforce it
  • [0:12:37] Using leverage and timing when negotiating with bigger companies
  • [0:16:22] The importance of listening and focusing on others when networking
  • [0:18:21] How to avoid “punishing people with me, me, me” at conferences
  • [0:26:16] How shifting your focus outward can cure social anxiety
  • [0:28:08] “Nonspecific networking”: meeting people without an immediate agenda
  • [0:32:10] Why the “creative prick” stereotype is unacceptable
  • [0:36:08] Recognizing “covert narcissism” and virtue signaling
  • [0:43:47] The importance of understanding non-linear music for game audio
  • [0:45:45] Getting familiar with game engines and audio middleware
  • [0:47:45] How mixing for games differs from mixing for an album
  • [0:55:23] Translating a vague client brief (“vampire disco”) into a final product
  • [1:02:05] Technical tips for programming realistic and nuanced drums
  • [1:07:02] Xiaoan’s workflow: mixing directly in the sequencing session
  • [1:12:29] Overcoming the fear of failure: “The worst that can happen is that you die”