
How To Rescue Your Lame Mix With These Mastering Tricks
Eyal Levi
How To Rescue Your Lame Mix With These Mastering Tricks – By Mike Kalajian
Compressors are a mystery…
I’m not ashamed to admit that using them effectively can be tricky. With so many possible combinations of Attack, Release, Ratio, Knee, etc, how can you ever be sure you’ve dialed in the settings that are just right for your song?
Throw in the fact that at the mastering stage every jump of the gain reduction meter affects everything in the song, and you’ve really got your work cut out for you!
Fortunately, if you break down dynamic range adjustments into a few different categories, clearly outlining the types of issues they are meant to address, the mystery of mastering compression begins to come into focus.
In this article we’ll talk about some of the more tricky common mix issues a mastering engineer deals with, and how to use specific dynamics processing to efficiently solve them. For each example i’ll include before and after mixes, as well as a preset file for the plugin i’m using.
I encourage you to load the files and settings up in your daw and get a feel for how they’re reacting to the music. For practicality purposes i’ll only be using plugins for these examples (even though I might actually use hardware in some cases) and all the plugins used have free trials and support cross platform preset files.
The most important thing to understand is that these techniques should only be used when a mix has an issue that calls for that particular process. Just because you have a tool in your arsenal doesn’t mean you’re going to use it on every or even most jobs, but in the right situation it can really save a mix.
Attached you’ll find a short “song” I wrote, recorded, and mixed specifically for this blog (be nice – i’m a mastering guy, not a producer) My friend Ryan O’leary of Fit For A King was kind enough to come by and record a few vocal parts to the song, because If it were me singing … let’s just say it would be painful.
Here’s the original unmastered mix:
[smart_track_player url=”https://s3.amazonaws.com/urmpublicpodcast/blog/mike+k+mastering+dynamics/Main+Mix+1.mp3″ title=”Main Mix Unmastered” artist=”Mike Kalajian” download=”false” social=”false” ]
Although I think it could be improved with a little “glue” across the entire mix, which we’ll eventually cover, from a mastering standpoint there’s not a whole lot wrong with it.
Over the course of this article i’ll provide alternate versions of this mix, each with a specific issue that we can address.
Please note – All files are 44.1khz 24-bit and are totally unmastered.
You can download them as WAVs here – or listen on with mp3 versions.
FIRST STOP: THE DE-ESSER
The obvious use for these guys is knocking down the harsh top end in a vocal track during the mix stage, but they can also be very useful in mastering. In this context it’s best to think of a de-esser as more of a “frequency specific compressor” meaning that the compression is being applied to only a certain frequency range, and the detector circuit of that compressor is being fed by a certain (but not always the same) frequency range.
My personal favorite example of this is DMG Audio’s “Essence.” In addition to the parameters mentioned above, Essence will allow you to equalize the side chain as it feeds into the compressor circuit. Using a sharp narrow eq boost on a problem frequency can really help you zero in on the problem and nothing else.
You can download a free trial of Essence from dmgaudio – I have no affiliation with them whatsoever, but it is the only plugin of it’s kind that I use. Like most of the dmg plugins it’s teeters on the verge of being too feature rich, but with mastering we sometimes need to get very very tweaky.
ISSUE #1 TAMING A SIBILANT VOCAL
In this first example we have a mix with a sibilant lead vocal:
[smart_track_player url=”https://s3.amazonaws.com/urmpublicpodcast/blog/mike+k+mastering+dynamics/Harsh+Vocal+(before)+1.mp3″ title=”Harsh Vocal Before Processing” artist=”Mike Kalajian” download=”false” social=”false” ]
I find this happens most often when you get a “dark” sounding mix. Using some eq to open up the mix can reveal sibilance in a lead vocal that the mix engineer may not have noticed.
To solve this, i’ll typically set up the de-esser with a very fast attack, fast – medium release and hard knee shape. I’ve used the sidechain eq to zero in on the most offensive sibilant frequency range (7500 hz in this case) and added a very hard narrow eq boost at that range in the side chain signal.
Now i’m able to drop the threshold to a point where compression ONLY occurs when the offending sibilance is present – important because I know that i’m not messing up the other elements in the mix.
Typically, i’ll loop a section with a few harsh syllables and play with the threshold, ratio, and also the frequency range being affected by the compression, until I find something that smooths the vocal out in the most transparent way possible.
Wait .. what exactly is the knee?
You can think of the knee as “ratio smoothing” so that even if you have a ratio of 3:1 the actual ratio is less than 3:1 if a signal only slightly exceeds the threshold – the ratio then gradually increases until it hits 3:1 at a designated point above the threshold (depending on the softness of the knee). In my experience using a hard knee for surgical frequency specific mastering tasks allows you to compress what you want, and little else.
Here is the same mix with processing applied:
[smart_track_player url=”https://s3.amazonaws.com/urmpublicpodcast/blog/mike+k+mastering+dynamics/Harsh+Vocal+(after)+1.mp3″ title=”Harsh Vocal After Processing” artist=”Mike Kalajian” download=”false” social=”false” ]
… and here is the preset file for Essence.
You can hear how the harsh top end sibilance is tamed in the mix, but the other elements haven’t been dulled. The ratio can be pulled up or down to change the total amount of de-essing taking place.
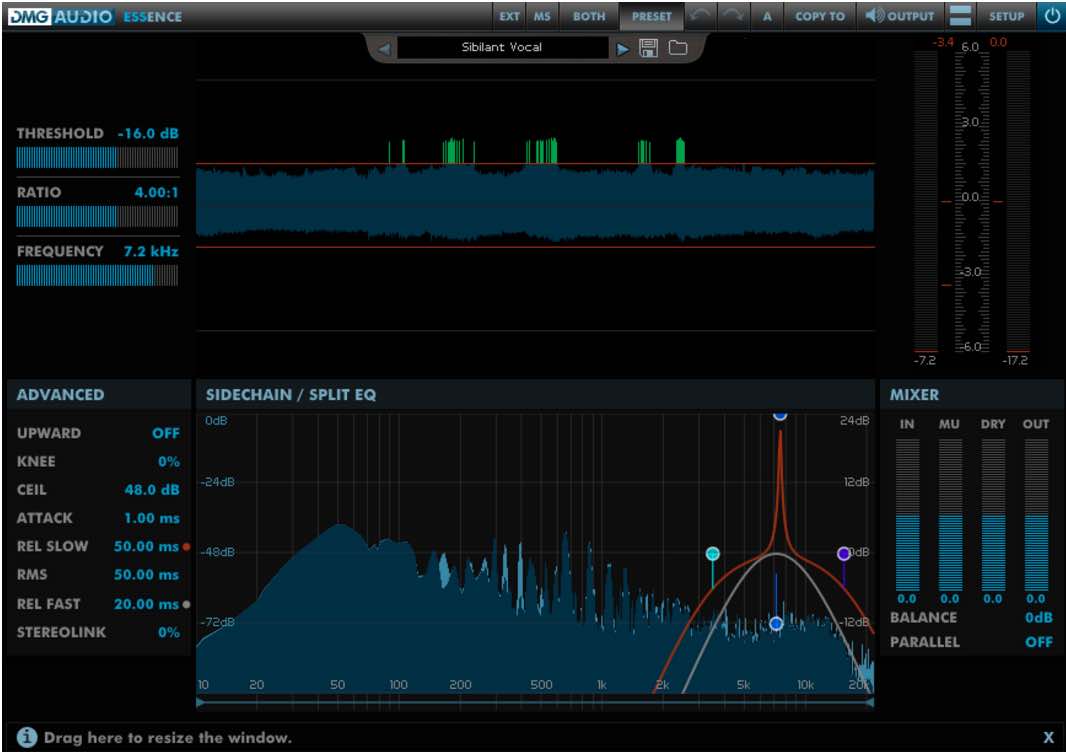
The orange line represents the side chain eq and filtering, while the grey represents the frequency range the compressor is acting upon. It’s also important to note that i’ve got essence in Mid / Side mode and i’m only performing this process on the mid channel.
FIXING AN OBNOXIOUS LEAD GUITAR
In this example we’ve got a mix with a lead guitar that pokes out in a really annoying way:
[smart_track_player url=”https://s3.amazonaws.com/urmpublicpodcast/blog/mike+k+mastering+dynamics/Annoying+Lead+(before)+1.mp3″ title=”Annoying Lead Guitar Before Processing” artist=”Mike Kalajian” download=”false” social=”false” ]
We can hear the heavy build up around 2k that really makes it tough to listen to. This happens a lot because many 2 way studio monitors have crossover points in the 2-5k range which can cause a “no man’s land” of frequency response. A mix engineer *could* be forgiven for pouring on these frequencies in order to separate a lead guitar from the rest of the music.
Again we’re going to create a large boost in the sidechain signal (right clicking on the frequency handles allows you to solo the sidechain EQ) and sweep around a bit to find where this lead guitar really rings and sounds annoying. For this i’m going to slow down the attack a touch, but more significantly the release will be slowed quite a bit.
The offending guitar part here has a MUCH longer sustain compared to the sibilant vocal, and a short release riding across a long period of gain reduction will cause the mix to sound blown out.
Like in the vocal example, we’re looking for a setting in which the compressor only reacts to the signal we want to affect.
In a perfect world, as soon as the lead is over and the song transitions into the verse, we would not see any gain reduction. Eq’ing is an alternate option here, but the compression will basically act as an EQ only when the lead guitar passes through that most offensive frequency range.
Here’s the same mix with processing applied:
[smart_track_player url=”https://s3.amazonaws.com/urmpublicpodcast/blog/mike+k+mastering+dynamics/Annoying+Lead+(after)+1.mp3″ title=”Annoying Lead Guitar After Processing” artist=”Mike Kalajian” download=”false” social=”false” ]
…and here’s the preset file for essence.
If you compare to the unprocessed mix you can hear that the lead has been pushed back down into the track a bit and and doesn’t sound like as much it’s coming through a megaphone.
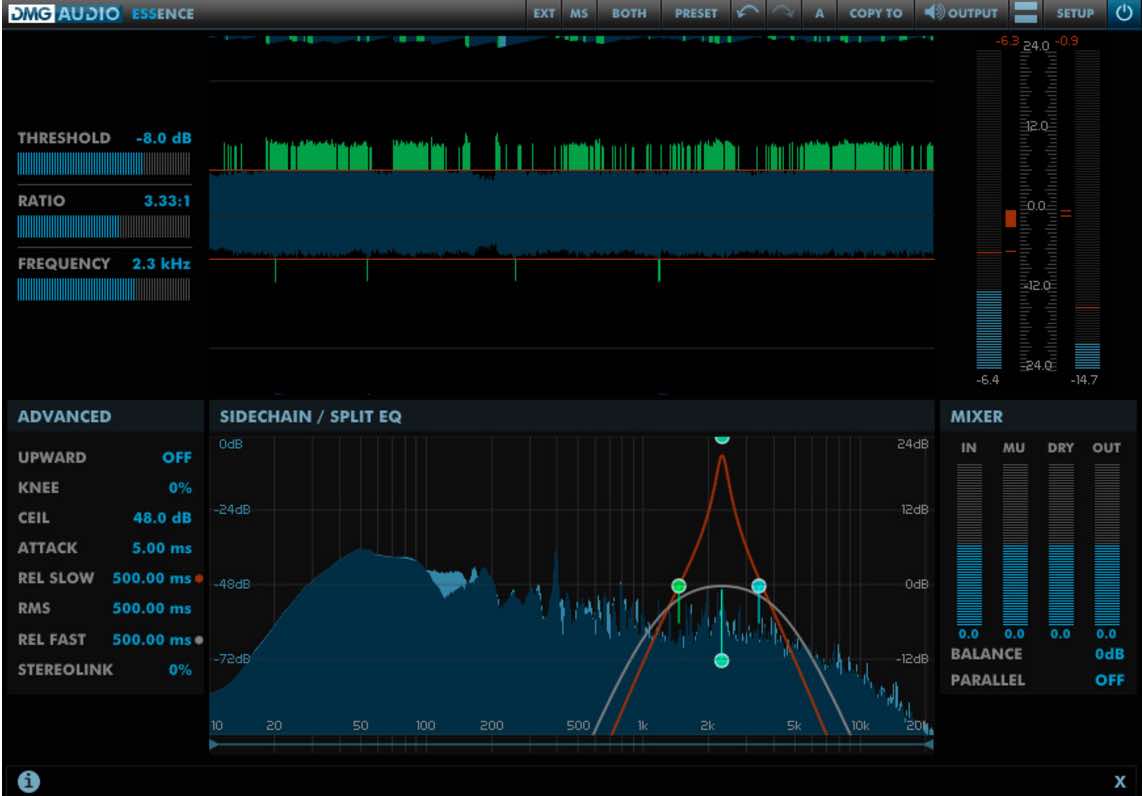
The reality of this set up is not so perfect, and we’re getting some compression in the chorus where the vocal hits notes that fill the same frequency space as our annoying intro lead guitar. One solution here is to put the intro section of the song on it’s own track and only apply this process there.
BEEFING UP A WIMPY SNARE DRUM
In this example the mix is pretty well balanced, but the snare drum just seems thin. It lacks the low mid punch to help it cut through the guitars and really establish the groove of the song:
[smart_track_player url=”https://s3.amazonaws.com/urmpublicpodcast/blog/mike+k+mastering+dynamics/Thin+Snare+(before)+1.mp3″ title=”Thin Snare Before Processing” artist=”Mike Kalajian” download=”false” social=”false” ]
Again, we could probably just EQ some of that back in, but we’d also be boosting some 200hz-ish stuff on the guitars / bass / vocals which could get a little ugly. We can easily use essence to add some of that punch back in by flipping it into a frequency dependent expander by turning on “upward” mode.
Like the first example i’m in the mid only portion of side mode, using a very narrow side chain eq to focus in on the main resonant frequency of the snare, which in this case is 180hz. Since we’re expanding here we can think of the attack and release almost like the attack and sustain of a transient enhancer.
I’m going to set the attack to the fastest possible setting, I want the expander to push the designated frequencies up immediately when it detects a snare hit. The release time is going to determine how long that 180hz band gets pushed when triggered. To me 30ms feels like it’s covering the length of the snare sample and not too much afterwards.
Once i’ve got the threshold dialed to that it’s only triggering when the snare is hit, it’s just a matter of using the ratio to determine how much push is applied.
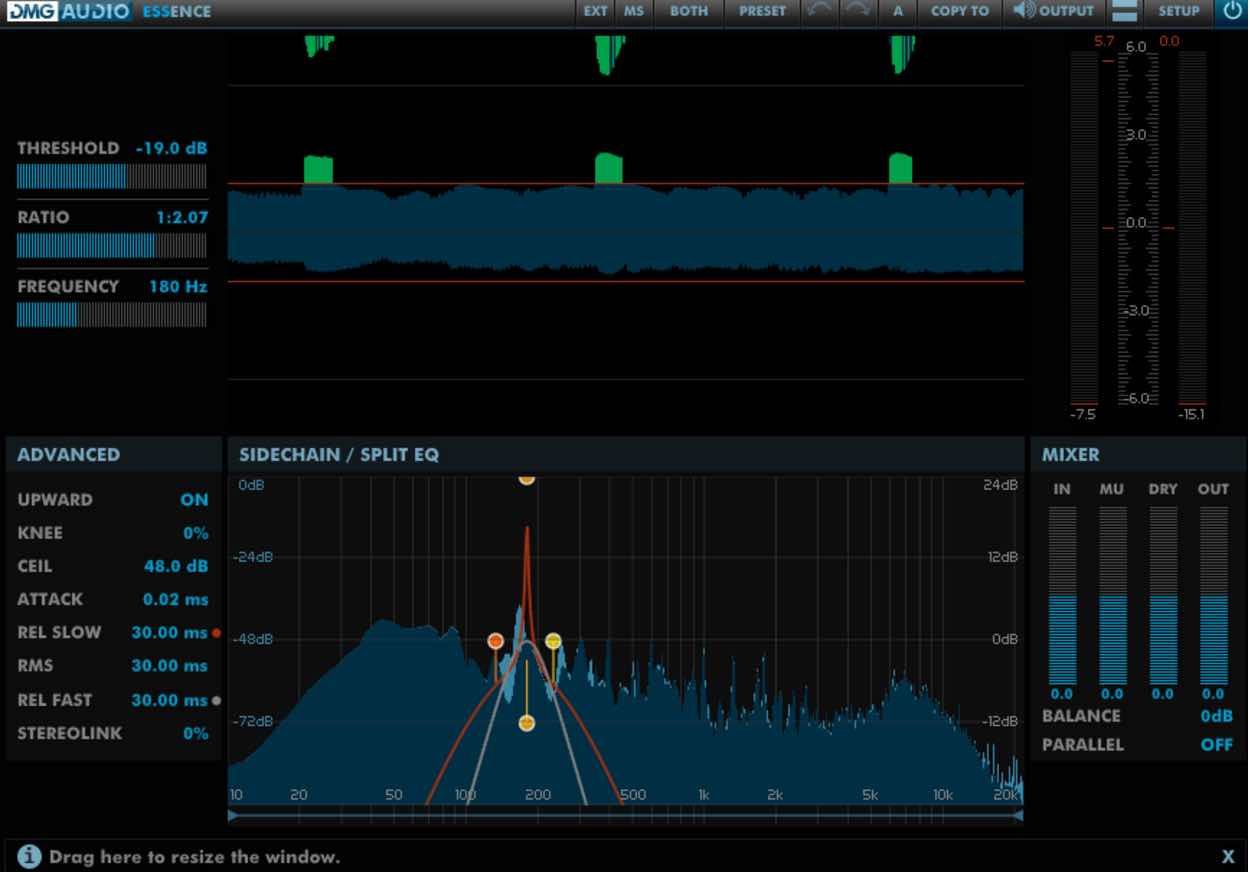
Overdo this and you’ve got a dubstep snare.
Here’s the mix with processing applied:
[smart_track_player url=”https://s3.amazonaws.com/urmpublicpodcast/blog/mike+k+mastering+dynamics/Thin+Snare+(after).mp3″ title=”Thin Snare After Processing” artist=”Mike Kalajian” download=”false” social=”false” ]
…and here’s the preset for essence.
The processed file has a nice added low end punch in the snare drum that really helps it jump out of the mix and establish the rhythmic feel of the song.
That about wraps it for now!
These are just a few examples of how you can carefully use dynamics processing to shape very specific mix elements. Next time we’ll talk about multiband compression and how we can very carefully use it to adjust the relative levels of elements in a stereo mix and add overall enhancements without destroying the mix (which is SO easy to do with multiband compression).
Mike Kalajian is the owner / chief engineer at Rogue Planet Mastering in New York. He’s worked with artists like, Saosin, The Dear Hunter, Giraffe Tongue Orchestra, Gates, Moving Mountains, and Against the Current.
 Nail The Mix is our online mixing school that gives you REAL multi-tracks from REAL bands, plus a mixing class from the producer who recorded it. Past guests include Periphery, Chelsea Grin, Machine Head and State Champs. Join now for instant access!

