
5 Tips To Super-Charge Your Mixing Workflow
urmadmin
Introduction To The Series:
What if I told you that whether you’re aware of it or not, there are probably dozens of tedious studio tasks that you’re wasting unnecessary amounts of valuable time on every single day?
But it doesn’t have to be that way…
Efficient time-management is one of the most crucial things to get right when trying to make a career out of music production and mixing. Taking the time to learn how and where to cut corners (in a good way) in order to save time is extremely beneficial towards getting more work done and ultimately, making your time spent in-front of a DAW as productive as possible.
In this week’s URM Blog, we’ll be taking a look at some tips and tricks you can use to streamline your workflow and free up some precious time.
Here are 5 tips to super-charge your mixing workflow:
Tip #1 – Make Mix Templates
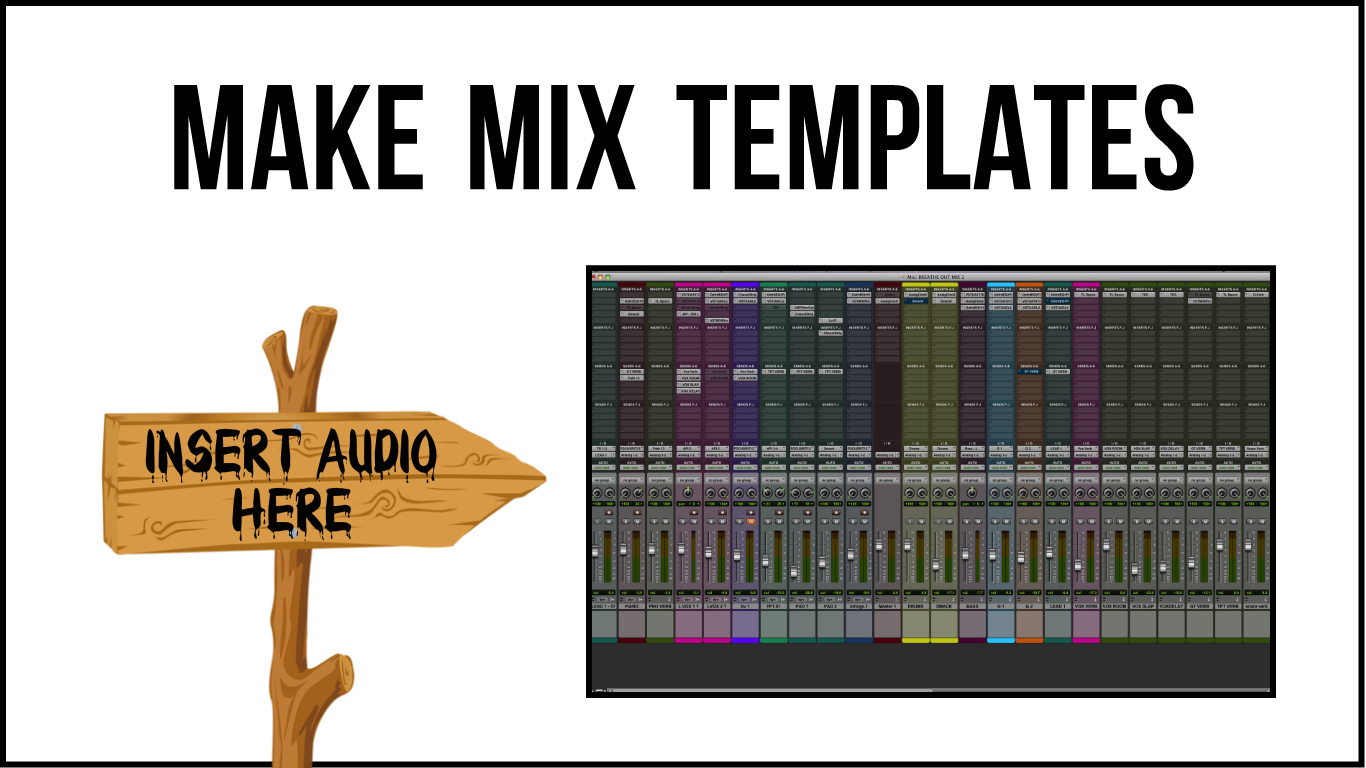
A common mistake which can waste a lot of time if done on a daily-basis is re-doing the same boring tasks from scratch every time you fire up a new session for a project.
Creating custom templates which allow you to bypass some of the repetitive grunt work is an excellent way of freeing up some valuable time and allowing you to dive straight into the fun part. (which also happens to be the better moneymaker!)
Here are a few examples of things you can consider including in a Mixing Template:
- Pre-Routed Instrument Groups/Busses: Setting up a well named, tidy grouping system takes a while, but is an integral part of any efficient mixing setup. Why not come up with a kind of “pre-built routing & bussing checkpoint” template which allows you to skip the tedious setup process?
- You can even pre-equip your group channels with any processing you’ll ultimately end up using in order to save further time and hassle later on.
- Parallel Compression, Distortion, Excitation Sends: You can set up an infinite number of varying parallel FX sends which can be blended in underneath your original signals for added oomph or air.
NOTE: Some of the sends I like to set-up in my own projects include a Parallel Distortion (Soundtoys Decapitator), multiple Parallel Compression sends of varying colour (A dbx 160, A Slate 1176) and an Exciter (Waves’ Aphex Aural Exciter).
- Multiple Reverb Sends Set For Different Purposes: These could include a short room-reverb for added ambience & realism, a medium plate for Drums, a long hall for FX and Vocals, etc.
- A selection of Delay Sends: A short “Lennon Style” slapback, a ¼ note Delay for long “delay throws”, a stereo Ping-Pong delay with varying settings for general use on Vocals and Instruments, etc.
- A Stereo Widener/Doubler Send: Waves’ Doubler, Eventide’s H3000 Factory and Soundtoys’ Microshift are all excellent plugin options for this purpose, and always great to have readily available on an Aux.
NOTE: These are just a few basic ideas of what might end up in a mixing template. Long story short, anything that you use on a regular basis and would usually take a while to set-up is an ideal candidate for inclusion.
Tip #2 – Commit To Decisions & Move On ASAP
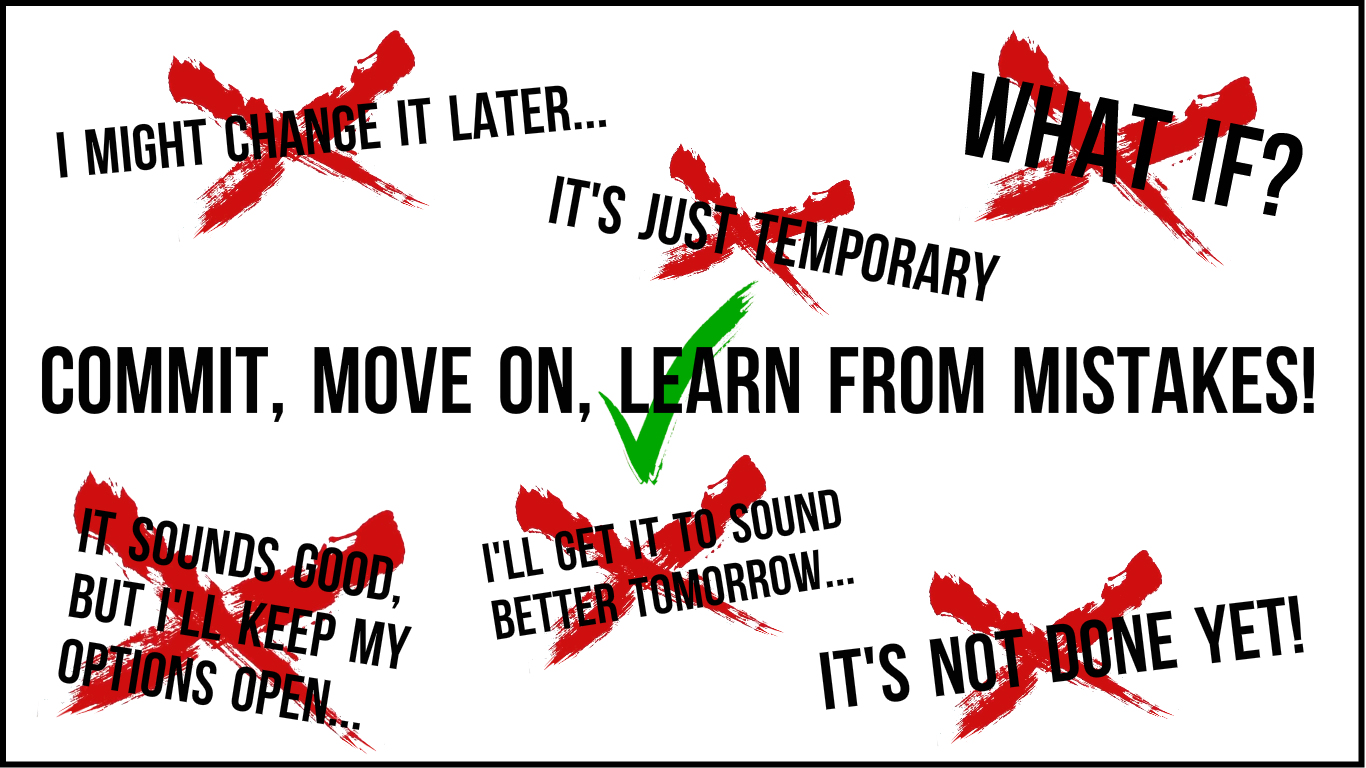
Making open-ended decisions at every step of the music production process is a surefire way of slowing down your progress and preventing yourself from ever getting anything done.
Ask yourself this:
Do you think a top-dog engineer like Chris Lord Alge would be able to churn out multiple mixes every single day if he was doubting every decision and repeating his moves over-and-over again in search of negligible improvements? – PROBABLY NOT…
NOTE: Check out my “Learn From The Legends” Blog series for an in-depth breakdown of some brilliant workflow tips from the mind of CLA himself.
https://urm.academy/learn-from-the-legends-volume-1-chris-lord-alge/
Here are a few pieces of advice on how to deal with the moments of indecision and insecurity that might occur during your music production process:
- Render/Print any open-ended source tones the moment you’re happy with them: This is crucial in order to prevent any “what if” urges from rearing their ugly heads further down the line. (This includes things like amp sims, impulse responses, drum samples etc.)
- Recording a backup DI alongside your “real” amp tone shouldn’t be seen as a default “fix the tone later” safety net; Sure, recording a DI is always good practice, but what’s the point in spending hours dialing in a tone and placing microphones in the room if you’re just gonna throw it all away in favour of amp sims or re-amping at the first chance you get…
- Bounce similar sounds down to manageable stereo stems and reduce your overall channel-count: CLA often talks about how he likes to combine similar elements down to single stems in order fit the hundreds of channels he receives per project across his 48 channel SSL setup for easy access.
Tip #3 – Process Your Groups & Move Forward Quickly!

Ever find that you’re applying similar processing to multiple elements within the same mix? Why not kill 2 (or more) birds with one stone by bussing them together and treating them as one?!?
An incredible example of this kind of workflow is last month’s Meshuggah Nail The Mix with Tue Madsen: Rather than obsessing over each and every guitar track one-by-one, Tue simply treats the entire guitar buss as a single sound, resulting in a huge wall of guitars.
Check out the video here:
https://www.youtube.com/watch?v=9Xte6sUXjn0
The exact same concept can even be applied across an entire mix if desired. This method of working is often called “Top-Down Mixing”:
What is “Top-Down Mixing?
Guys like Chris Lord Alge, Andrew Scheps and Adam “Nolly” Getgood are known for instantiating some fairly drastic EQ on their master busses at the very beginning of their mixes.
These moves often take the shape of broad high and low-end boosts in order to brighten and fatten all of the raw elements within the mix from the get-go and in return, speed up the process of getting them to commercial levels of “polished”.
NOTE: Here’s a concise video demonstration of “Top-Down Mixing” in order to give you a few basic ideas on where to get started:
https://www.youtube.com/watch?v=Wxj9vZQ_53k
A typical Top-Down mixing chain might look something a bit like this:
- Saturation: Using some kind of tape or console emulation and driving the input subtly can do wonders towards gluing your mix together and giving it some added liveliness.
- Additive EQ: The most common tool for this purpose is a broad and gentle “Pultec” style equaliser which boosts everything below 100Hz and above 5kHz.
- Buss Compression: Mixing into a few dB of compression from the get-go can help reduce the amount of time it takes to produce a tight and punchy mix. A lot of people like the sound of an SSL type buss compressor with a slow attack and fast release for this application.
- Limiting: As dangerous as it may sound, mixing through some subtle peak limiting from the get-go can give you a better idea of what your drums and transient elements will end up sounding like post-mastering.
It often takes a few tries and revisions to settle on a “Top-Down” setup that really does the trick for your specific work setup. Don’t be afraid to try out new ideas and switch things around until you finally land on a magic combination that seems to makes your life easier.
Tip #4 – Create “Ballpark” Plugin Presets & FX Chains
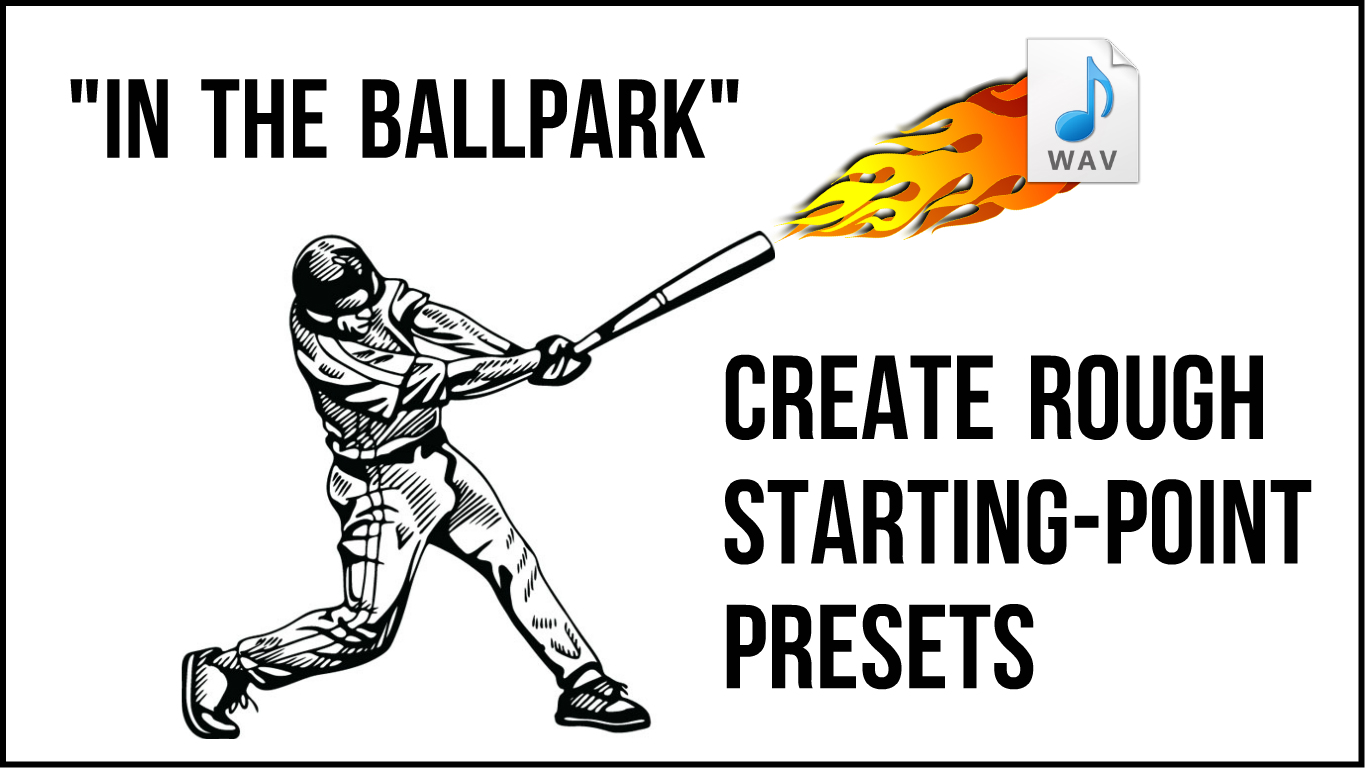
Do you have certain “go-to” plugin settings that more-or-less end up on every single one of your mixing projects? Why not set them as your plugin defaults and save time otherwise spent dialing them in several times per-day…?
FACT: Certain elements within a mix will call for a similar kind of treatment almost every time regardless of genre. Ex: Snare and Kick will need a scoop in the mids, vocals will need brightening etc. etc…
Given this information, why not save yourself some future hassle and come up with default plugin presets that will get you a significant deal closer to your desired end sounds from the moment you insert them on the channel?
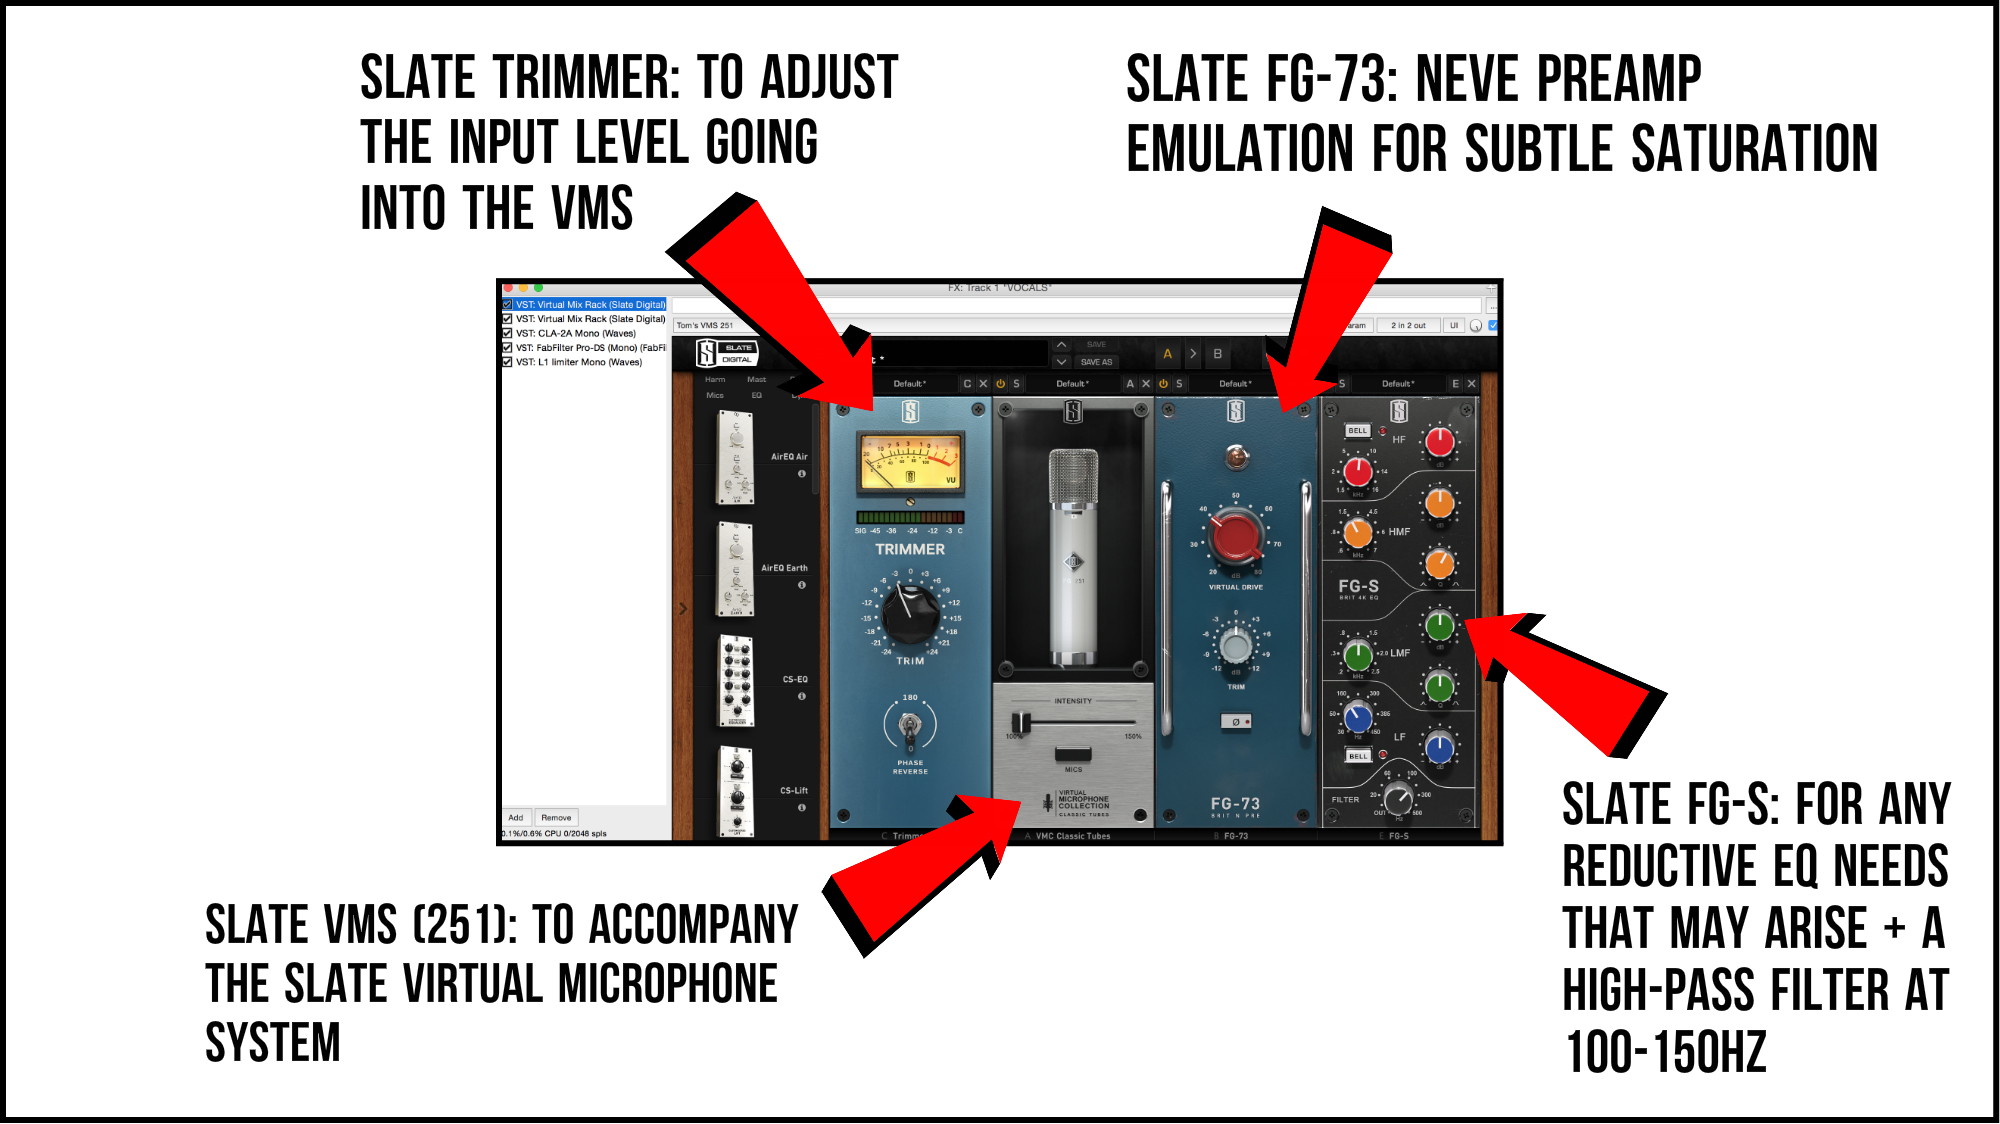
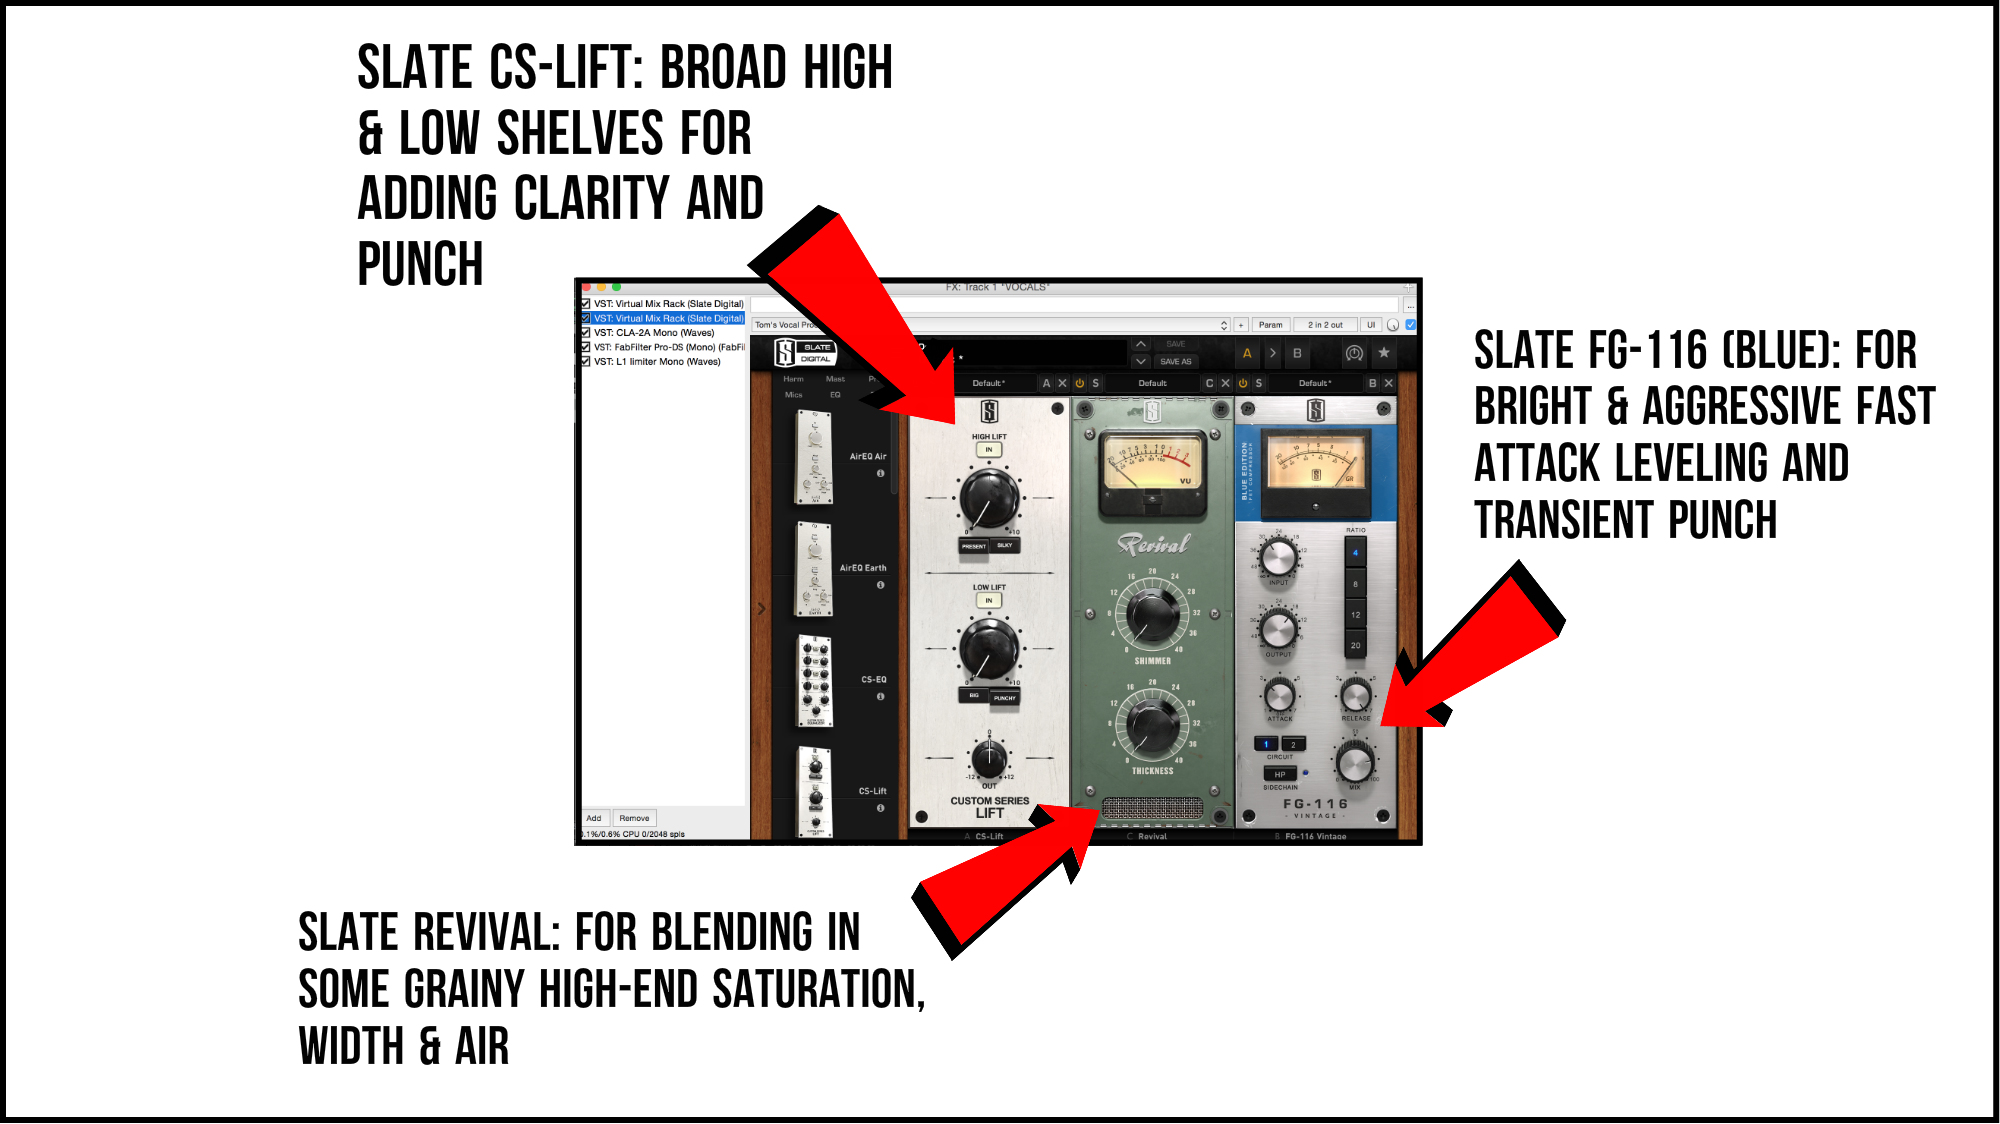
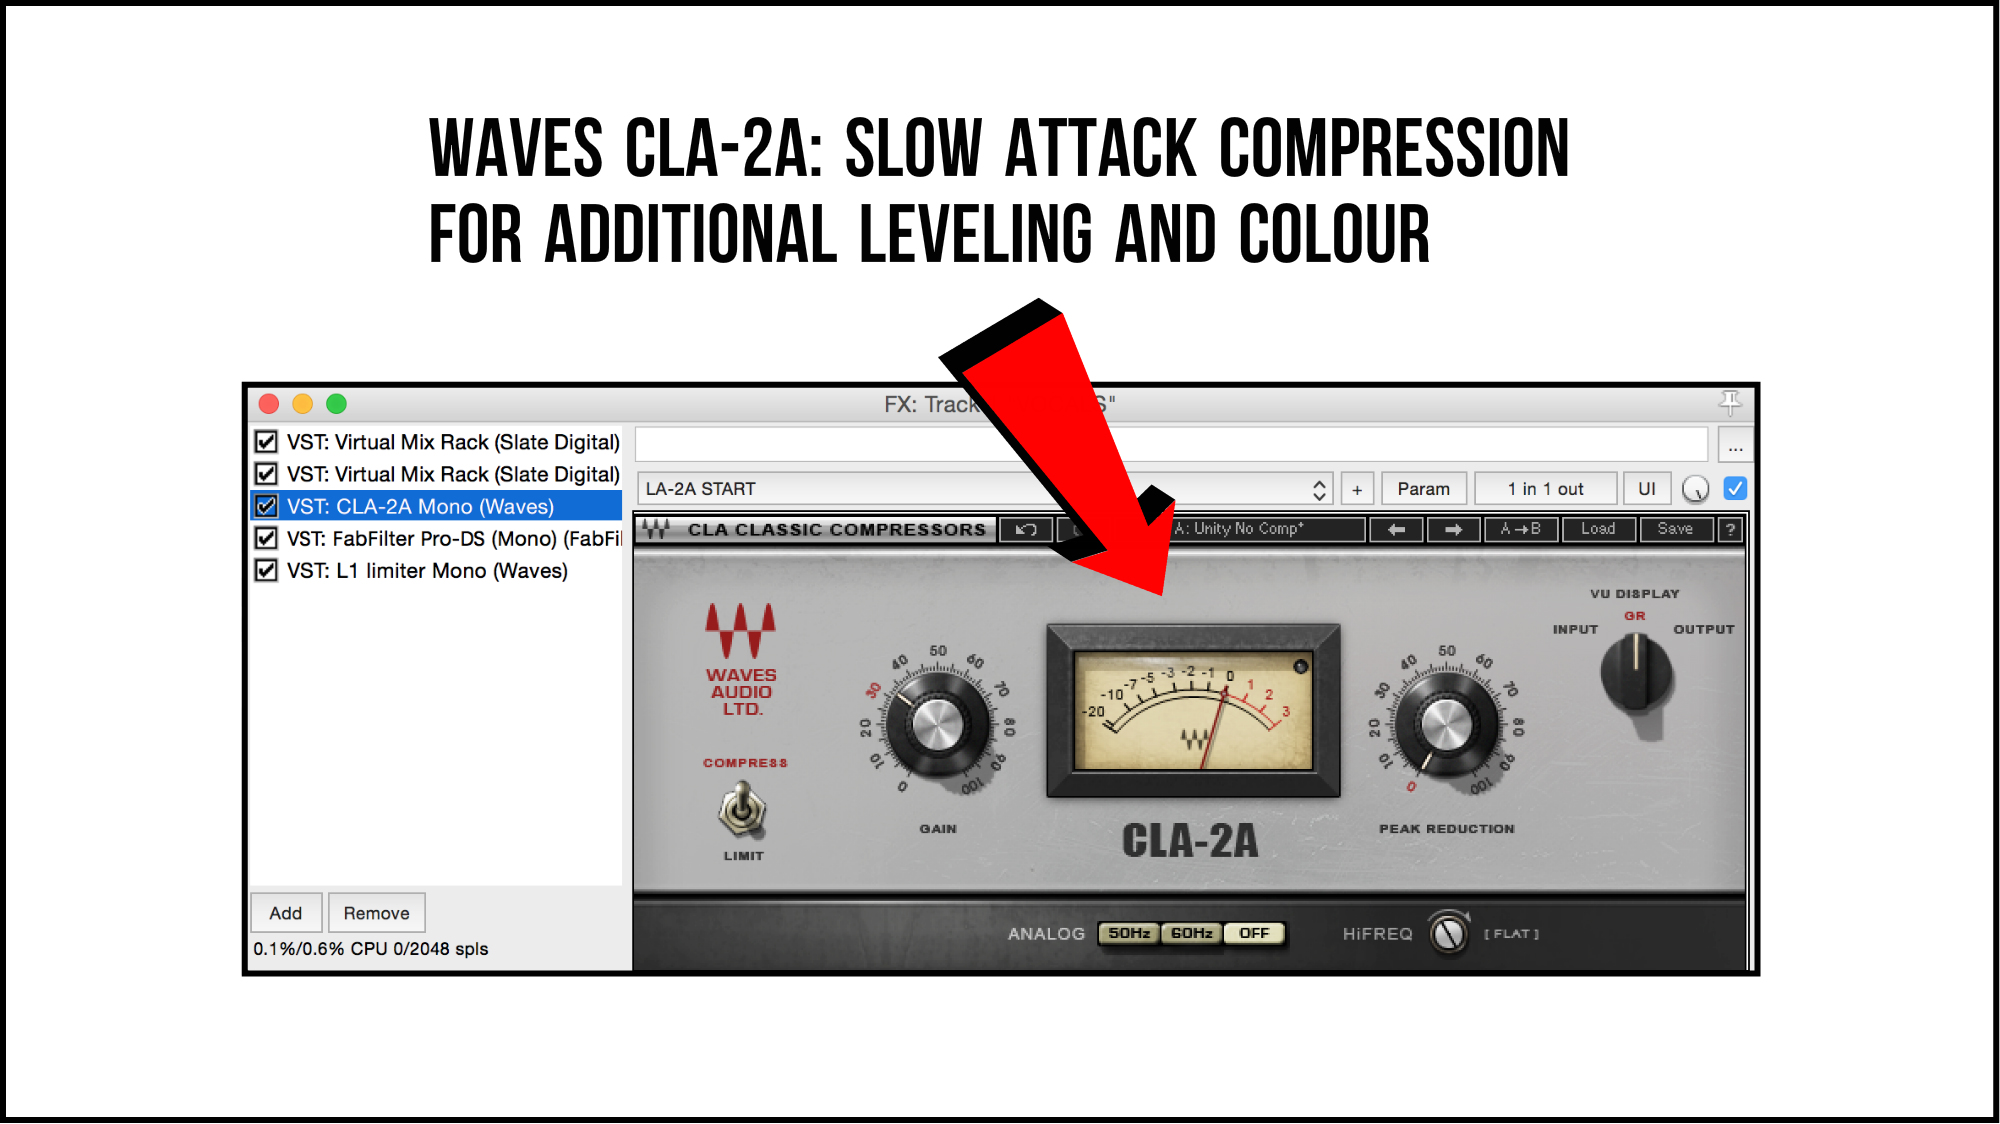
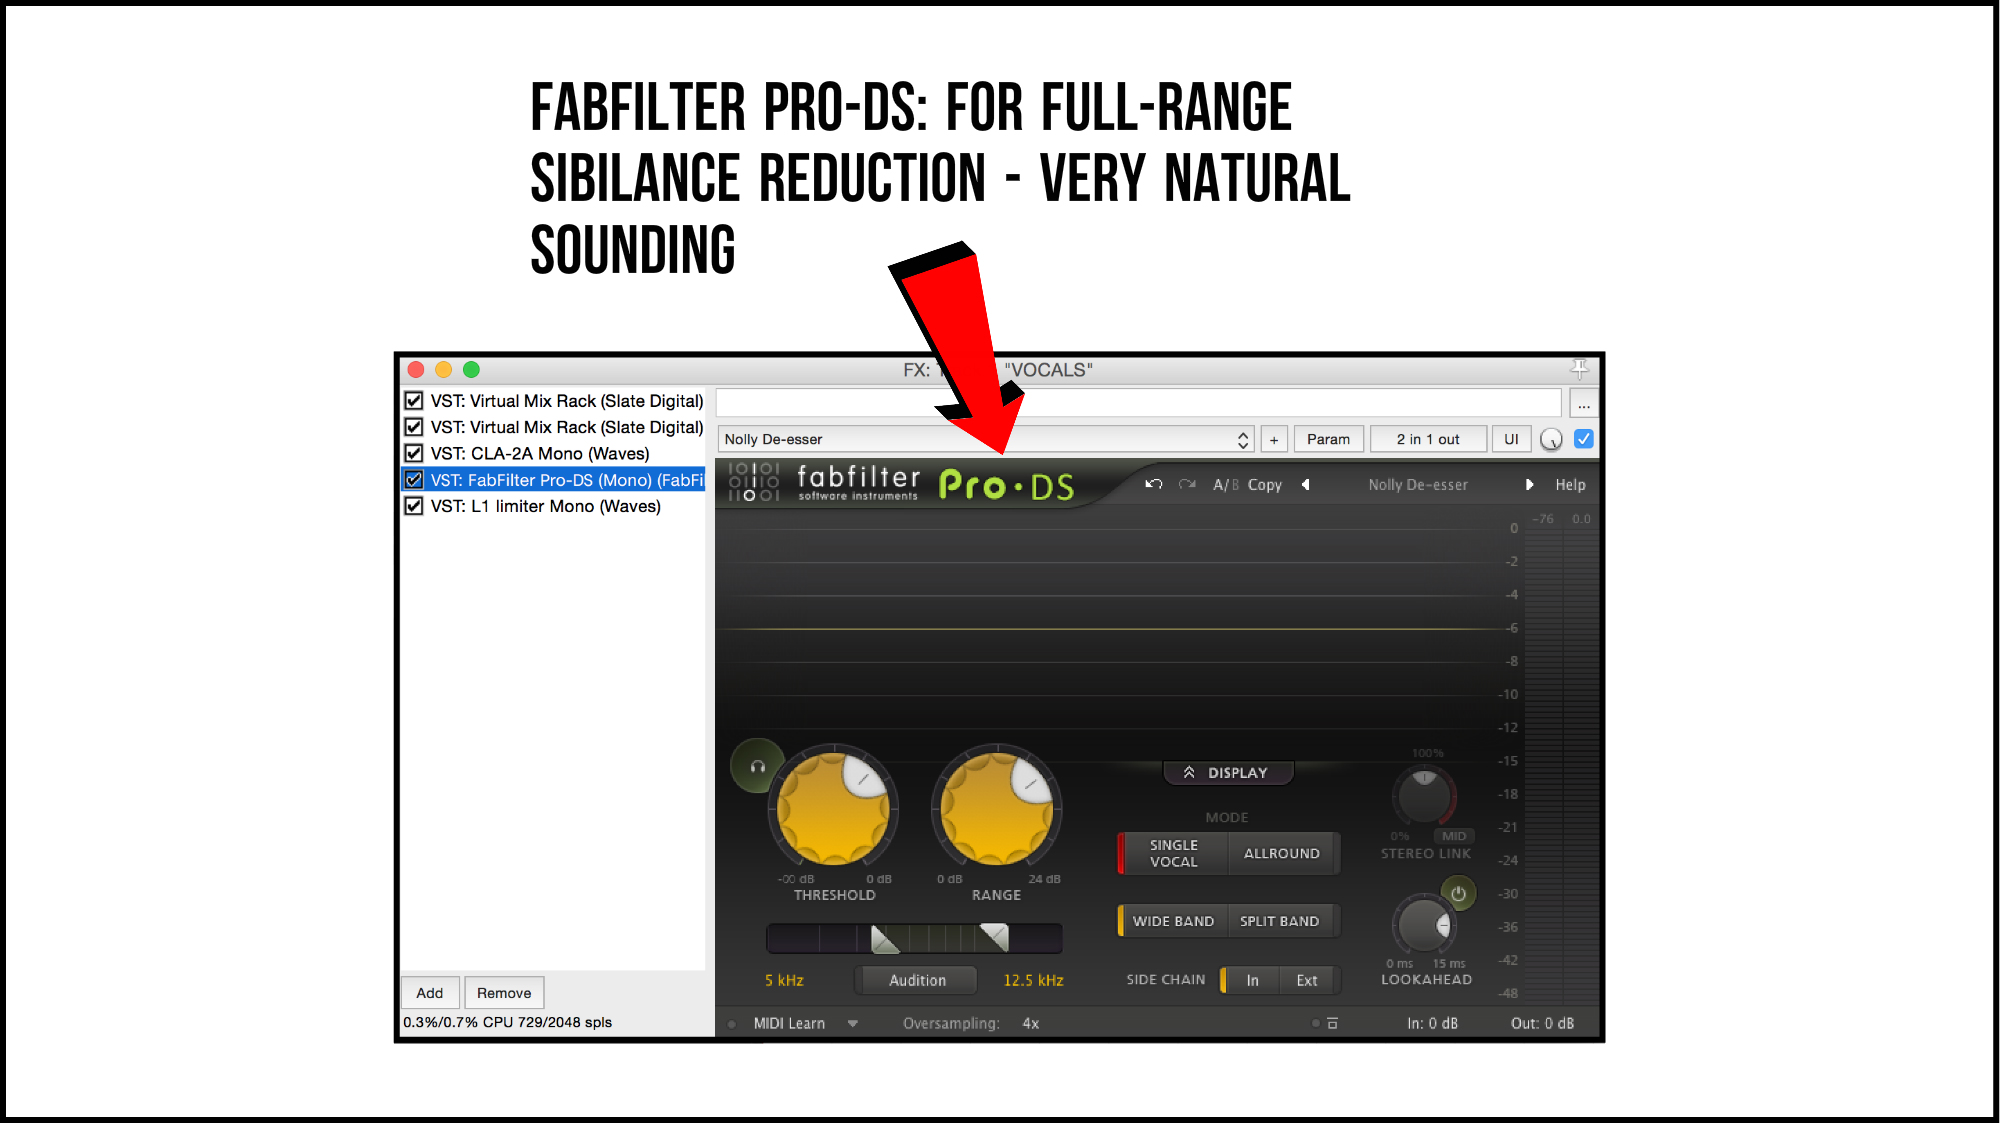
Here’s an example in the shape of the initial vocal FX chain I like to start with in each one of my mixes:
My Overall Initial Vocal Plugin Chain:
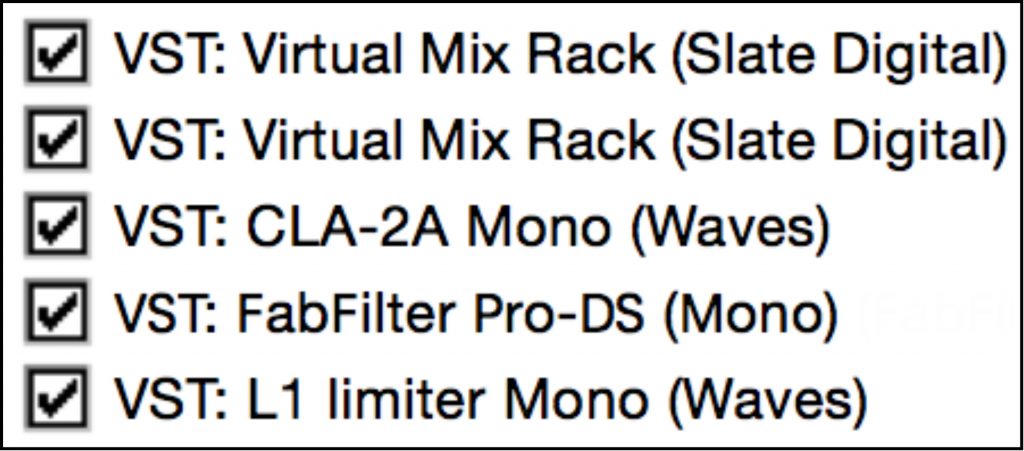
1st Plugin: Slate VMR (Trimmer, VMS, FG-73, FG-s)
2nd Plugin: Slate VMR (CS-Lift, Revival, FG-116 Vintage)
3rd Plugin: Waves CLA-2A
4th Plugin: FabFilter Pro-DS
5th Plugin: Waves L1 Limiter
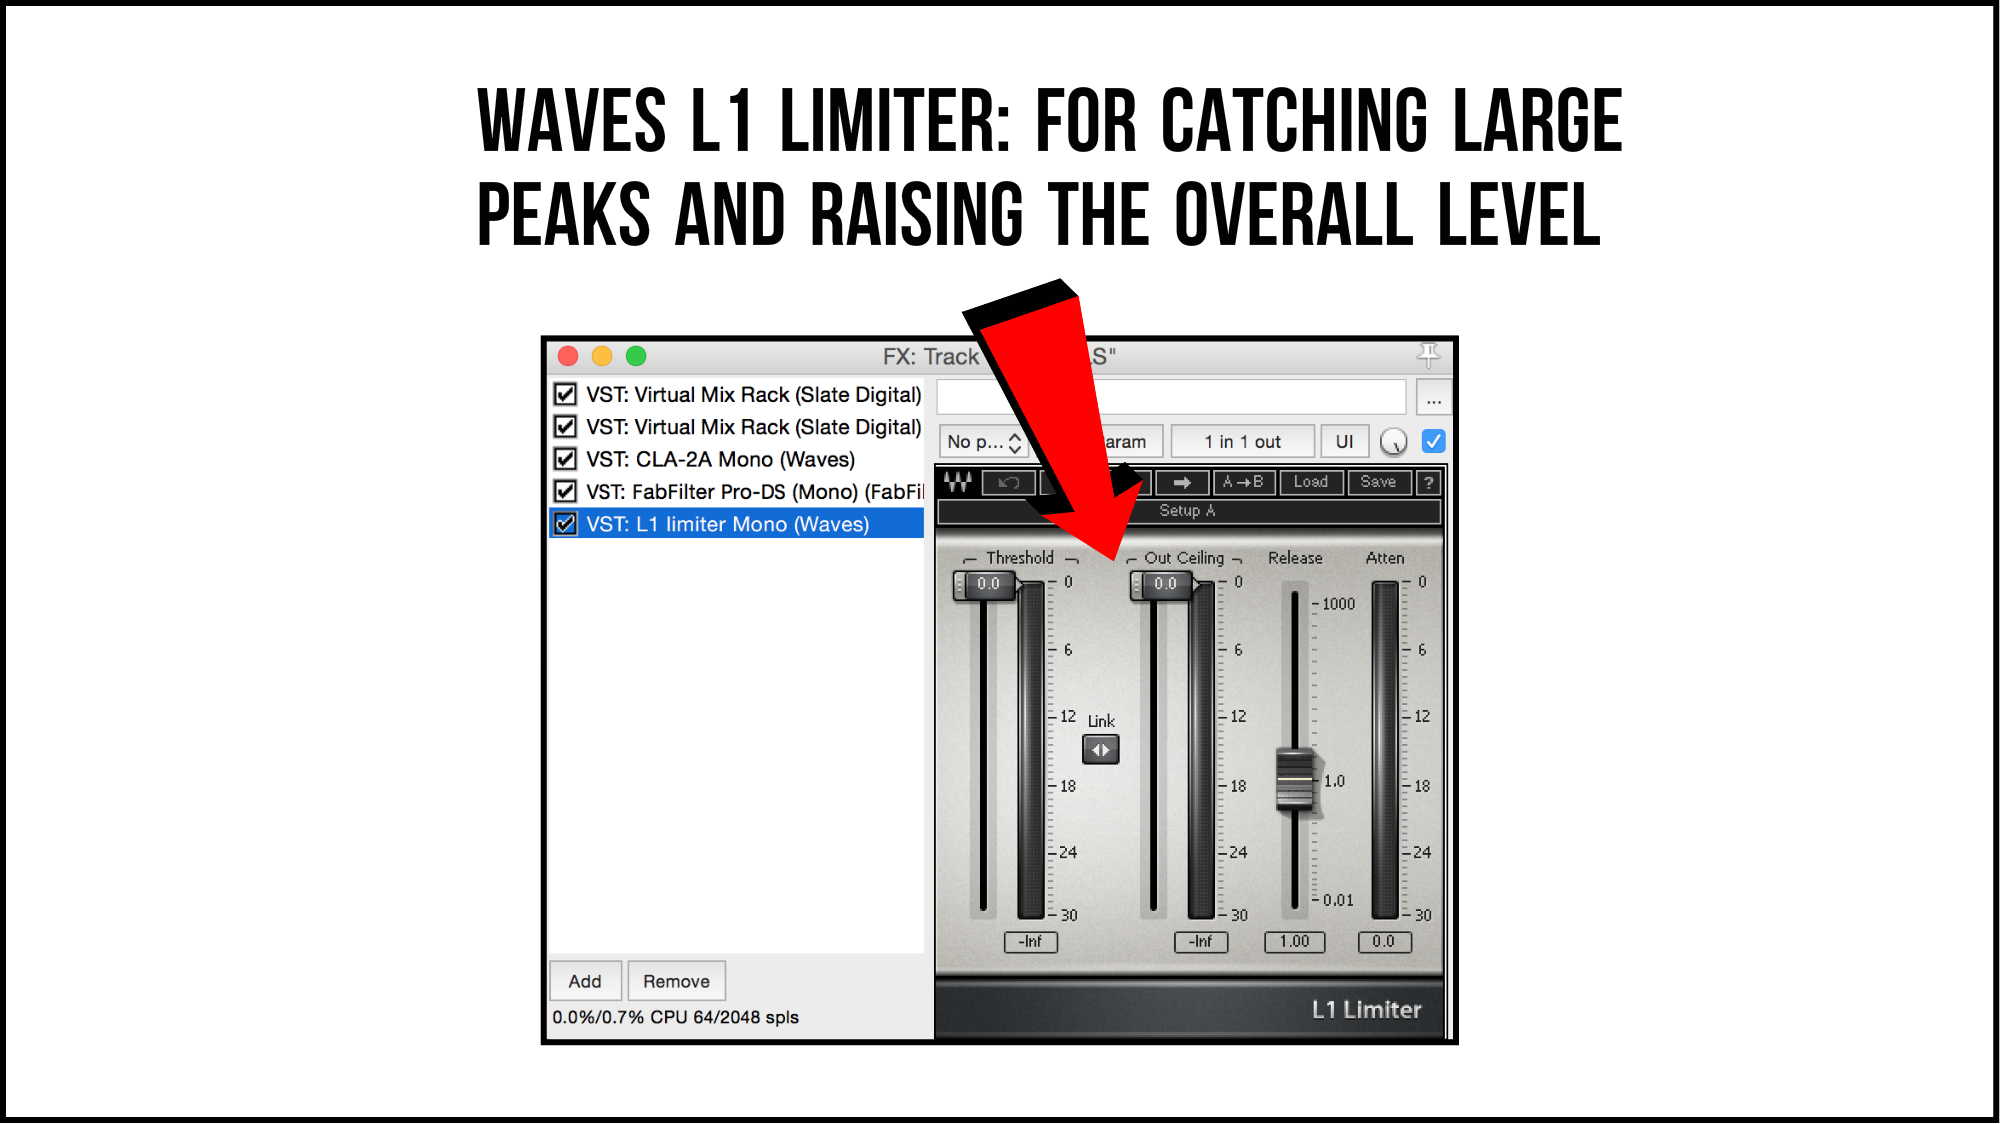
As you can tell from the sheer amount going on in the images above, dialing in all of these initial vocal channel settings from scratch would take a fair bit of time. By saving this entire chain as a default preset, all it takes is few clicks at the start of each session and I’m ready to get started on my Vocal mixing process.
Tip #5 – CONCLUSION: Learn About Workflow From The Greats!

Ever started watching through a mixing tutorial or reading through a mixing related book… Only to skip past the workflow related sections in order to get to the “good part”?
I know I have… But it’s not always justified!
Let’s take Nail The Mix as an example: As boring as the basics may seem to a beginner, taking the time to study the way that professionals like our URM overlords Joey Sturgis, Eyal Levi and Joel Wanasek like to approach the process of setting-up their sessions can actually have a greater impact on your growth as an engineer than just copying the EQ and Compression settings they’re using…
After all, It’s not a coincidence that many superstar producers and mixers prefer to talk about workflow rather than specific mixing settings in interviews and tutorials…
All of this being said, if you take a single piece of advice from this article then let it be this:
Don’t let your “I know all of that stuff already!” attitude and mixer’s pride get in the way of your improvement! There’s always something new and beneficial to be picked up from studying how the professionals like to go about their work process!
Final Words:
This concludes “5 Tips To Super-Charge Your Mixing Workflow.” I hope that this article has given you some new ideas to try out during your next project. Be sure to comment below if any of this information has helped you out, or if you have any questions.
Stay tuned for more production/mixing related articles in the not-so-distant future!
Want mix tips from URM Academy? Read them here!
 Nail The Mix is our online mixing school that gives you REAL multi-tracks from REAL bands, plus a mixing class from the producer who recorded it. Past guests include Periphery, Chelsea Grin, Machine Head and State Champs. Join now for instant access!

