| By Thomas Brett |
Introduction:
Without a doubt, the studio tool which people seem to have the most trouble getting their heads around when first starting out is Compression.
The most common reason for this, in my opinion, is the fact that the whole concept is often taught poorly/in the wrong way to begin with!
In this week’s URM Blog, rather than rambling on in vain about some abstract terms that most beginners don’t understand in the first place (as most tutors in “good” audio schools seem to do…), I’ll attempt to show you exactly how a compressor is affecting a signal via some easy-to-comprehend visual examples.
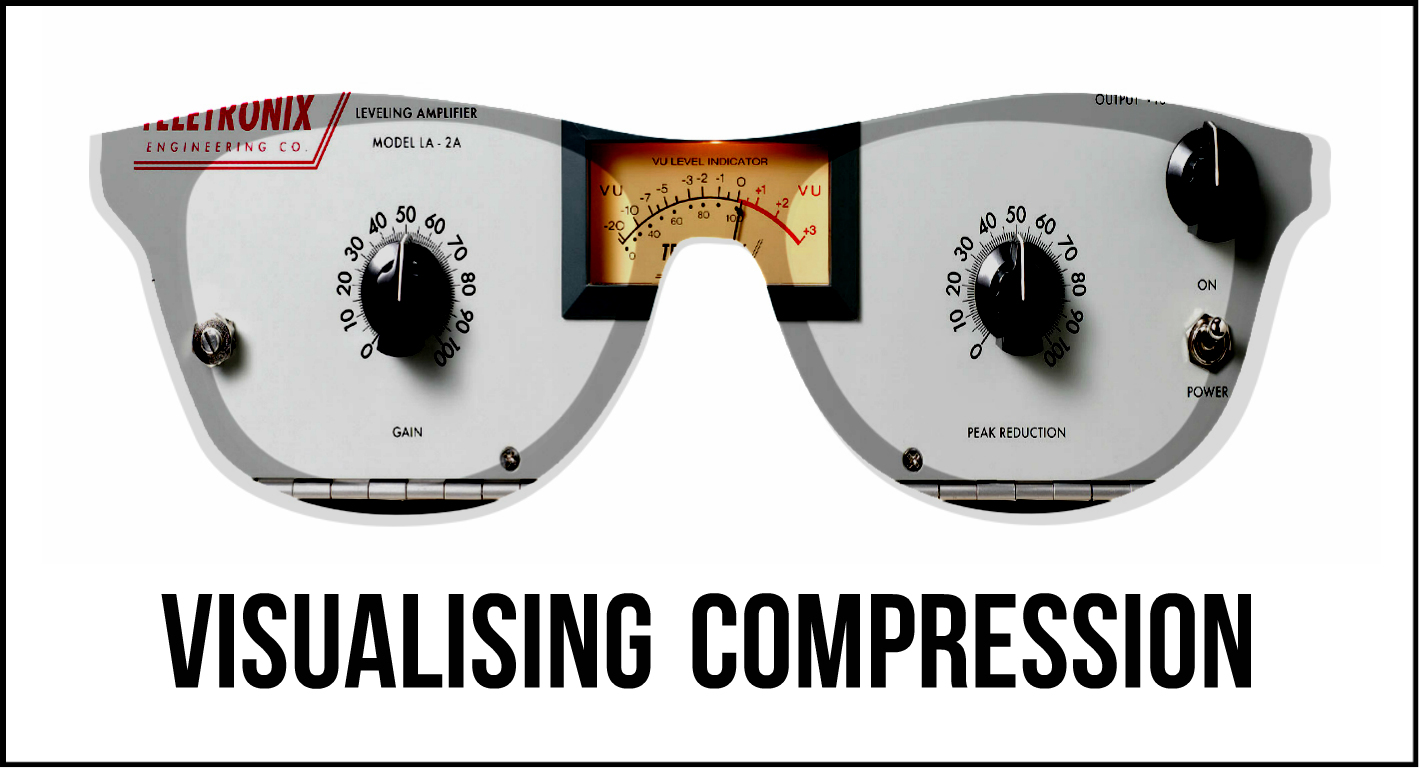
VISUALISING COMPRESSION
Before we dive in head first, it’s important that you have a general working understanding of the terminology, and what we’re trying to achieve with the use of compression in the first place:
Compression, In Basic Terms…
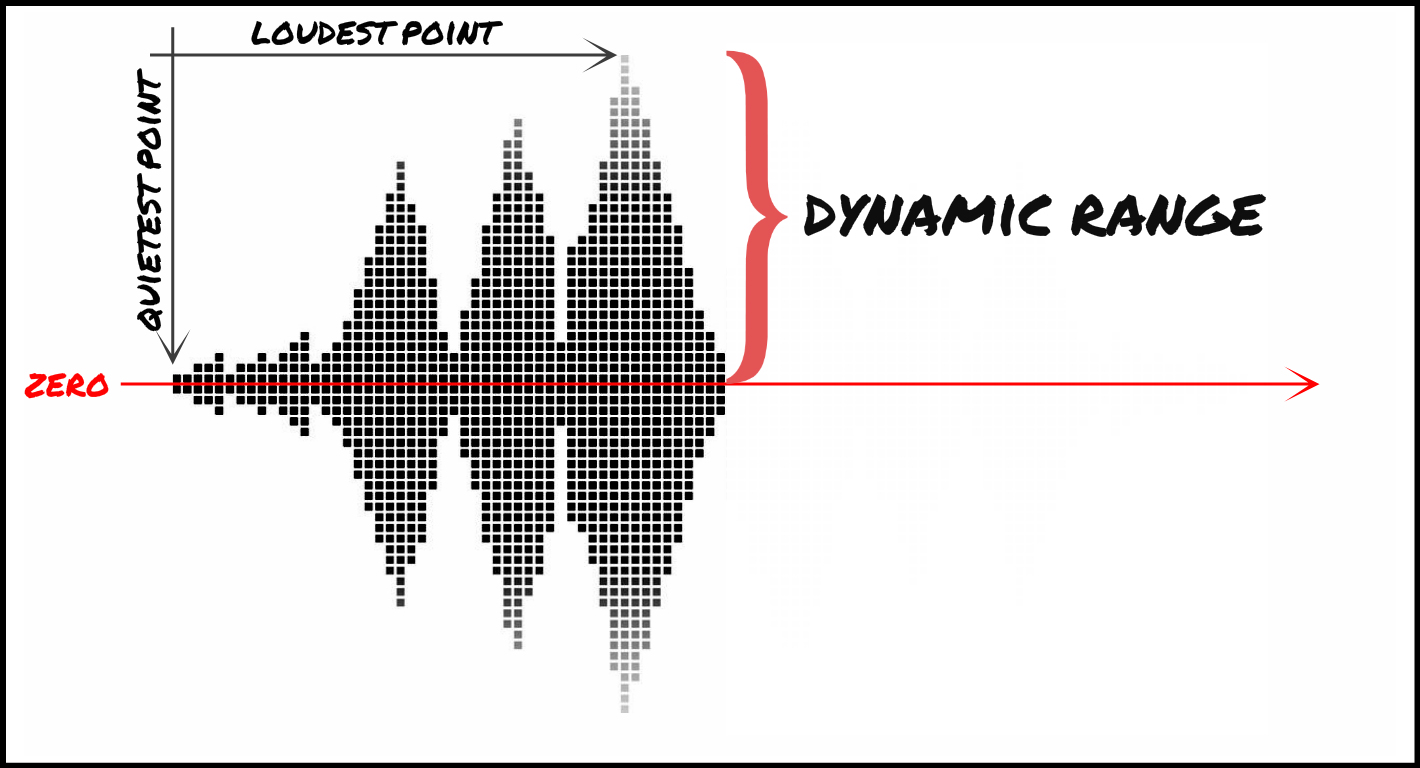
At it’s core, “compression” does exactly what it says on the tin when talked about in the context of audio: It reduces the distance between the quietest and loudest parts (the dynamic range) of an audio signal, resulting in a more consistent overall volume.
Beyond this primary functionality, the various controls which are available on a given compressor’s user interface simply allow us to shape how said “reduction” takes place (to a certain extent):
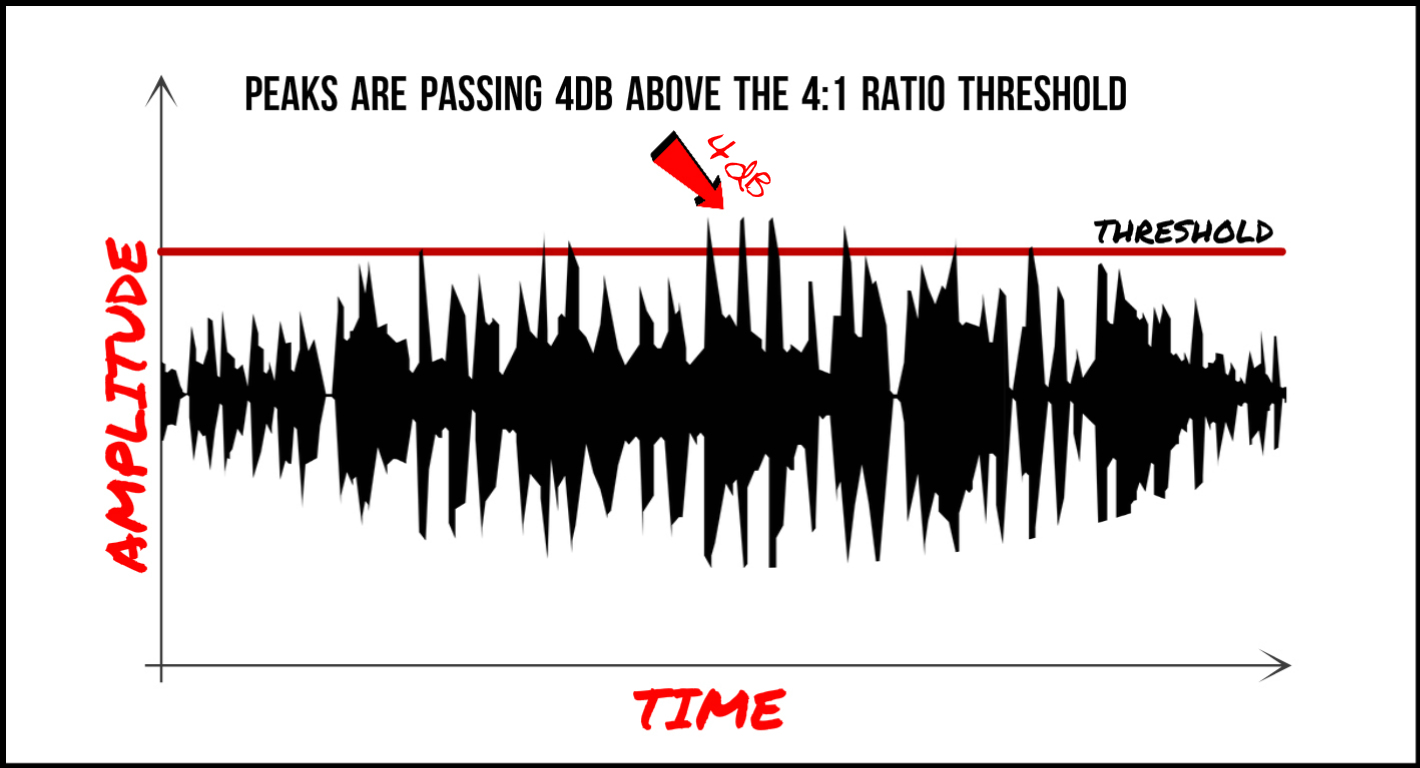
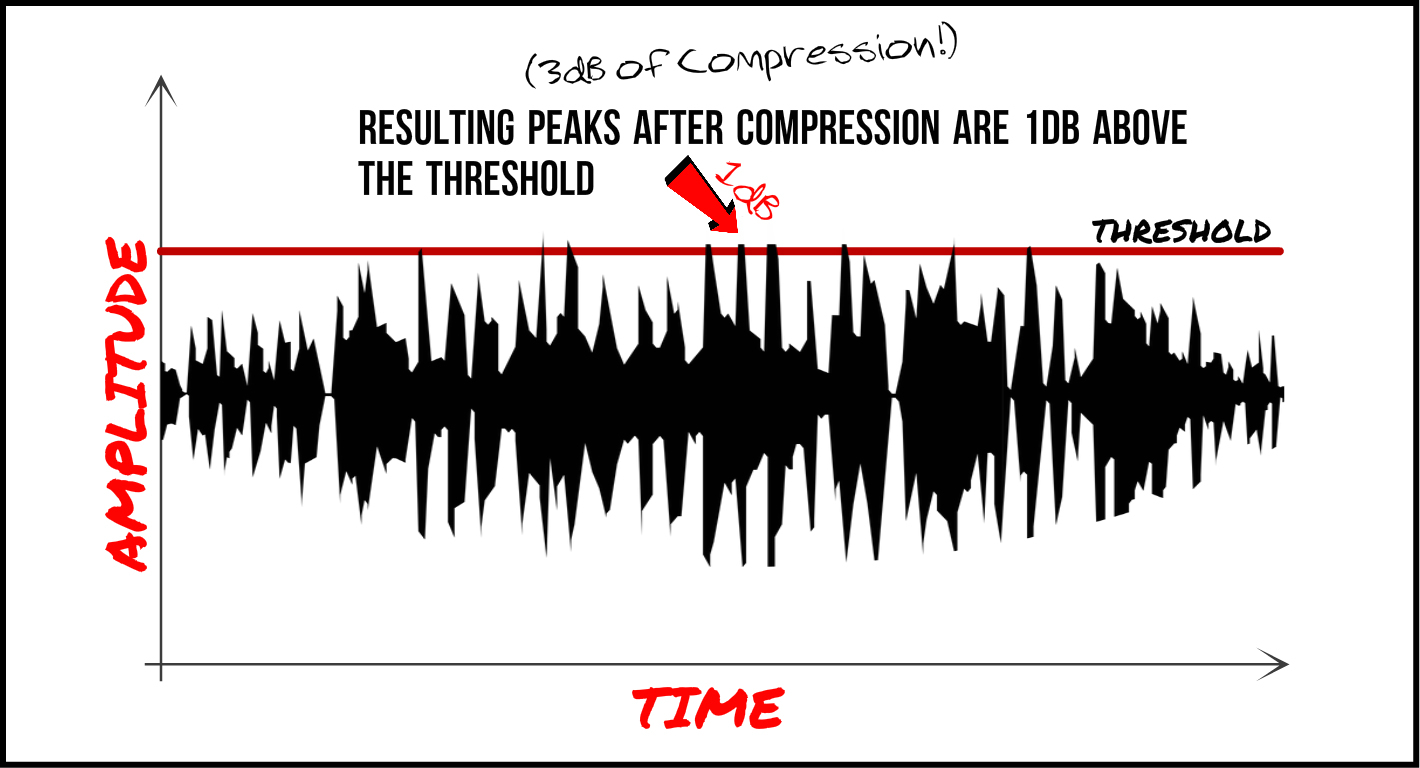
Threshold/Input: The minimum level at which compression/gain reduction starts to occur. (The crimson line in the graphics below)
Ratio: The severity of the compression that’s being applied to the signal. Ex. A 4:1 ratio means that for every 4dB of level that goes above the threshold, only 1dB of audio will be allowed through (3dB of compression will occur).
4:1 Ratio – BEFORE COMPRESSION
4:1 Ratio – AFTER COMPRESSION
Attack: How long it takes for the compressor to “catch up” to the audio signal which has gone above the threshold / How long the compressor waits before clamping down.
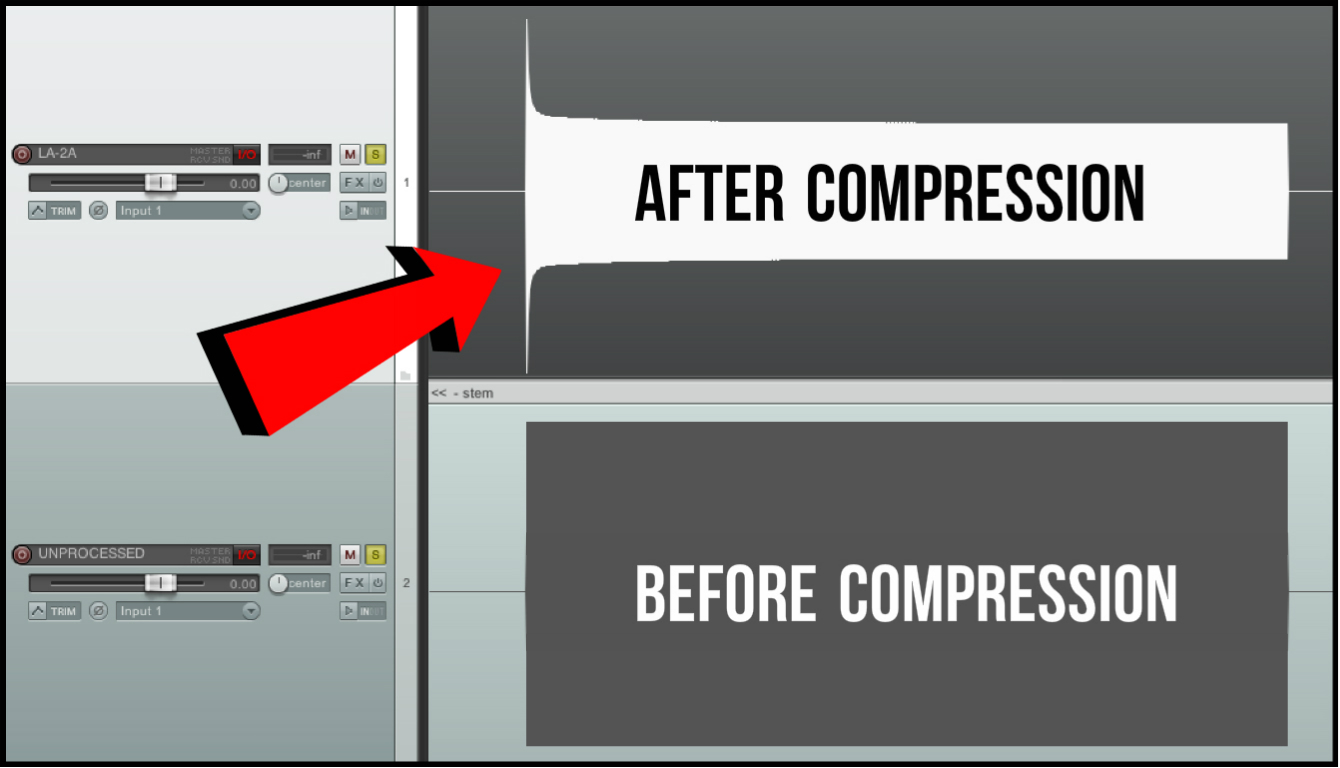
Image: The resulting peak from a 1kHz sine-wave being compressed by 10dB through a Waves CLA-2A Compressor (The 2A has an average attack time of 10ms)
Release: How long it takes for the compressor to “let go” of the compressed audio signal after it’s gone back below the threshold / How long the compressor waits before returning the signal to its’ uncompressed state.
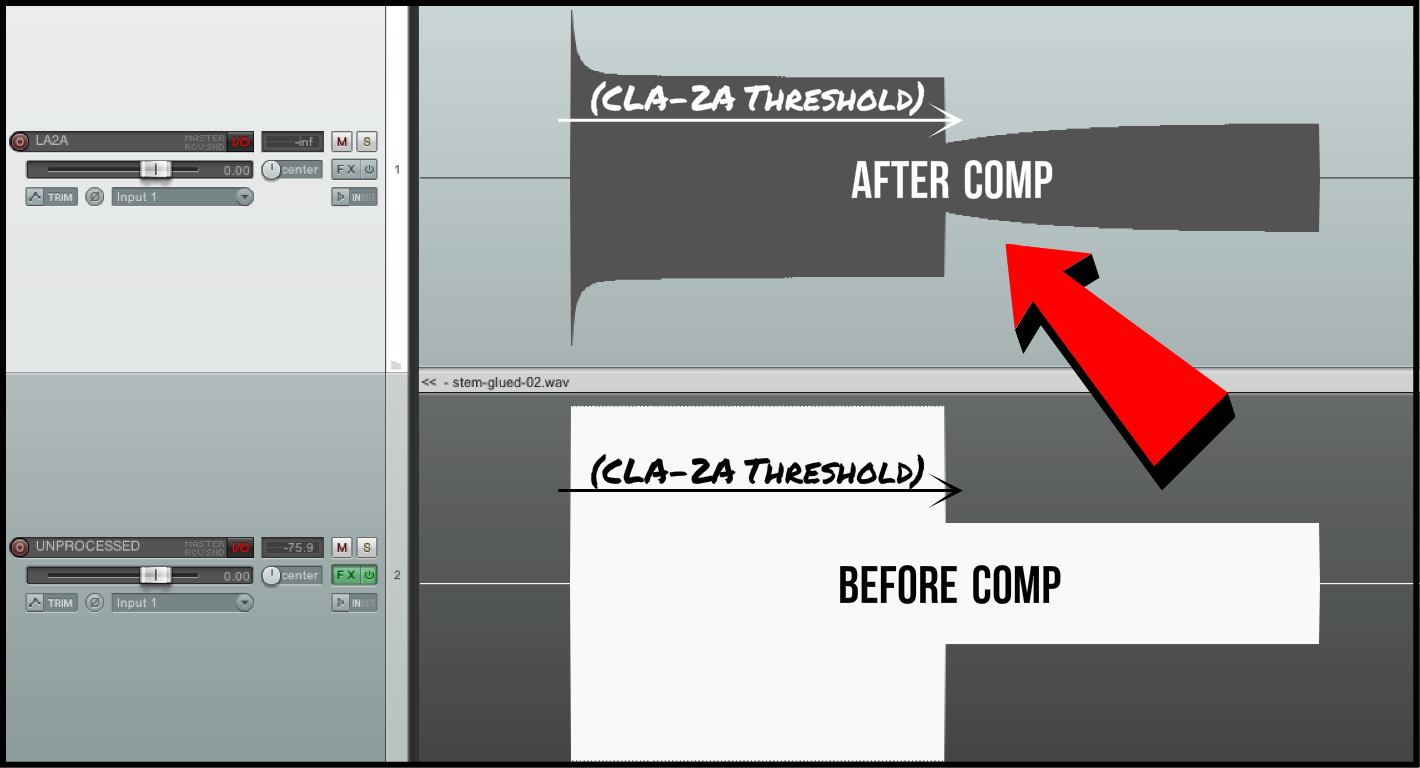
Image: The resulting release curve from a 1kHz sine-wave being compressed by 5dB and then suddenly dropped below the compressor threshold, triggering the release.
Makeup Gain/Output: This is a volume knob for turning your overall signal back up after compression. That simple!
NOTE: Most compressors just have a regular-old output/volume knob for matching your input and output levels by ear, but some of them come with fancy “auto make-up gain” controls which attempt to do the job for you. Either way, they’re both serving the same basic purpose.
Practical Compression
Once you’re past the initial “understanding what the heck this thing does” phase, you’ll eventually learn to ignore the numbers and come up with intuitive ways of utilising compressors in a much more practical “problem solving” manner.
Here are a few practical compression examples off the top of my head:
Gentle Limiting For Transient Reduction: Come across a piano which sounds particularly tacky or brittle on the front-end? Use a limiter with a super fast attack/release to chop off those annoying transients without altering the overall dynamics of the instrument!
Tacky Keys – Before Waves’ L1 Limiting
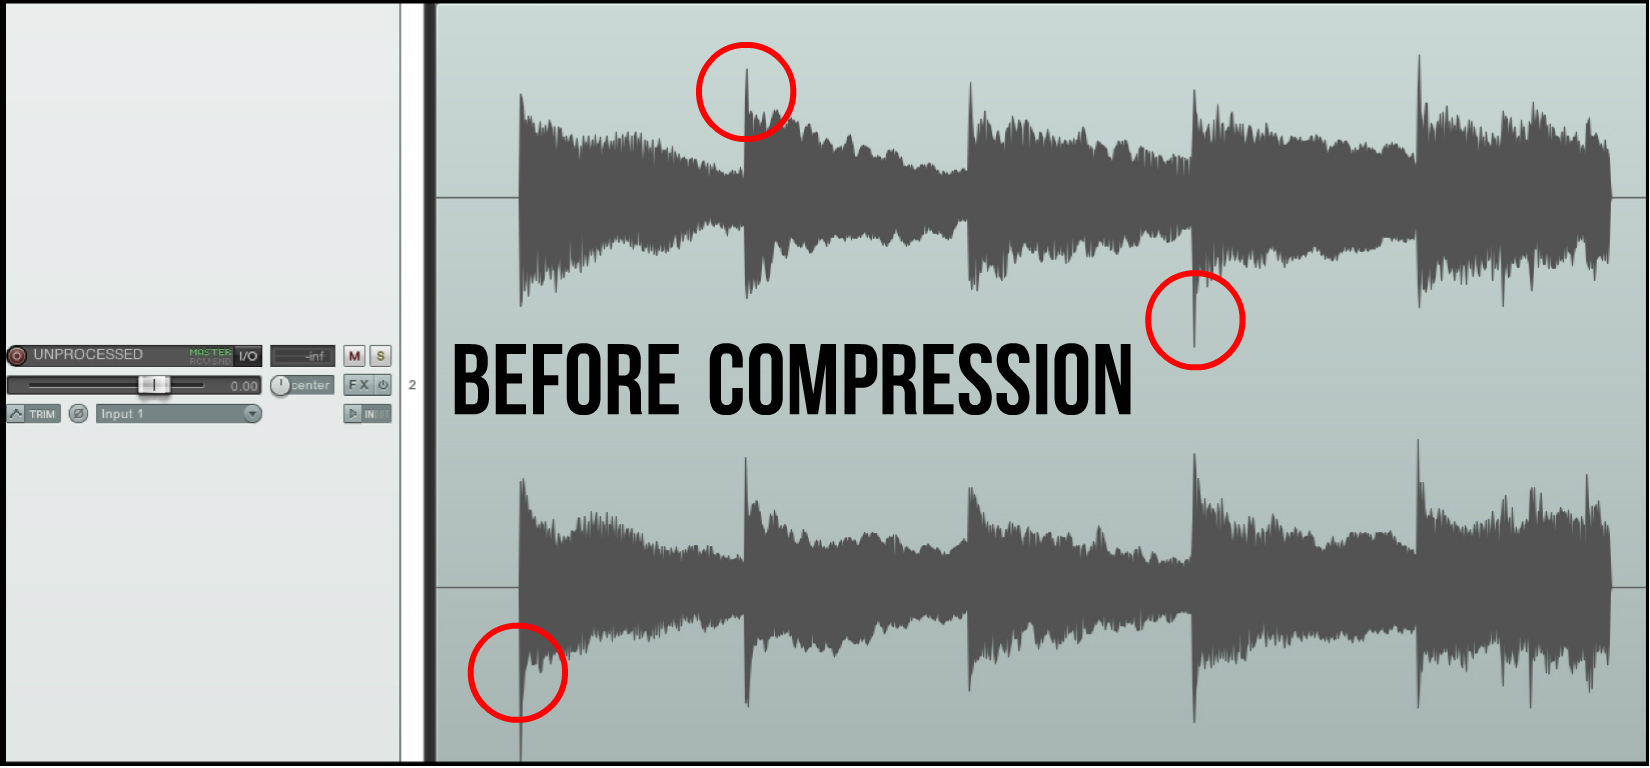
IMAGE: Notice the sharp attack transients at the beginning of each audio blob.
Tacky Keys – Rendered With 6dB of Waves’ L1 Limiting
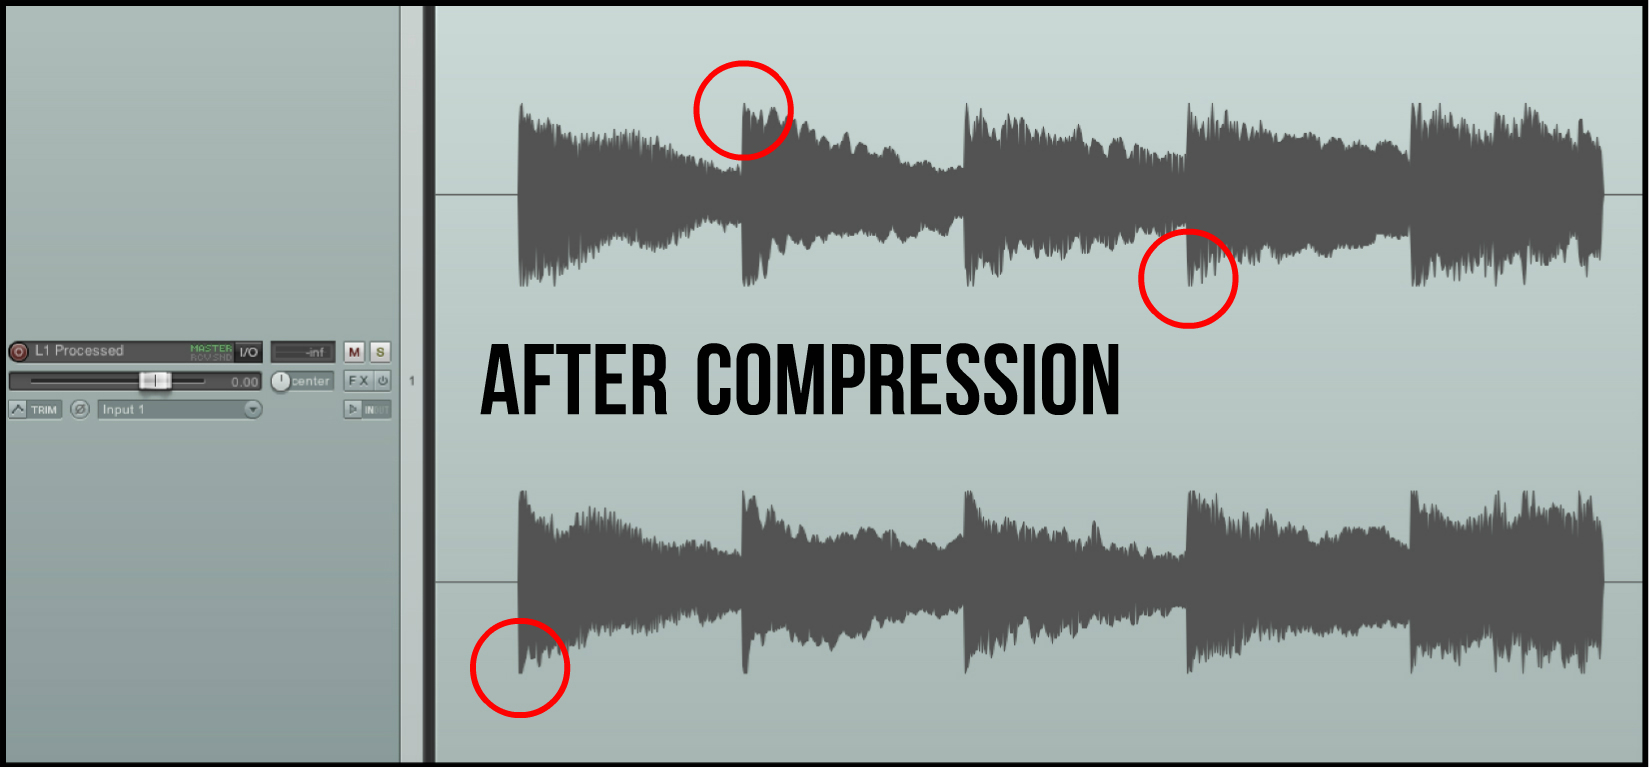
IMAGE: Notice how the transients have been smoothed out by the limiter, while the rest of the audio remains untouched.
Quick Release For Extra Room Ambience: Looking to thicken up your drum room tracks and give them some nice depth and “washiness”? Try using some fast attack / fast release 1176-style compression to reduce the initial drum hits in the mics and bring up the level of the room sustain.
Fast Attack / Fast Release 1176 Style Compression On A Kick Drum
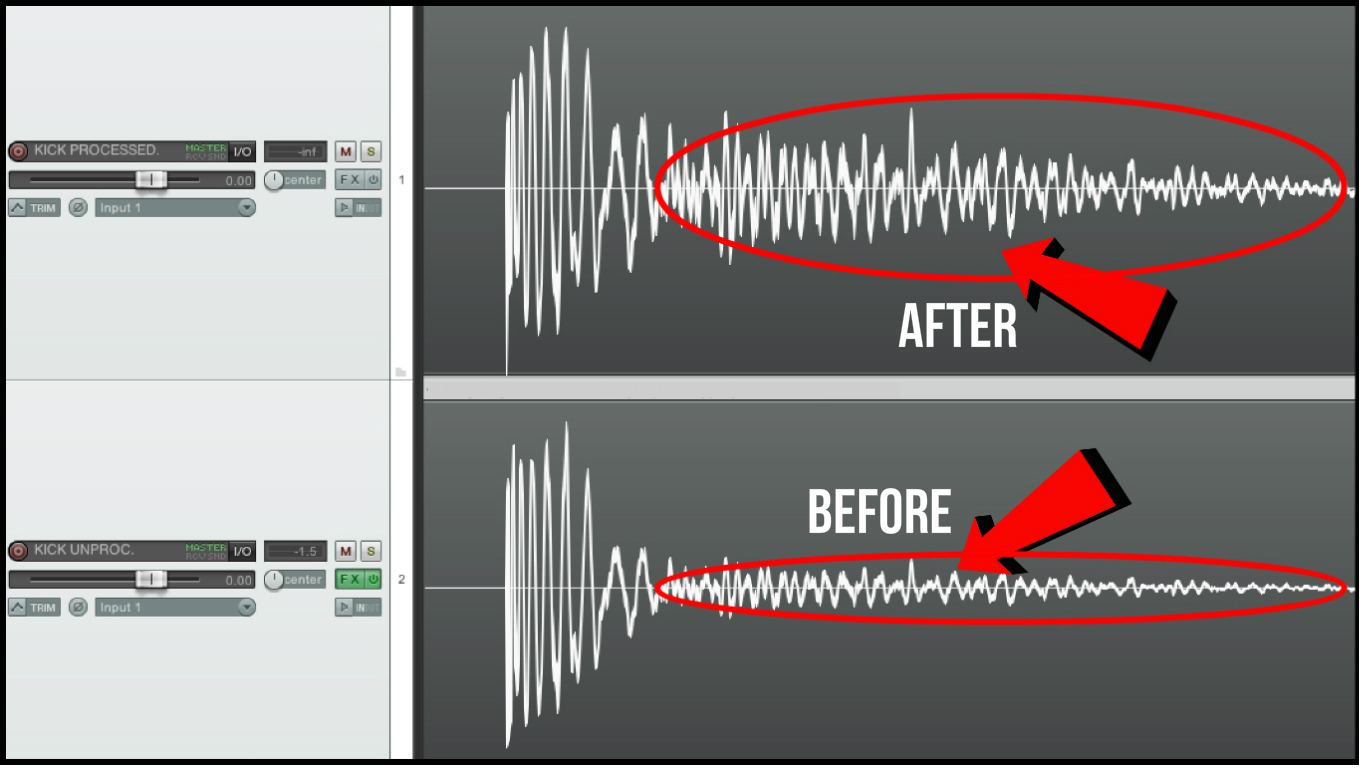
IMAGE: This kick drum was compressed by 10dB with an 1176 style compressor set to a fast attack/release. Notice how the direct “shell sustain” portion of the kick is still around the same overall volume (with a reduced attack transient due to the fast-attack compression), while the ambience/room sound/reverb of the kick that was below the compressor’s threshold is greatly increased in volume after the make-up gain was applied.
NOTE: In cases where there isn’t much room sound in the signal to begin with (Ex. A vocal which was recorded in a great isolation booth), using a quick release will really help towards bringing up the the volume of the intimate details in the signal (such as mouth noises & consonants) and really help level-out the performance. On the flipside, ”fast-release compressing” a vocal track which has a lot of bad room resonance baked into the sound will most likely accentuate the problem, making it even worse.
Slow Attack / Fast Release For “In Your Face” Punch: Using a slower attack setting allows for the initial “attack” transient of a sound to pass through the compressor untouched, resulting in an increased sense of aggression and impact when the processed signal is volume-matched to the uncompressed signal using the makeup-gain control.
Smack Attack – Slow Attack SSL Compression On A Snare
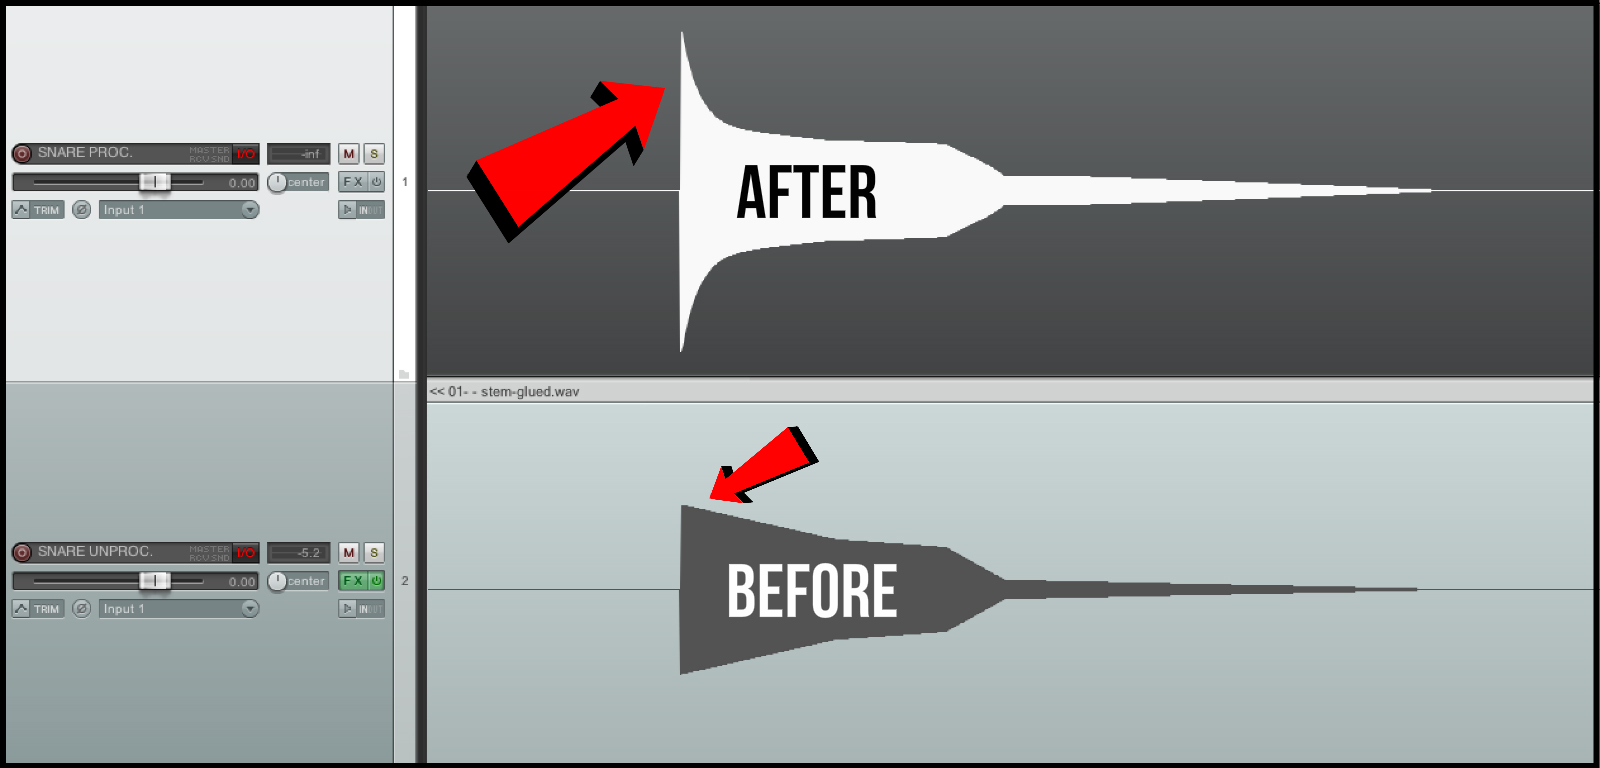
Image: On the slow-attack setting, the SSL E-Channel compressor waits for around 30ms before acting on my fake sine-wave snare, resulting in a giant transient “click” when compressed by 6dB and volume matched to the unprocessed signal.
Limiting To Even-Out Sustained Instruments: Heavily sustained instruments such as pads, synths, keys, ambient swells and sub-basses don’t have much to offer in the area of transients, and are often very gradual in the way they rise & fall in volume. These inherent characteristics make them excellent candidates for limiting, as there won’t be any sudden jumps in volume to mess with the attack/release cycle of the compressor, or cause any annoying “fast release” distortion artifacts.
L1 To Oblivion – Evening Out A Highly Dynamic Signal
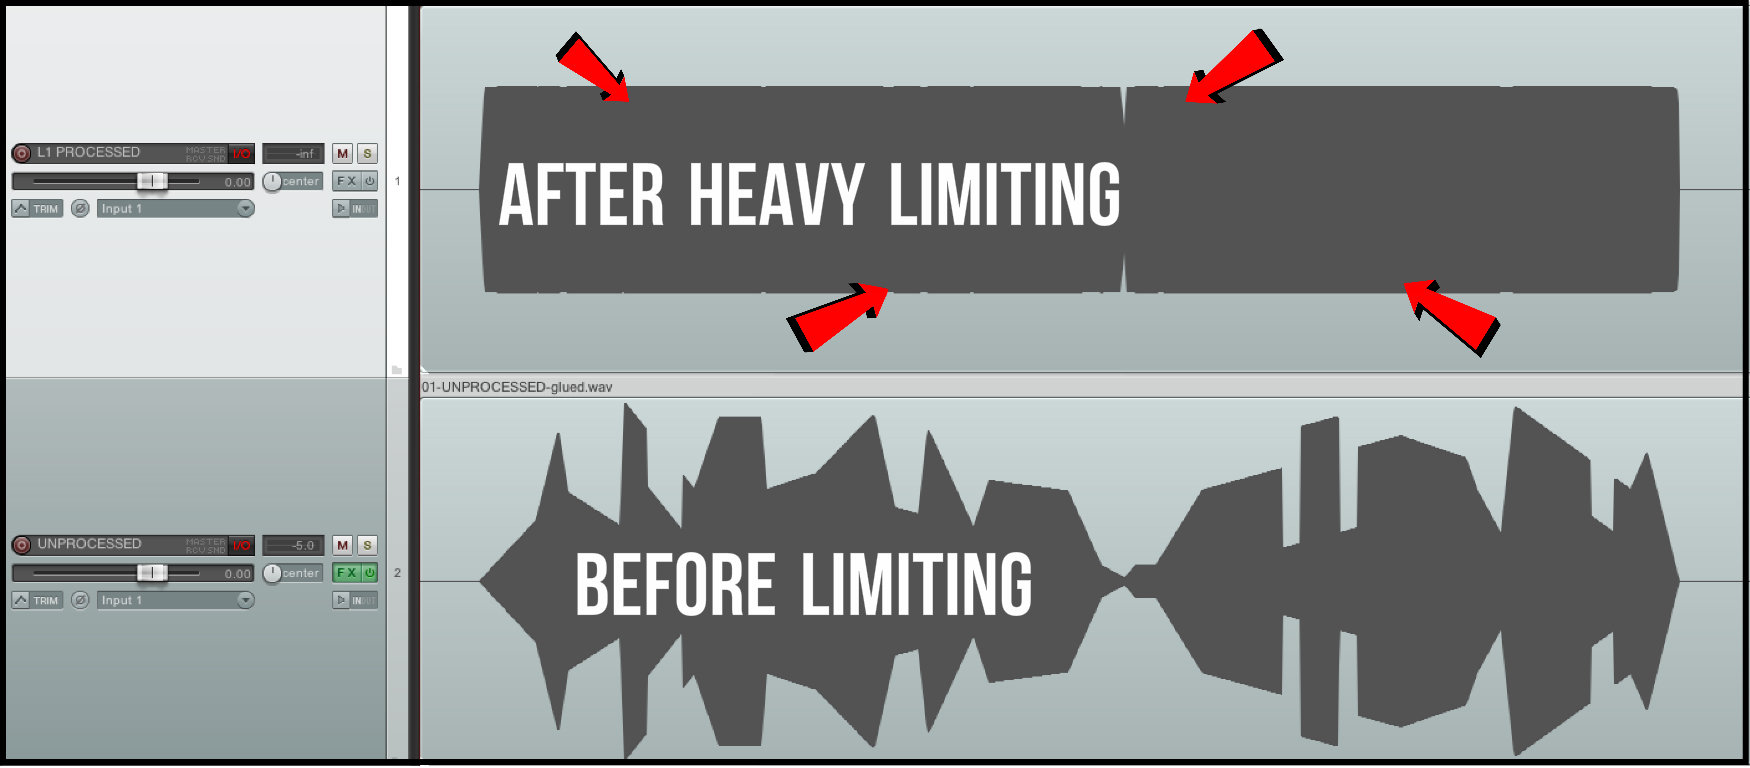
IMAGE: In this drastic example I’ve put together to prove my point, notice how the super-dynamic and random signal I’ve generated via volume automation gets completely obliterated or “dynamically flatlined” by the heavy-handed “brickwall” limiting of the Waves’ L1 limiter & some make-up gain.
NOTE: There are obviously a lot of additional scenarios and examples I could give to further demonstrate the way compression applies to audio, but I think you get the point by now…
CONCLUSION:
Compression is awesome… And not nearly as daunting as you’d originally think once you buckle-down and really get a practical grasp of it!
Similar to what I talked about in my “Are You Overthinking EQ?” URM Blog from last week, the best piece of final advice I can possibly give you in regards to learning compression is to stop worrying about the numbers.
Remember, everything is source dependant, so stop trying to blindly copy other people’s compression settings and simply get on with using your own ears to determine the right course of action!
Final Words:
This concludes “Visualising Compression.” I hope that this article has given you some new ideas to try out during your next project. Be sure to comment below if any of this information has helped you out, or if you have any questions.
Stay tuned for more production/mixing related articles in the not-so-distant future!
Thomas Brett is a producer, mixing engineer and songwriter at Brett Brothers recording studio in the UK. Check out the Brett Brothers studio website for more information and articles on all things mixing www.brettbrothersstudio.com
Want mix tips from Thomas Brett? Read them here!
 Nail The Mix is our online mixing school that gives you REAL multi-tracks from REAL bands, plus a mixing class from the producer who recorded it. Past guests include Periphery, Chelsea Grin, Machine Head and State Champs. Join now for instant access!
Comments 2
Best explanation of compression I have read to date. THANKS!
Pingback: [ URM BLOG ] In Your Face Vocals (Ft. Nolly & Periphery)